给定如下图像,我们的目标是生成一个标题,例如“冲浪者骑在波浪上”。

使用注意力机制给出图片标题
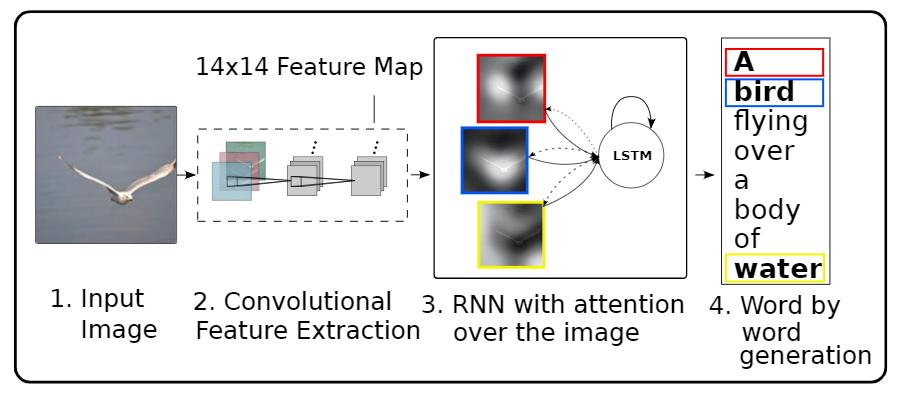
在这里,我们将使用基于注意力的模型。这使我们能够在生成标题时查看模型关注的图像部分。
模型体系结构类似于论文 Show, Attend and Tell: Neural Image Caption Generation with Visual Attention. https://arxiv.org/abs/1502.03044
使用注意力机制给出图片标题
本教程是一个端到端的例子。当您运行时,它*载下** MS-COCO 数据集,使用Inception V3对图像子集进行预处理和缓存,训练一个编解码器模型,并使用训练过的模型对新图像生成标题。
在本例中,您将使用相对较少的数据来训练模型,大约20,000张图像对应30,000个标题(因为数据集中每个图像都有多个标题)。
1. *载下**并准备MS-COCO数据集
您将使用MS-COCO数据集来训练我们的模型。该数据集包含超过82,000个图像,每个图像至少有5个不同的标题注释。下面的代码自动*载下**并提取数据集。 注意:训练集是一个13GB的文件。
2. (可选)限制训练集的大小以加快训练速度
对于本例,我们将选择30,000个标题的子集,并使用这些标题和相应的图像来训练我们的模型。与往常一样,如果您选择使用更多的数据,标题质量将会提高。
3. 使用InceptionV3预处理图像
接下来,我们将使用InceptionV3(在Imagenet上预训练)对每个图像进行分类。我们将从最后一个卷积层中提取特征。
首先,我们需要将图像转换成inceptionV3期望的格式:
- 将图像大小调整为299px×299px
- 使用preprocess_input方法对图像进行预处理,使图像规范化,使其包含-1到1范围内的像素,这与用于训练InceptionV3的图像的格式相匹配。
4. 初始化InceptionV3并加载预训练的Imagenet权重
现在您将创建一个 tf.keras 模型,其中输出层是 InceptionV3 体系结构中的最后一个卷积层。该层的输出形状为 8x8x2048。使用最后一个卷积层是因为在这个例子中使用了注意力。您不会在训练期间执行此初始化,因为它可能会成为瓶颈。
- 您通过网络转发每个图像并将结果向量存储在字典中(image_name --> feature_vector)
- 在所有图像通过网络传递之后,您挑选字典并将其保存到磁盘。
5. 缓存从InceptionV3中提取的特性
您将使用InceptionV3预处理每个映像并将输出缓存到磁盘。缓存RAM中的输出会更快但内存密集,每个映像需要 8 * 8 * 2048 个浮点数。
可以通过更复杂的缓存策略(例如,通过分割图像以减少随机访问磁盘 I/O)来提高性能,但这需要更多代码。
使用GPU在Clab中运行大约需要10分钟。如果您想查看进度条,可以: 使用GPU在Colab中运行大约需要10分钟。如果你想看到一个进度条,你可以:
- 安装tqdm (!pip install tqdm),
- 导入它(from tqdm import tqdm),
- 然后改变这一行:
6. 对标题进行预处理和标记
- 首先,您将对标题进行标记(例如,通过拆分空格)。这为我们提供了数据中所有独特单词的词汇表(例如,“冲浪”,“足球”等)。
- 接下来,您将词汇量限制为前5,000个单词(以节省内存)。您将使用令牌“UNK”(未知)替换所有其他单词。
- 然后,您可以创建单词到索引和索引到单词的映射。
最后,将所有序列填充到与最长序列相同的长度。
7. 将数据分解为训练和测试
# Create training and validation sets using 80-20 split
img_name_train, img_name_val, cap_train, cap_val = train_test_split(img_name_vector,
 cap_vector,
 test_size=0.2,
 random_state=0)
len(img_name_train), len(cap_train), len(img_name_val), len(cap_val)
 (24000, 24000, 6000, 6000)
8. 创建用于训练的tf.data数据集
我们的图片和标题已准备就绪!接下来,让我们创建一个tf.data数据集来用于训练我们的模型。
9. 模型
有趣的事实:下面的解码器与 注意神经机器翻译的示例中的解码器相同。
模型架构的灵感来自论文 Show, Attend and Tell 。
- 在这个例子中,你从InceptionV3的下卷积层中提取特征,给我们一个形状矢量(8, 8, 2048).
- 你将它压成(64,2048)的形状。
- 然后,该向量通过CNN编码器(由单个完全连接的层组成)。
- RNN(此处为GRU)参与图像以预测下一个单词。
class BahdanauAttention(tf.keras.Model):
 def __init__(self, units):
 super(BahdanauAttention, self).__init__()
 self.W1 = tf.keras.layers.Dense(units)
 self.W2 = tf.keras.layers.Dense(units)
 self.V = tf.keras.layers.Dense(1)
 def call(self, features, hidden):
 # features(CNN_encoder output) shape == (batch_size, 64, embedding_dim)
 # hidden shape == (batch_size, hidden_size)
 # hidden_with_time_axis shape == (batch_size, 1, hidden_size)
 hidden_with_time_axis = tf.expand_dims(hidden, 1)
 # score shape == (batch_size, 64, hidden_size)
 score = tf.nn.tanh(self.W1(features) + self.W2(hidden_with_time_axis))
 # attention_weights shape == (batch_size, 64, 1)
 # we get 1 at the last axis because we are applying score to self.V
 attention_weights = tf.nn.softmax(self.V(score), axis=1)
 # context_vector shape after sum == (batch_size, hidden_size)
 context_vector = attention_weights * features
 context_vector = tf.reduce_sum(context_vector, axis=1)
 return context_vector, attention_weights
class CNN_Encoder(tf.keras.Model):
 # Since we have already extracted the features and dumped it using pickle
 # This encoder passes those features through a Fully connected layer
 def __init__(self, embedding_dim):
 super(CNN_Encoder, self).__init__()
 # shape after fc == (batch_size, 64, embedding_dim)
 self.fc = tf.keras.layers.Dense(embedding_dim)
 def call(self, x):
 x = self.fc(x)
 x = tf.nn.relu(x)
 return x
class RNN_Decoder(tf.keras.Model):
 def __init__(self, embedding_dim, units, vocab_size):
 super(RNN_Decoder, self).__init__()
 self.units = units
 self.embedding = tf.keras.layers.Embedding(vocab_size, embedding_dim)
 self.gru = tf.keras.layers.GRU(self.units,
 return_sequences=True,
 return_state=True,
 recurrent_initializer='glorot_uniform')
 self.fc1 = tf.keras.layers.Dense(self.units)
 self.fc2 = tf.keras.layers.Dense(vocab_size)
 self.attention = BahdanauAttention(self.units)
 def call(self, x, features, hidden):
 # defining attention as a separate model
 context_vector, attention_weights = self.attention(features, hidden)
 # x shape after passing through embedding == (batch_size, 1, embedding_dim)
 x = self.embedding(x)
 # x shape after concatenation == (batch_size, 1, embedding_dim + hidden_size)
 x = tf.concat([tf.expand_dims(context_vector, 1), x], axis=-1)
 # passing the concatenated vector to the GRU
 output, state = self.gru(x)
 # shape == (batch_size, max_length, hidden_size)
 x = self.fc1(output)
 # x shape == (batch_size * max_length, hidden_size)
 x = tf.reshape(x, (-1, x.shape[2]))
 # output shape == (batch_size * max_length, vocab)
 x = self.fc2(x)
 return x, state, attention_weights
 def reset_state(self, batch_size):
 return tf.zeros((batch_size, self.units))
encoder = CNN_Encoder(embedding_dim)
decoder = RNN_Decoder(embedding_dim, units, vocab_size)
optimizer = tf.keras.optimizers.Adam()
loss_object = tf.keras.losses.SparseCategoricalCrossentropy(
 from_logits=True, reduction='none')
def loss_function(real, pred):
 mask = tf.math.logical_not(tf.math.equal(real, 0))
 loss_ = loss_object(real, pred)
 mask = tf.cast(mask, dtype=loss_.dtype)
 loss_ *= mask
 return tf.reduce_mean(loss_)
10. Checkpoint 检查点
checkpoint_path = "./checkpoints/train"
ckpt = tf.train.Checkpoint(encoder=encoder,
 decoder=decoder,
 optimizer = optimizer)
ckpt_manager = tf.train.CheckpointManager(ckpt, checkpoint_path, max_to_keep=5)
start_epoch = 0
if ckpt_manager.latest_checkpoint:
 start_epoch = int(ckpt_manager.latest_checkpoint.split('-')[-1])
11. 训练
- 您提取各自.npy文件中存储的特性,然后通过编码器传递这些特性。
- 编码器输出,隐藏状态(初始化为0)和解码器输入(它是开始标记)被传递给解码器。
- 解码器返回预测和解码器隐藏状态。
- 然后将解码器隐藏状态传递回模型,并使用预测来计算损失。
- 使用teacher forcing决定解码器的下一个输入。
- Teacher forcing 是将目标字作为下一个输入传递给解码器的技术。
最后一步是计算梯度,并将其应用于优化器和反向传播。
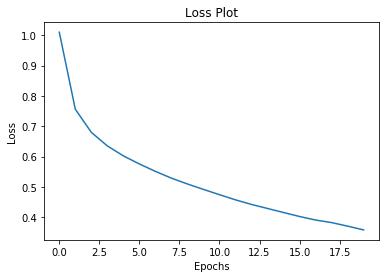
训练loss
12. 标题!
- 评估函数类似于训练循环,只是这里不使用 teacher forcing 。解码器在每个时间步长的输入是其先前的预测,以及隐藏状态和编码器的输出。
- 当模型预测结束令牌时停止预测。
- 并存储每个时间步的注意力。
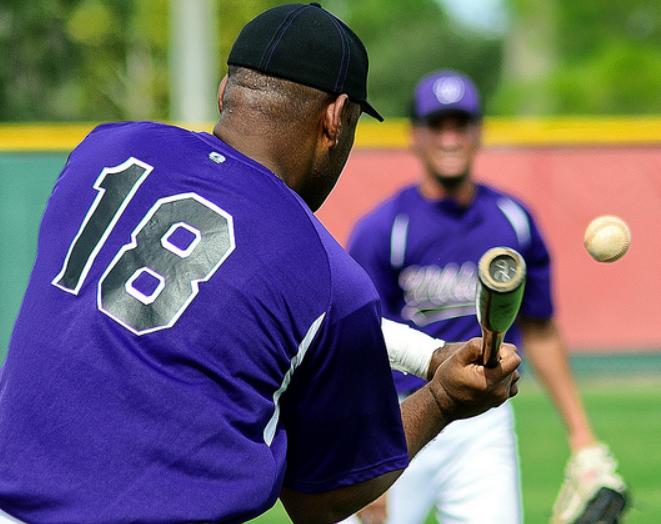
 Real Caption: <start> a man gets ready to hit a ball with a bat <end>
 Prediction Caption: a baseball player begins to bat <end>
 真实的标题:一个人准备用球棒击球
 预测标题: 棒球运动员开始击球
13. 在你自己的图片上试试
为了好玩,下面我们提供了一种方法,您可以使用我们刚刚训练过的模型为您自己的图像添加标题。请记住,它是在相对少量的数据上训练的,您的图像可能与训练数据不同(因此请为奇怪的结果做好准备!)
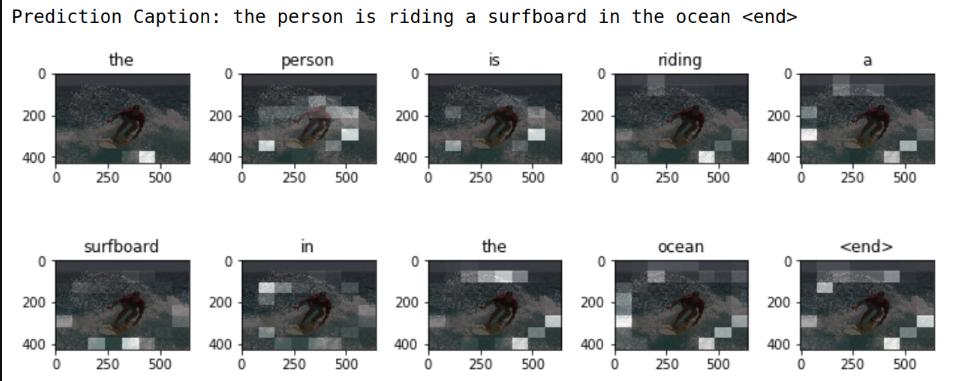
 Prediction Caption: a man riding a surf board in the water <end>
 预测标题:一名男子在水中骑冲浪板

冲浪
下一步
恭喜!您刚刚训练了一个注意力机制给图像取标题的模型。接下来,看一下这个使用注意力机制的神经机器翻译示例。它使用类似的架构来翻译西班牙语和英语句子。您还可以尝试在不同的数据集上训练此笔记本中的代码。
通过下面链接查看完整代码
最新版本:
https://www.mashangxue123.com/tensorflow/tf2-tutorials-text-image_captioning.html
英文版本:
https://tensorflow.google.cn/alpha/tutorials/text/image_captioning