1 说明
=====
1.1 OpenPose 是基于卷积神经网络和监督学习并以 caffe 为框架写成的开源库。
1.2 可以实现人的面部表情、躯干和四肢甚至手指的跟踪,适用多人且具有较好的鲁棒性。
1.3 是世界上第一个基于深度学习的实时多人二维姿态估计,为机器理解人类提供了一个高质量的信息维度。
1.4 代码来源:
https://github.com/spmallick/learnopencv
2 效果图
======
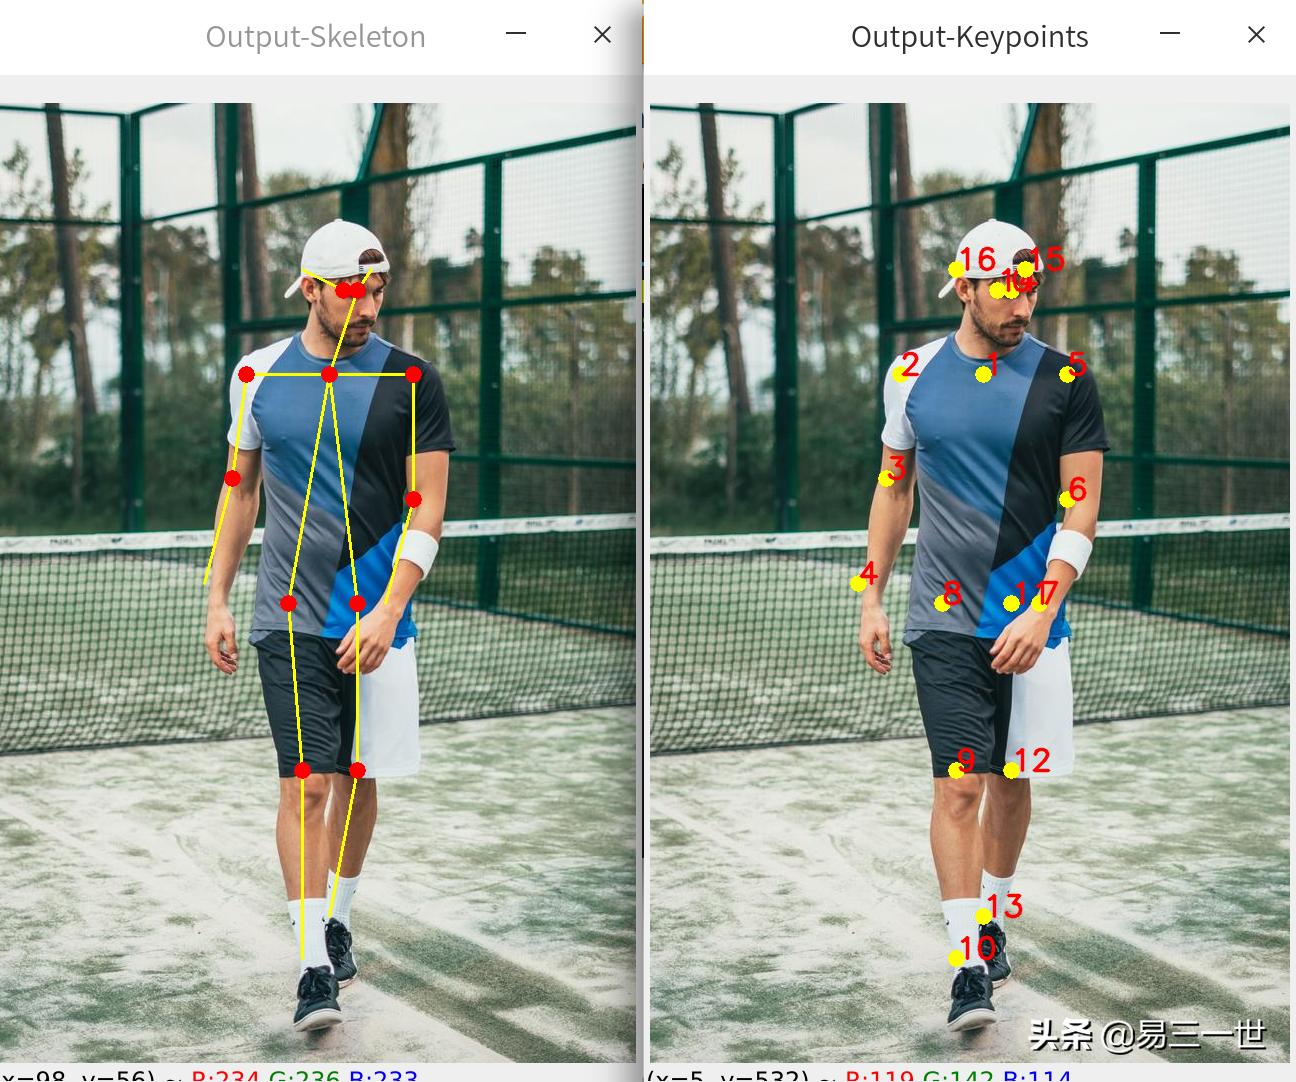
2.1 图片
2.2 视频
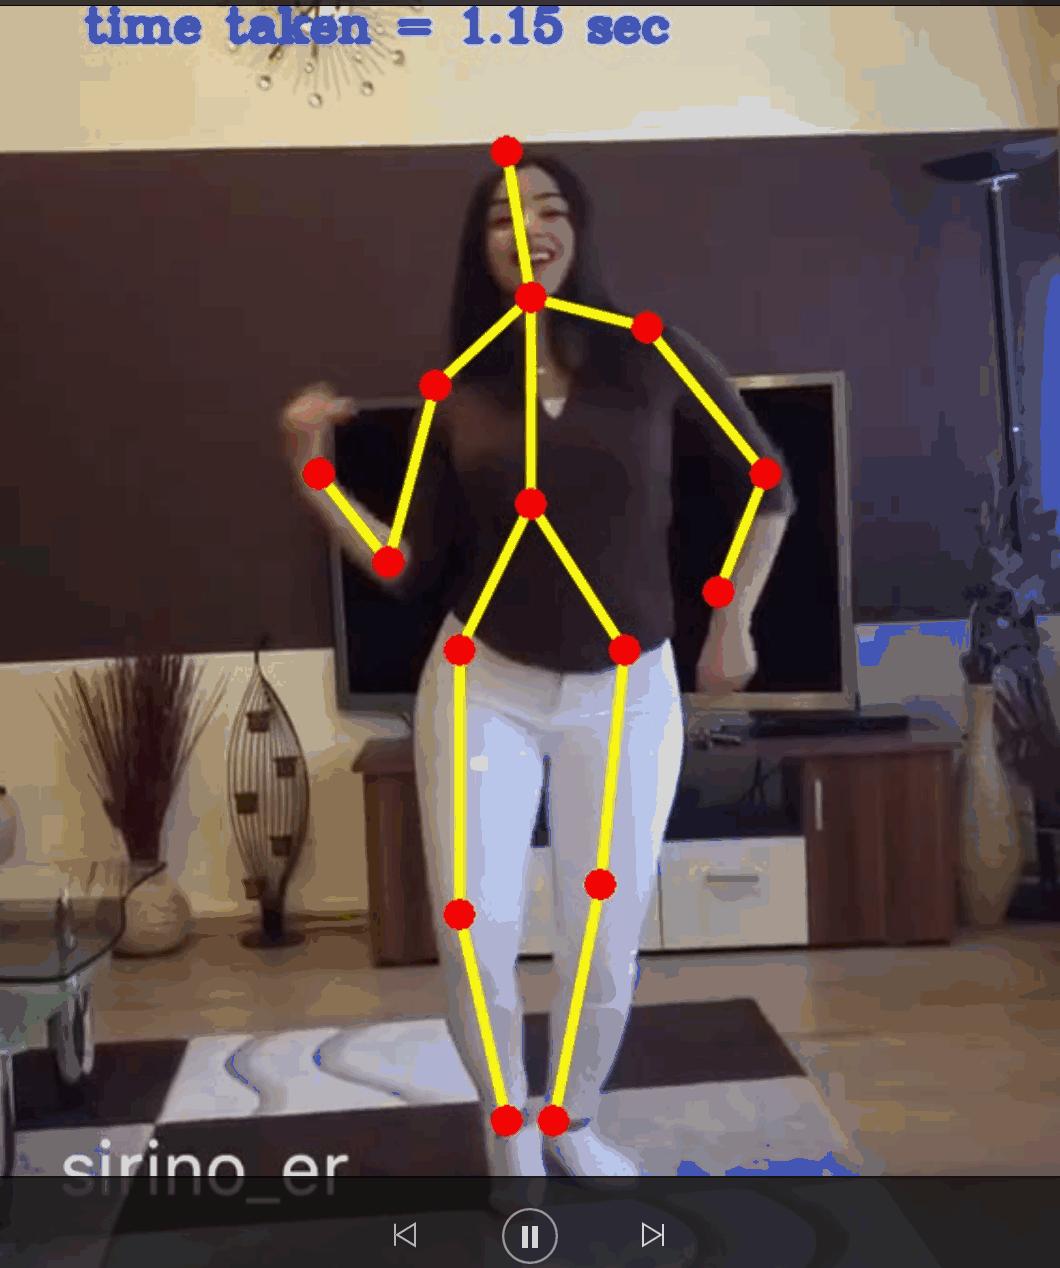
视频节选
3 准备
=====
3.1 对源代码进行修改、注释、运行,提高可读性和可操作性,适合小白,入门秒懂。
3.2 环境:python3.8+opencv4.4.0+深度deepin-linux操作系统。
3.3 模型*载下**地址,官网也有太慢了。
网友提供,谢谢
https://blog.csdn.net/GL_a_/article/details/81661821
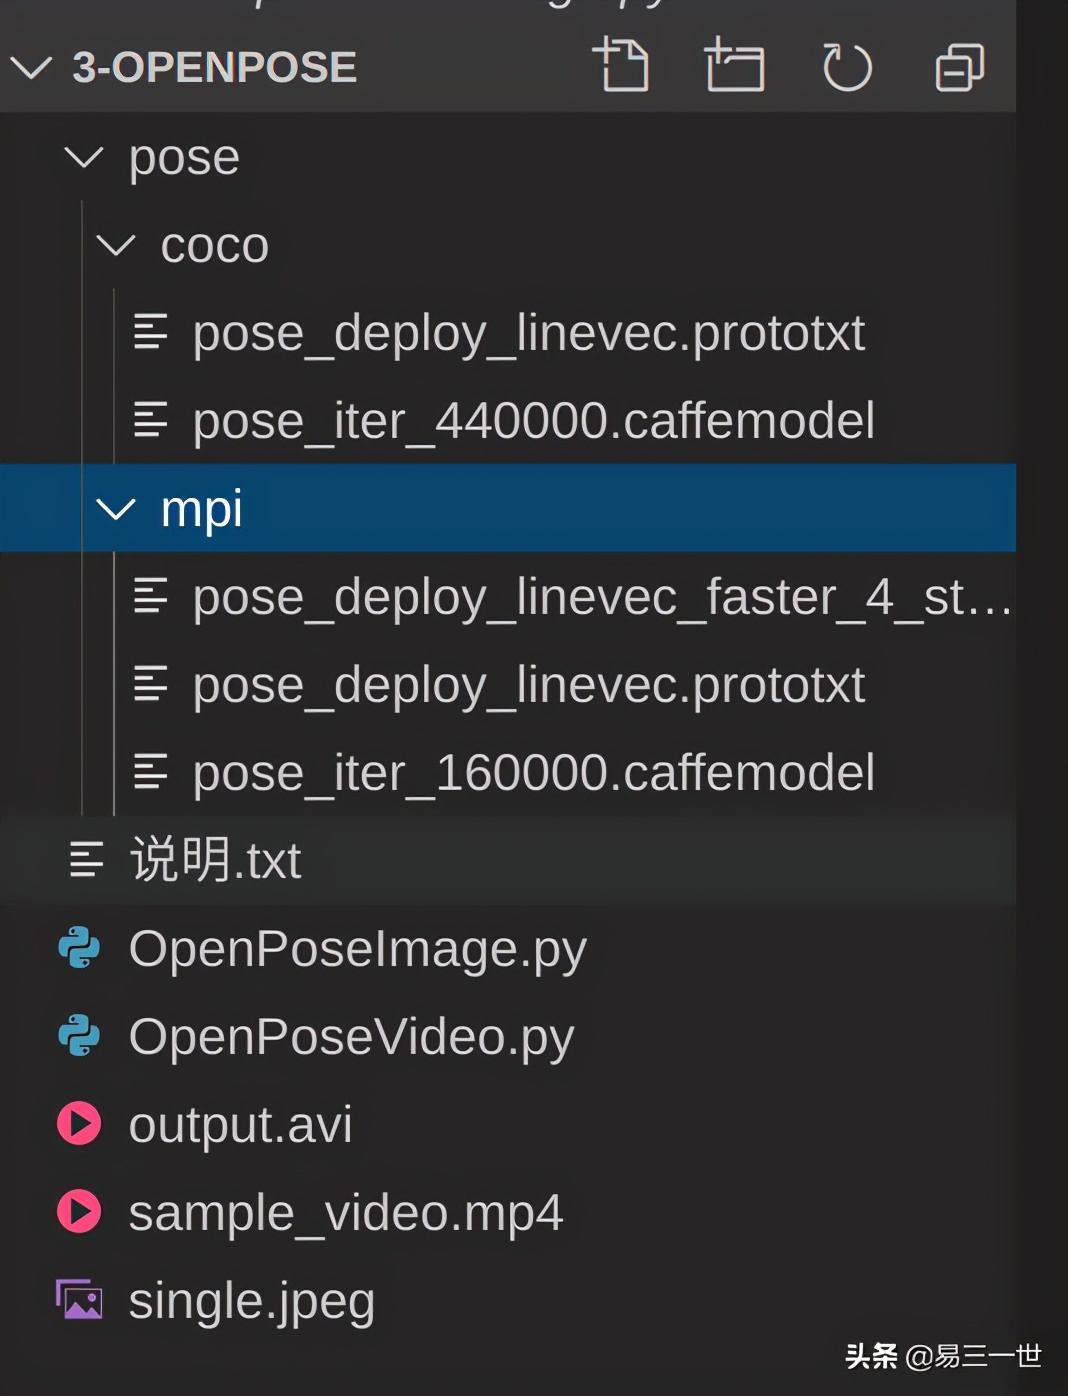
3.4 文档结构
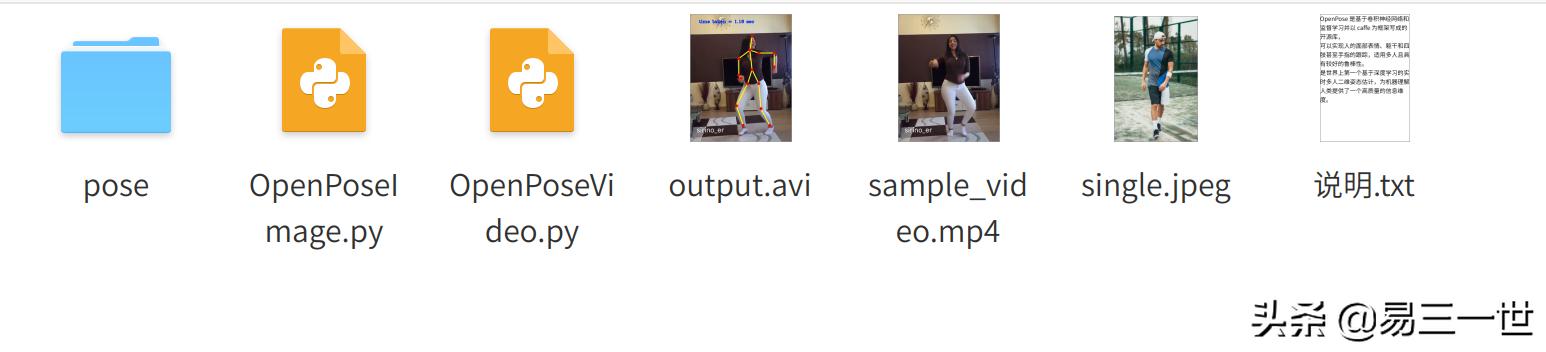
说明是自己单独的,output.avi是视频生成的效果图
4 图片人体骨架
============
4.1 代码:OpenPoseImage.py
#打开终端输入:本机
#python3.8 OpenPoseImage.py --device cpu --image_file single.jpeg

#第1步:导入模块
import cv2
import time
import numpy as np
import argparse

#终端参数设置
parser = argparse.ArgumentParser(description='Run keypoint detection')
#启动cpu运行
parser.add_argument("--device", default="cpu", help="Device to inference on")
parser.add_argument("--image_file", default="single.jpeg", help="Input image")
args = parser.parse_args()

#第3步:模型设置
#模型*载下**地址:https://blog.csdn.net/GL_a_/article/details/81661821
#国内的,快

#模型判定
MODE = "COCO"
#if MODE is "COCO":
if MODE=="COCO":
    #当前目录下的文件夹
    protoFile = "pose/coco/pose_deploy_linevec.prototxt"
    #或者直接*载下**,太慢了,文件很大
    #http://posefs1.perception.cs.cmu.edu/OpenPose/models/pose/coco/pose_iter_440000.caffemodel
    weightsFile = "pose/coco/pose_iter_440000.caffemodel"  #缺少
    nPoints = 18
    POSE_PAIRS = [ [1,0],[1,2],[1,5],[2,3],[3,4],[5,6],[6,7],[1,8],[8,9],[9,10],[1,11],[11,12],[12,13],[0,14],[0,15],[14,16],[15,17]]

#附加
#elif MODE is "MPI" :
elif MODE=="MPI" :
    protoFile = "pose/mpi/pose_deploy_linevec_faster_4_stages.prototxt"
    #或者直接*载下**,太慢了,文件很大
    #http://posefs1.perception.cs.cmu.edu/OpenPose/models/pose/mpi/pose_iter_160000.caffemodel
    weightsFile = "pose/mpi/pose_iter_160000.caffemodel"  #缺少
    nPoints = 15
    POSE_PAIRS = [[0,1], [1,2], [2,3], [3,4], [1,5], [5,6], [6,7], [1,14], [14,8], [8,9], [9,10], [14,11], [11,12], [12,13] ]


#第4步:opencv读取图片
frame = cv2.imread(args.image_file)
frameCopy = np.copy(frame)
frameWidth = frame.shape[1]
frameHeight = frame.shape[0]
threshold = 0.1

#第5步:模型读取和深度学习设置骨架和骨架点
#读取模型
net = cv2.dnn.readNetFromCaffe(protoFile, weightsFile)

#默认启动cpu
if args.device == "cpu":
    net.setPreferableBackend(cv2.dnn.DNN_TARGET_CPU)
    print("Using CPU device")

#附加设置,启动GPU
elif args.device == "gpu":
    net.setPreferableBackend(cv2.dnn.DNN_BACKEND_CUDA)
    net.setPreferableTarget(cv2.dnn.DNN_TARGET_CUDA)
    print("Using GPU device")

#时间设置
t = time.time()
# input image dimensions for the network
inWidth = 368
inHeight = 368
inpBlob = cv2.dnn.blobFromImage(frame, 1.0 / 255, (inWidth, inHeight),
                          (0, 0, 0), swapRB=False, crop=False)

net.setInput(inpBlob)

output = net.forward()
print("time taken by network : {:.3f}".format(time.time() - t))

H = output.shape[2]
W = output.shape[3]

#骨架点
# Empty list to store the detected keypoints
points = []

for i in range(nPoints):
    # confidence map of corresponding body's part.
    probMap = output[0, i, :, :]

    # Find global maxima of the probMap.
    minVal, prob, minLoc, point = cv2.minMaxLoc(probMap)

    # Scale the point to fit on the original image
    x = (frameWidth * point[0]) / W
    y = (frameHeight * point[1]) / H

    if prob > threshold :
        cv2.circle(frameCopy, (int(x), int(y)), 8, (0, 255, 255), thickness=-1, lineType=cv2.FILLED)
        cv2.putText(frameCopy, "{}".format(i), (int(x), int(y)), cv2.FONT_HERSHEY_SIMPLEX, 1, (0, 0, 255), 2, lineType=cv2.LINE_AA)

        # Add the point to the list if the probability is greater than the threshold
        points.append((int(x), int(y)))
    else :
        points.append(None)

#骨架
# Draw Skeleton,画骨架
for pair in POSE_PAIRS:
    partA = pair[0]
    partB = pair[1]

    if points[partA] and points[partB]:
        cv2.line(frame, points[partA], points[partB], (0, 255, 255), 2)
        cv2.circle(frame, points[partA], 8, (0, 0, 255), thickness=-1, lineType=cv2.FILLED)

#显示生成图片
cv2.imshow('Output-Keypoints', frameCopy)
cv2.imshow('Output-Skeleton', frame)

#输出生成图片
#cv2.imwrite('Output-Keypoints.jpg', frameCopy)
#cv2.imwrite('Output-Skeleton.jpg', frame)

print("Total time taken : {:.3f}".format(time.time() - t))

cv2.waitKey(0)
4.2 操作和效果图
5 视频骨架测试
============
5.1 代码OpenPoseVideo.py:
#打开终端,需要一定的时间
#python3.8 OpenPoseVideo.py --device cpu --video_file sample_video.mp4

import cv2
import time
import numpy as np
import argparse

parser = argparse.ArgumentParser(description='Run keypoint detection')
parser.add_argument("--device", default="cpu", help="Device to inference on")
parser.add_argument("--video_file", default="sample_video.mp4", help="Input Video")
args = parser.parse_args()

MODE = "MPI"
#注意源代码是is,python3改为==
#if MODE is "COCO":
if MODE=="COCO":
    protoFile = "pose/coco/pose_deploy_linevec.prototxt"
    weightsFile = "pose/coco/pose_iter_440000.caffemodel"
    nPoints = 18
    POSE_PAIRS = [ [1,0],[1,2],[1,5],[2,3],[3,4],[5,6],[6,7],[1,8],[8,9],[9,10],[1,11],[11,12],[12,13],[0,14],[0,15],[14,16],[15,17]]

#elif MODE is "MPI" :
elif MODE=="MPI" :
    protoFile = "pose/mpi/pose_deploy_linevec_faster_4_stages.prototxt"
    weightsFile = "pose/mpi/pose_iter_160000.caffemodel"
    nPoints = 15
    POSE_PAIRS = [[0,1], [1,2], [2,3], [3,4], [1,5], [5,6], [6,7], [1,14], [14,8], [8,9], [9,10], [14,11], [11,12], [12,13] ]

inWidth = 368
inHeight = 368
threshold = 0.1

input_source = args.video_file
cap = cv2.VideoCapture(input_source)
hasFrame, frame = cap.read()

#生成本目录下的视频
vid_writer = cv2.VideoWriter('output.avi',cv2.VideoWriter_fourcc('M','J','P','G'), 10, (frame.shape[1],frame.shape[0]))

net = cv2.dnn.readNetFromCaffe(protoFile, weightsFile)
if args.device == "cpu":
    net.setPreferableBackend(cv2.dnn.DNN_TARGET_CPU)
    print("Using CPU device")
elif args.device == "gpu":
    net.setPreferableBackend(cv2.dnn.DNN_BACKEND_CUDA)
    net.setPreferableTarget(cv2.dnn.DNN_TARGET_CUDA)
    print("Using GPU device")

while cv2.waitKey(1) < 0:
    t = time.time()
    hasFrame, frame = cap.read()
    frameCopy = np.copy(frame)
    if not hasFrame:
        cv2.waitKey()
        break

    frameWidth = frame.shape[1]
    frameHeight = frame.shape[0]

    inpBlob = cv2.dnn.blobFromImage(frame, 1.0 / 255, (inWidth, inHeight),
                              (0, 0, 0), swapRB=False, crop=False)
    net.setInput(inpBlob)
    output = net.forward()

    H = output.shape[2]
    W = output.shape[3]
    # Empty list to store the detected keypoints
    points = []

    for i in range(nPoints):
        # confidence map of corresponding body's part.
        probMap = output[0, i, :, :]

        # Find global maxima of the probMap.
        minVal, prob, minLoc, point = cv2.minMaxLoc(probMap)

        # Scale the point to fit on the original image
        x = (frameWidth * point[0]) / W
        y = (frameHeight * point[1]) / H

        if prob > threshold :
            cv2.circle(frameCopy, (int(x), int(y)), 8, (0, 255, 255), thickness=-1, lineType=cv2.FILLED)
            cv2.putText(frameCopy, "{}".format(i), (int(x), int(y)), cv2.FONT_HERSHEY_SIMPLEX, 1, (0, 0, 255), 2, lineType=cv2.LINE_AA)

            # Add the point to the list if the probability is greater than the threshold
            points.append((int(x), int(y)))
        else :
            points.append(None)

    # Draw Skeleton
    for pair in POSE_PAIRS:
        partA = pair[0]
        partB = pair[1]

        if points[partA] and points[partB]:
            cv2.line(frame, points[partA], points[partB], (0, 255, 255), 3, lineType=cv2.LINE_AA)
            cv2.circle(frame, points[partA], 8, (0, 0, 255), thickness=-1, lineType=cv2.FILLED)
            cv2.circle(frame, points[partB], 8, (0, 0, 255), thickness=-1, lineType=cv2.FILLED)

    cv2.putText(frame, "time taken = {:.2f} sec".format(time.time() - t), (50, 50), cv2.FONT_HERSHEY_COMPLEX, .8, (255, 50, 0), 2, lineType=cv2.LINE_AA)
    cv2.imshow('Output-Skeleton', frame)

    vid_writer.write(frame)

vid_writer.release()
5.2 因为需要一定的时间,过程省略,效果图如文章开头。