大家好,我是爱讲故事的某某某。 欢迎来到今天的[五分钟机器学习] 手把手教你制作变脸视频
本期内容将继续视频内容【五分钟机器学习】手把手教你制作川建国变脸视频。制作变脸视频的理论内容基于【五分钟机器学习】川普教你唱红色滑板鞋:GAN生成对抗网络,还没有看过的小伙伴欢迎去补番。
本期专栏的主要内容如下:
- 【五分钟机器学习】手把手教你制作川建国变脸视频 视频内容补充
- 使用免费Google Colab训练变脸视频
【五分钟机器学习】手把手教你制作川建国变脸视频 视频内容补充
如视频中提到,制作一个变脸视频主要分为4大步骤:
- 准备环节 1.1 安装CUDA1.2 视频素材1.3 软件安装
- 数据标记 2.1 提取视频帧2.2 提取脸部图像2.3 处理提取到的脸部图像2.4 标注脸部轮廓2.5 利用标注的信息训练一个模型提取脸部轮廓2.6 提取所有脸部图像中的脸部轮廓
- 变脸模型训练 3.1 模型预训练3.2 最终训练
- 合成视频
需要注意的是,本教程适用于Windows用户,且电脑上安装有适用于CUDA显卡加速的Nvidia显卡。不适用此条件的请直接跳到Section2在Colab上面进行制作变脸视频。
CUDA*载下**链接: https://developer.nvidia.com/cuda-10.2-download-archive
DeepFake*载下**链接:https://github.com/iperov/DeepFaceLab (国内用户需梯子)
或者你可以从我的百度网盘*载下**:https://pan.baidu.com/s/1uG8Div0gOVcMYvQHgf9-nA 提取码:45qg
视频中提到,训练变脸视频需要在CelebA(Large-scale CelebFaces Attributes Dataset)数据集上预训练。在打开6) train SAEHD.bat这个文件后,我的训练参数设置如下:

Fig1. 预训练参数设置
当预训练结束之后,你需要再次打开6) train SAEHD.bat这个文件,开始正式的变脸模型训练。这时候你需要设置pretrain= N,在这个设置下训练1-2天,使输出足够清晰,比如Fig3。

Fig 2. Disable Pretrain mode

Fig3. 训练结果1

Fig4. 训练结果2
这时候,如果你觉得视频渲染结果还不够真实,可以稍微修改下训练参数,这里我把我在这三个阶段的训练参数放在了一起供你参考:

Fig5. 训练参数
训练结束后,你需要打开7) merge SAEHD.bat进行渲染生成变脸图片。在Interactive Merger中你会看到以下窗口:

Fig6. Interactive Merger
这个界面*功中**能很多,详细介绍请参考下方的官方介绍:
1. Main overlay modes: - original: displays original frame without swapped face- overlay: simple overlays learned face over the frame- hist-match: overlays the learned face and tires to match it based on histogram (has 2 modes: normal and masked hist match, toggable with Z button)- seamless: uses opencv poisson seamless clone function to blend new learned face over the head in the original frame- seamless hist match: combines both hist-match and seamless.- raw-rgb: overlays raw learned face without any masking
NOTE: Seamless modes can cause flickering, it's recommended to use overlay. 2. Hist match threshold: controls strength of the histogram matching in hist-match and seamless hist-match overlay mode. Q - increases valueA - decreases value 3. Erode mask: controls the size of a mask. W - increases mask erosion (smaller mask)S - decreases mask erosion (bigger mask) 4. Blur mask: blurs/feathers the edge of the mask for smoother transition E - increases blurD - decreases blur 5. Motion blur: upon entering initial parameters (interactive converter, model, GPU/CPU) merger/converter loads all frames and data_dst aligned data, while it's doing it, it calculates motion vectors that are being used to create effect of motion blur which this setting controls, it let's you add it in places where face moves around but high values may blur the face even with small movement. The option only works if on set of faces is present in the "data_dst/aligned" folder - if during cleanup you had some faces with _1 prefixes (even if only faces of one person are present) the effect won't work, same goes if there is a mirror that reflects target persons face, in such case you cannot use motion blur and the only way to add it is to train each set of faces separately. R - increases motion blurF - decreases motion blur 6. Super resolution: uses similar algorithm as data_src dataset/faceset enhancer, it can add some more definitions to areas such as teeth, eyes and enhance detail/texture of the learned face. T - increases the enhancement effectG - decreases the enhancement effect 7. Blur/sharpen: blurs or sharpens the learned face using box or gaussian method. Y - sharpens the faceH - blurs the faceN - box/gaussian mode switch 8. Face scale: scales learned face to be larger or smaller. U - scales learned face down J - scales learned face up 9. Mask modes: there are 6 masking modes: dst: uses masks derived from the shape of the landmarks generated during data_dst faceset/dataset extraction. learned-prd: uses masks learned during training. Keep shape of source faces. learned-dst: uses masks learned during training. Keep shape of source faces.
learned-prd*dst: combines both masks, smaller size of both.
learned-prd+dst: combines both masks, bigger size of both. XSeg-prd: uses trained XSeg model to mask using data from source faces. XSeg-dst: uses trained XSeg model to mask using data from destination faces. XSeg-prd*dst: combines both masks, smaller size of both. learned-prd*dst*XSeg-dst*prd: combines all 4 mask modes, smaller size of all.You can also mask it manually in post:https://mrdeepfakes.com/forums/thread-gu...er-effects 10. Color transfer modes: similar to color transfer during training, you can use this feature to better match skin color of the learned face to the original frame for more seamless and realistic face swap. There are 8 different modes: RCTLCTMKLMKL-MIDTIDT-MSOT - MMIX-M 11. Image degrade modes: there are 3 settings that you can use to affect the look of the original frame (without affecting the swapped face): Denoise - denoises image making it slightly blurry (I - increases effect, K - decrease effect) Bicubic - blurs the image using bicubic method (O - increases effect, L - decrease effect) Color - decreases color bit depth (P - increases effect, ; - decrease effect) Additional controls: TAB button - switch between main preview window and help screen.Bear in mind you can only change parameters in the main preview window, pressing any other buttons on the help screen won't change them. -/_ and =/+ buttons are used to scale the preview window. Use caps lock to change the increment from 1 to 10 (affects all numerical values).To save/override settings for all next frames from current one press shift + / key.To save/override settings for all previous frames from current one press shift + M key.To start merging of all frames press shift + > key.To go back to the 1st frame press shift + < key.To only convert next frame press > key.To go back 1 frame press < key.
使用免费Google Colab训练变脸视频
如果你的环境不符合上面的要求,你可以选择在Google Colab上面使用它免费的GPU服务器进行训练。Google的Colaboratory是免费的 Jupyter 笔记本环境,不需要进行任何设置就可以使用,并且完全在云端运行。你可以把它想象成一个不需要你配置环境成云端的Python IDE。
注意:大部分google网址国内都无法访问,如果要使用Colab必须先学会科学上网。
这部分要求:Google 账号,Google Drive中至少有15G以上空余空间,国内用户也需要梯子
你需要先将你准备好的视频和预训练后的模型等打包成workspace.zip再上传到你GoogleDrive的根目录下。没有预训练模型的小伙伴可以从上方我的百度网盘*载下**。
打开这个链接https://colab.research.google.com/github/chervonij/DFL-Colab/blob/master/DFL_Colab.ipynb
这个文件是DeepFake官方提供的一个程序,你可以直接在这上面,利用Google的GPU服务器训练你的变脸模型。需要注意的是在程序的运行过程中你需要保持网页的开启,并且由于服务器是免费的,你只能每次免费连续使用12个小时。在12小时后,GOOGLE将停止提供GPU服务,到时你需要手动重新连接。
书归正文,尽管Colab没有一个好用的GUI,但是它提供的文件结构还是很清晰的,我们可以知道每一步的程序在做什么。

Fig1. Colab界面
第一步就是确保程序的连接和安装,选择Prevent random disconnects这一项点击运行。顺利的话我们会看到屏幕上会显示Done的输出Google 提供的Colaboratory 。 Colaboratory 是免费的 Jupyter 笔记本环境,不需要进行任何设置就可以使用,并且完全在云端运行。

Fig2. 确认程序链接状况
然后你可以选择CheckGPU去看看colab 为你分配的GPU额度。

Fig3. 查看GPU配额
然后就是安装Install or update DeepFaceLab,选择这个选项,点击运行。静待2-3分钟。安装完成后会提示你安装成功的。

Fig4.安装DeepFaceLab
第2步,我们需要导入我们之前的Workspace的zip文件。这一步开始前,你需要把你准备好的视频命名成data_src和data_dst,然后将他们预训练的模型放workspace文件夹中,并打包成Zip。
选择manage workspace,点击运行,等待这个文件从你的GoogleDrive上传到Colab 服务器中。这一步可能需要3-5分钟。我们耐心等待。
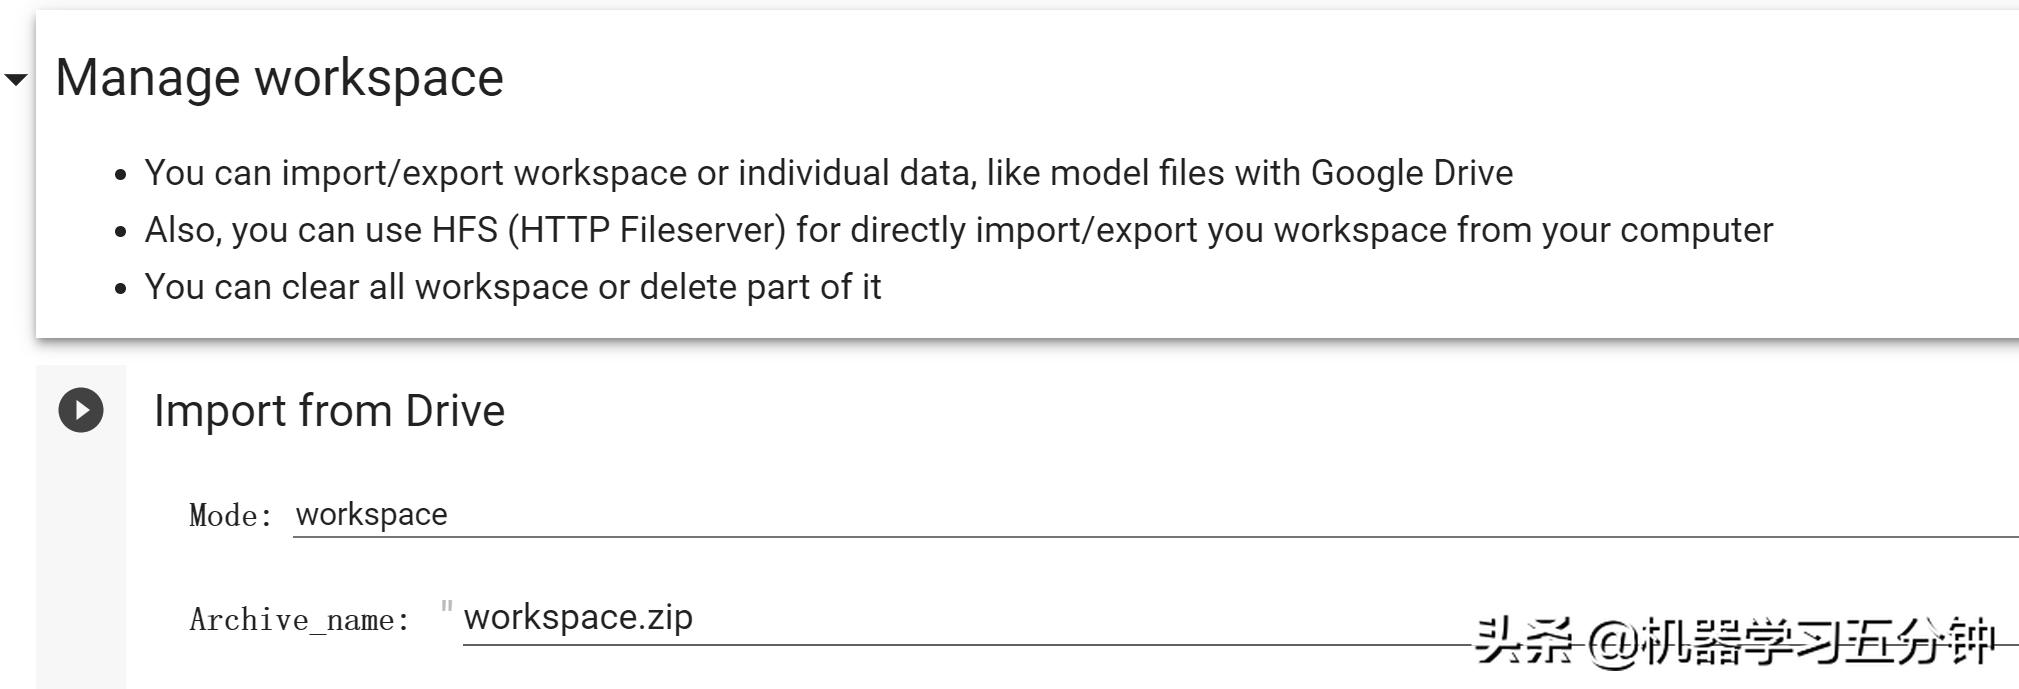
Fig5.上传workspace到Colab环境
第3步,成功上传后,我们需要将视频转化成图片并训练提取脸部轮廓,我们依次执行Extract frames,Detect faces,Apply or remove XSeg mask to the faces 这三个程序。这一步还是非常花时间的,它相当于我们本地操作版本的第2步数据标记。

Fig6. 数据处理
第4步,完成了脸部轮廓的提取,我们来到Train model这个选项,点击训练。静置这个网页12小时,等待他的训练过程。虽然网页不能看到图片输出训练过程,但是我们还是可以从页面右侧的文件栏内,看到保存的预览图。

Fig7.模型训练
到了12个小时后,这个程序会自动将训练结果保存到你的GoogleDrive,由于免费的账户只有15G的空间,所以还是要按确保你的GoogleDrive别放太多的内容。
当然你也可以手动导出训练的模型, 回到之前 "Manage workspace"选择 "Export to Drive"。选择你需要备份的选项,点击运行就能将文件导出到你的GoogleDrive中了。

Fig8. 导出训练进程到GoogleDrive
如果训练结果不够好,你需要等待12个小时,重启服务器,继续之前未完成的训练。这次你只需要选择Training model 就好了。
第5步,当训练的结果足够好,你就可以来到最后一步 Merge Frames。依次运行这个选项下的Merge和Get result Video。然后你就可以看到输出的视频会保存到你的GoogleDrive中。

Fig9.生成变脸视频
以上就是今天的「五分钟机器学习」 手把手教你制作川建国变脸视频 的主要内容了。
如果你觉得本期内容有所帮助,欢迎素质三连。
您的支持将是我继续发电的最大动力~
我是某某某