什么是人脸验证?
这可以认为是分类问题,使用匹配分数来验证人的身份。如果两个图像属于同一个人,则它们应具有较高的匹配度;如果两个图像属于两个不同的人,则匹配度应较低。
您可能想到的第一件事是,为什么不将捕获的图像与另一个像素逐个匹配呢?如果所捕获图像的像素值与另一个图像的像素值之间的距离(均方或绝对)很小,则它们应该对应于同一个人。但是,由于光线,位置或方向略有变化,图像中的像素值也会发生巨大变化,因此该方法实际上效果不佳。
那我们现在怎么办呢?这就是卷积神经网络(俗称CNN)发挥作用的地方。通过将每个图像嵌入d维向量空间,此类网络可以帮助我们更好地表示图像。然后评估图像嵌入的相似性。
解决问题的一些方法
- SVM:这里的想法是为训练集中的每个示例训练一个线性SVM分类器。
- DeepID:在这里,验证任务被视为人脸识别的子问题(为每个人分配标签)。
- 暹罗网络:这是基于以下思想:个人内部的距离应该比人际之间的距离小得多。
在研究暹罗网络之前,让我们首先讨论暹罗网络所基于的一个非常重要的概念。那就是One Shot Learning。
“One Shot Learning”是一个对象分类问题,主要出现在计算机视觉中,它试图从一个或几个训练样本中学习有关对象分类的信息。通常,在深度学习中,我们需要大量的机器学习数据,我们获得的机器学习数据越多则机器学习模型越好。但在人脸验证的情况下,一个人不可能获得数千张照片。其实,我们的大脑也不需要成千上万的人的照片来识别一个人。
对于面部验证任务,我们希望系统能够从一张/几张图像中判断一个人的身份。
如前所述,卷积神经网络(CNN)有助于图像的向量化表示。但是卷积神经网络(CNN)确实需要训练很多实例。此外,每次将一个新用户的图像添加到机器学习数据集中,都要对机器学习模型进行训练,这很不方便。因此,为什么不建立一个模型来学习两个不同的人之间的距离呢?这正是暹罗网络所要做的。
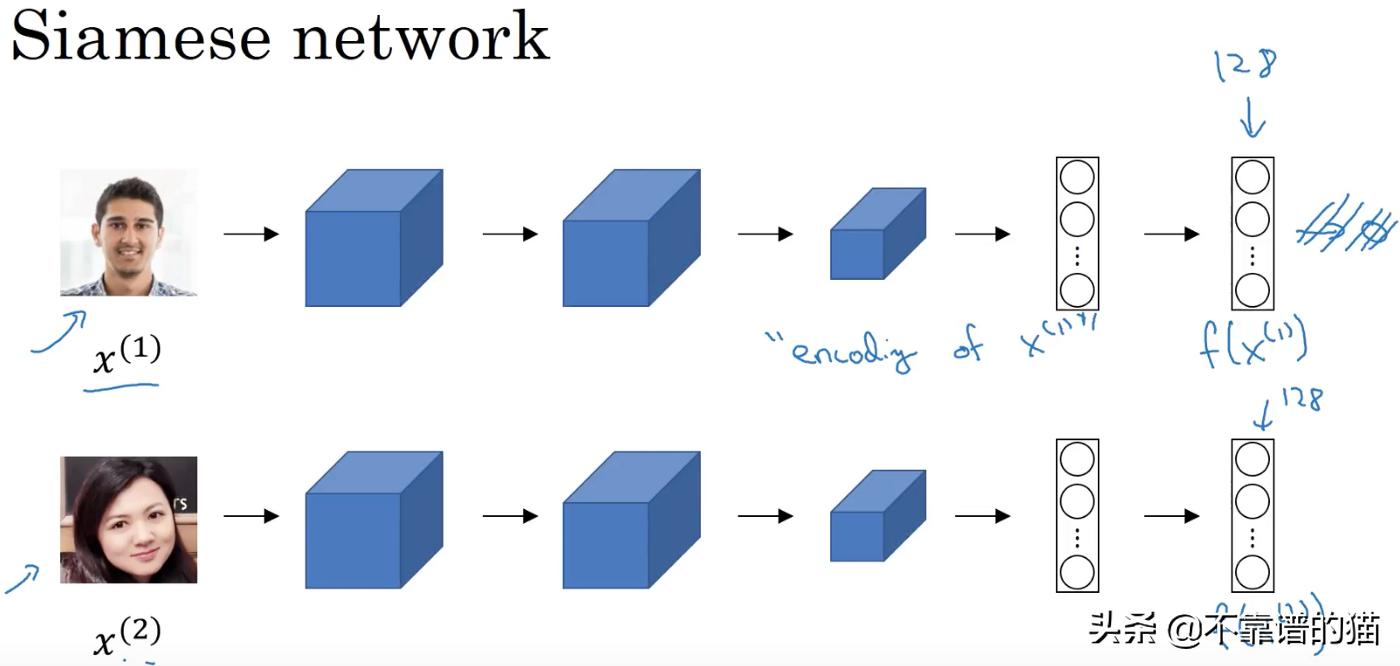
图像x(1)被馈送给卷积神经网络(CNN),由卷积层和全连接层组成。卷积层提供了一个特征空间,而附加到卷积层的全连接层则在该空间中学习一个函数(大部分是非线性的)。我们最后得到的是一个特征向量(在特征向量中没有添加softmax激活,因为在这个阶段它不会被用于分类)。图像x(2)被输入到一个与上面完全相同的卷积神经网络(CNN)。在我们的例子中,我们有第三张图像x(3)被提供给相同的CNN。
我们选择x(1)作为anchor图像,x(2)作为正图像,x(3)作为负图像。anchor和正图像属于同一人,而负图像是另一个人。因此,我们的目标是最小化正图像和anchor之间的距离,同时最大化anchor和负图像之间的距离。

该目标可以写为:
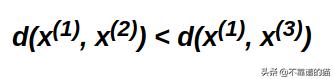
我们可以添加一个超参数alpha
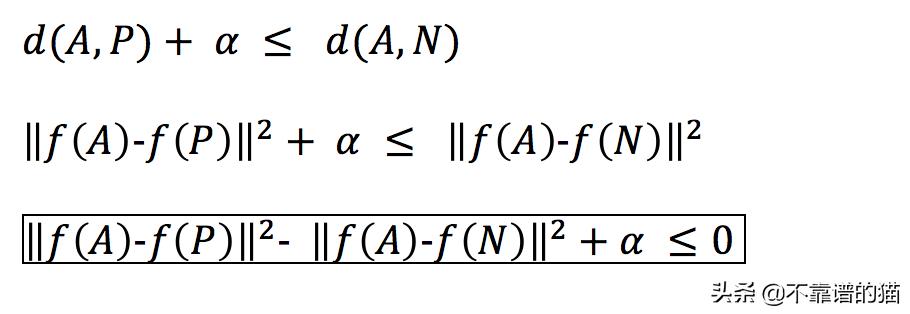
这里A = x(1),P = x(2),N = x(3)
现在,我们如何将其构造为损失函数。

这称为三重损失函数。如我们所见,此损失函数可确保max函数中的第一项不超过0。
Python实现
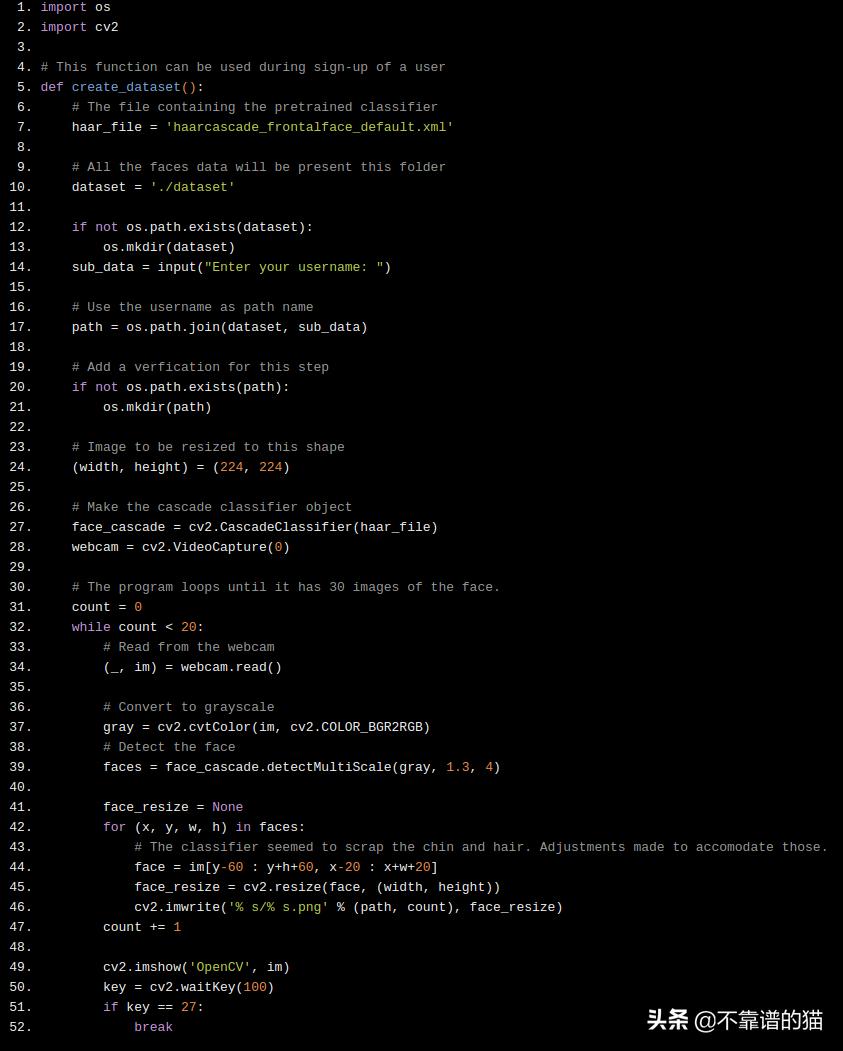
创建数据
这是创建机器学习数据集的Python代码。它使用称为Haar frontal face classifier 的预训练分类器,该分类器以级联方式识别人脸。下面的代码存储使用网络摄像头捕获的20张人脸图像,并将其存储在文件夹中。
import os
import cv2

# This function can be used during sign-up of a user
def create_dataset():
    # The file containing the pretrained classifier
    haar_file = 'haarcascade_frontalface_default.xml'

    # All the faces data will be present this folder
    dataset = './dataset'

    if not os.path.exists(dataset):
        os.mkdir(dataset)
    sub_data = input("Enter your username: ")

    # Use the username as path name
    path = os.path.join(dataset, sub_data)

    # Add a verfication for this step
    if not os.path.exists(path):
        os.mkdir(path)

    # Image to be resized to this shape
    (width, height) = (224, 224)

    # Make the cascade classifier object
    face_cascade = cv2.CascadeClassifier(haar_file)
    webcam = cv2.VideoCapture(0)

    # The program loops until it has 30 images of the face.
    count = 0
    while count < 20:
        # Read from the webcam
        (_, im) = webcam.read()

        # Convert to grayscale
        gray = cv2.cvtColor(im, cv2.COLOR_BGR2RGB)
        # Detect the face
        faces = face_cascade.detectMultiScale(gray, 1.3, 4)

        face_resize = None
        for (x, y, w, h) in faces:
            # The classifier seemed to scrap the chin and hair. Adjustments made to accomodate those.
            face = im[y-60 : y+h+60, x-20 : x+w+20]
            face_resize = cv2.resize(face, (width, height))
            cv2.imwrite('% s/% s.png' % (path, count), face_resize)
        count += 1

        cv2.imshow('OpenCV', im)
        key = cv2.waitKey(100)
        if key == 27:
            break
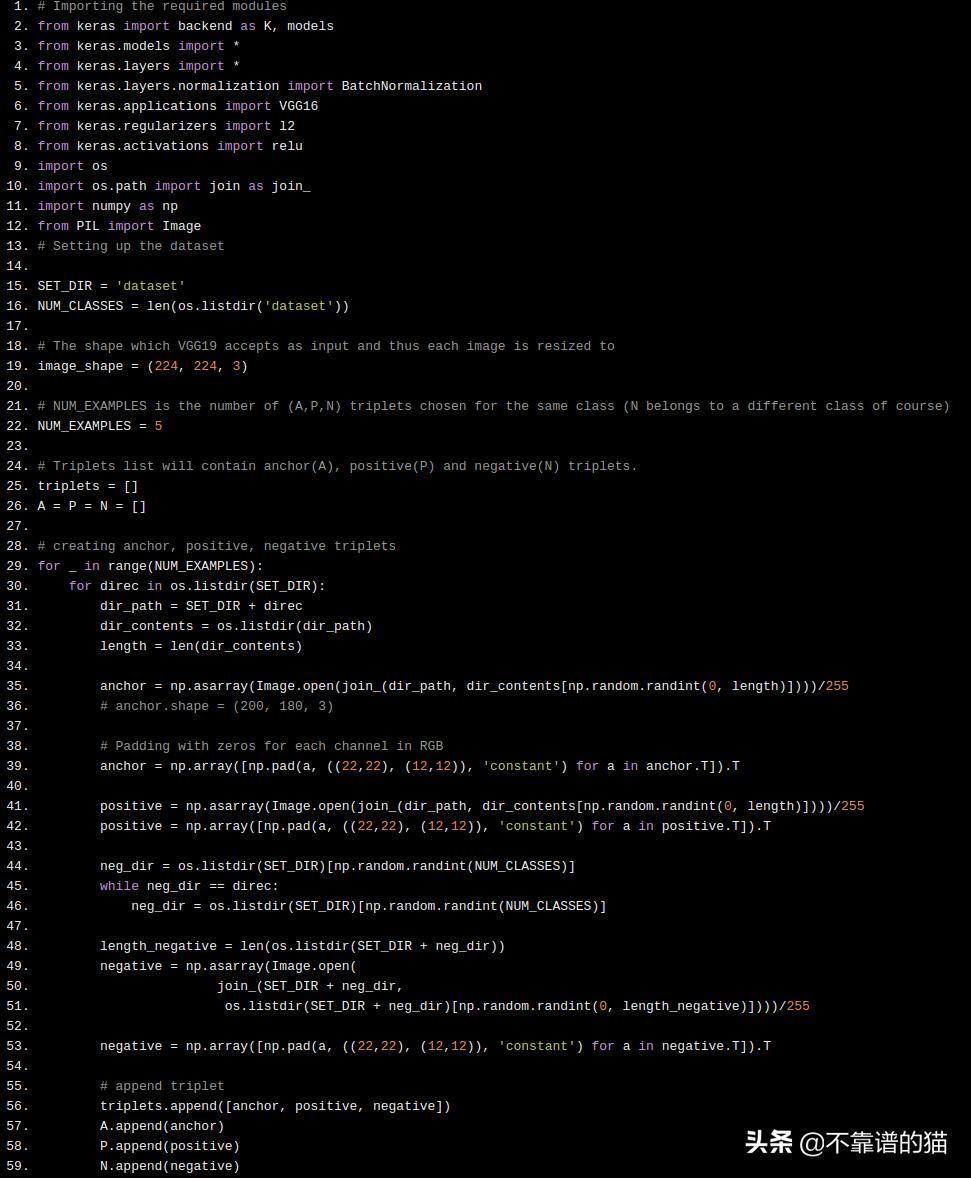
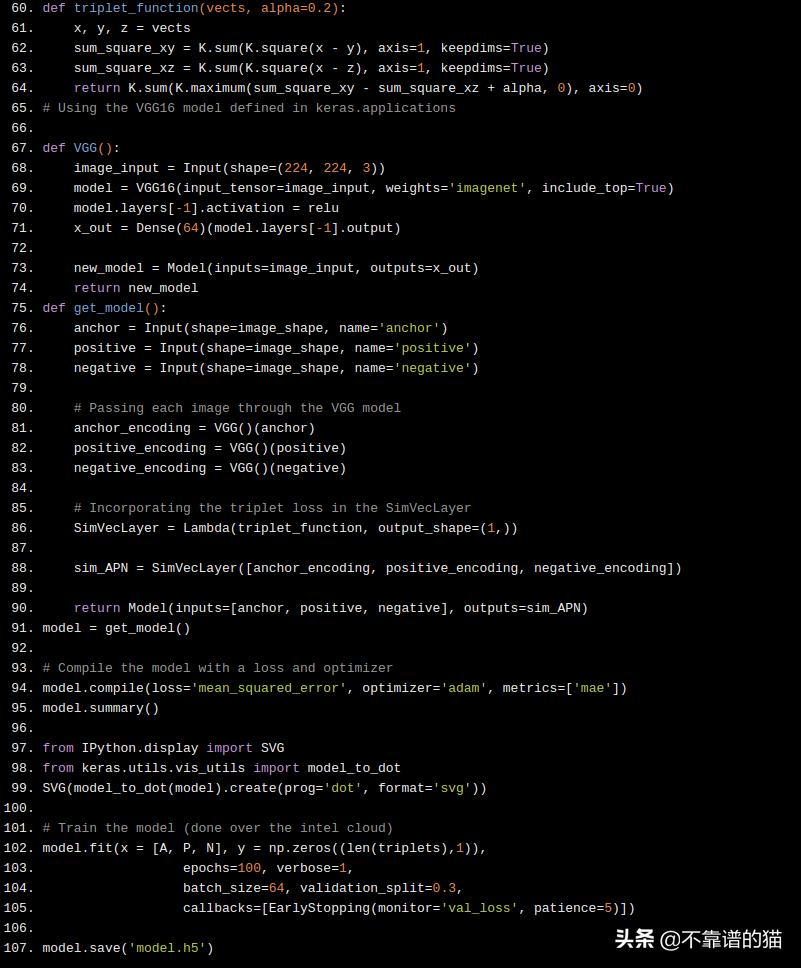
创建模型并进行训练
创建数据集时,您可以看到我在现有图像上填充了一些值(此处宽度为22,高度为12)。之所以如此,是因为使用了在ImageNet数据集上预训练的VGG16模型,该神经网络模型期望输入图像的尺寸为(224、224、3),而我们使用的数据集的每个图像都为(200、180、3)。
对于每个人(由数据集文件夹内的文件夹标识的人),我们存储5个(A,P,N)的triplets。然后对它们进行训练,该模型本身包含三个VGG16模型,并由一个实现三重损失函数的Lambda层连接。
# Importing the required modules
from keras import backend as K, models
from keras.models import *
from keras.layers import *
from keras.layers.normalization import BatchNormalization
from keras.applications import VGG16
from keras.regularizers import l2
from keras.activations import relu
import os
import os.path import join as join_
import numpy as np
from PIL import Image
# Setting up the dataset

SET_DIR = 'dataset'
NUM_CLASSES = len(os.listdir('dataset'))

# The shape which VGG19 accepts as input and thus each image is resized to
image_shape = (224, 224, 3)

# NUM_EXAMPLES is the number of (A,P,N) triplets chosen for the same class (N belongs to a different class of course)
NUM_EXAMPLES = 5

# Triplets list will contain anchor(A), positive(P) and negative(N) triplets.
triplets = []
A = P = N = []

# creating anchor, positive, negative triplets
for _ in range(NUM_EXAMPLES):
    for direc in os.listdir(SET_DIR):
        dir_path = SET_DIR + direc
        dir_contents = os.listdir(dir_path)
        length = len(dir_contents)

        anchor = np.asarray(Image.open(join_(dir_path, dir_contents[np.random.randint(0, length)])))/255
        # anchor.shape = (200, 180, 3)

        # Padding with zeros for each channel in RGB
        anchor = np.array([np.pad(a, ((22,22), (12,12)), 'constant') for a in anchor.T]).T

        positive = np.asarray(Image.open(join_(dir_path, dir_contents[np.random.randint(0, length)])))/255
        positive = np.array([np.pad(a, ((22,22), (12,12)), 'constant') for a in positive.T]).T

        neg_dir = os.listdir(SET_DIR)[np.random.randint(NUM_CLASSES)]
        while neg_dir == direc:
            neg_dir = os.listdir(SET_DIR)[np.random.randint(NUM_CLASSES)]

        length_negative = len(os.listdir(SET_DIR + neg_dir))
        negative = np.asarray(Image.open(
                       join_(SET_DIR + neg_dir,
                        os.listdir(SET_DIR + neg_dir)[np.random.randint(0, length_negative)])))/255

        negative = np.array([np.pad(a, ((22,22), (12,12)), 'constant') for a in negative.T]).T

        # append triplet
        triplets.append([anchor, positive, negative])
        A.append(anchor)
        P.append(positive)
        N.append(negative)
def triplet_function(vects, alpha=0.2):
    x, y, z = vects
    sum_square_xy = K.sum(K.square(x - y), axis=1, keepdims=True)
    sum_square_xz = K.sum(K.square(x - z), axis=1, keepdims=True)
    return K.sum(K.maximum(sum_square_xy - sum_square_xz + alpha, 0), axis=0)
# Using the VGG16 model defined in keras.applications

def VGG():
    image_input = Input(shape=(224, 224, 3))
    model = VGG16(input_tensor=image_input, weights='imagenet', include_top=True)
    model.layers[-1].activation = relu
    x_out = Dense(64)(model.layers[-1].output)

    new_model = Model(inputs=image_input, outputs=x_out)
    return new_model
def get_model():
    anchor = Input(shape=image_shape, name='anchor')
    positive = Input(shape=image_shape, name='positive')
    negative = Input(shape=image_shape, name='negative')

    # Passing each image through the VGG model
    anchor_encoding = VGG()(anchor)
    positive_encoding = VGG()(positive)
    negative_encoding = VGG()(negative)

    # Incorporating the triplet loss in the SimVecLayer
    SimVecLayer = Lambda(triplet_function, output_shape=(1,))

    sim_APN = SimVecLayer([anchor_encoding, positive_encoding, negative_encoding])

    return Model(inputs=[anchor, positive, negative], outputs=sim_APN)
model = get_model()

# Compile the model with a loss and optimizer
model.compile(loss='mean_squared_error', optimizer='adam', metrics=['mae'])
model.summary()

from IPython.display import SVG
from keras.utils.vis_utils import model_to_dot
SVG(model_to_dot(model).create(prog='dot', format='svg'))

# Train the model (done over the intel cloud)
model.fit(x = [A, P, N], y = np.zeros((len(triplets),1)),
                  epochs=100, verbose=1,
                  batch_size=64, validation_split=0.3,
                  callbacks=[EarlyStopping(monitor='val_loss', patience=5)])

model.save('model.h5')
使用模型进行验证
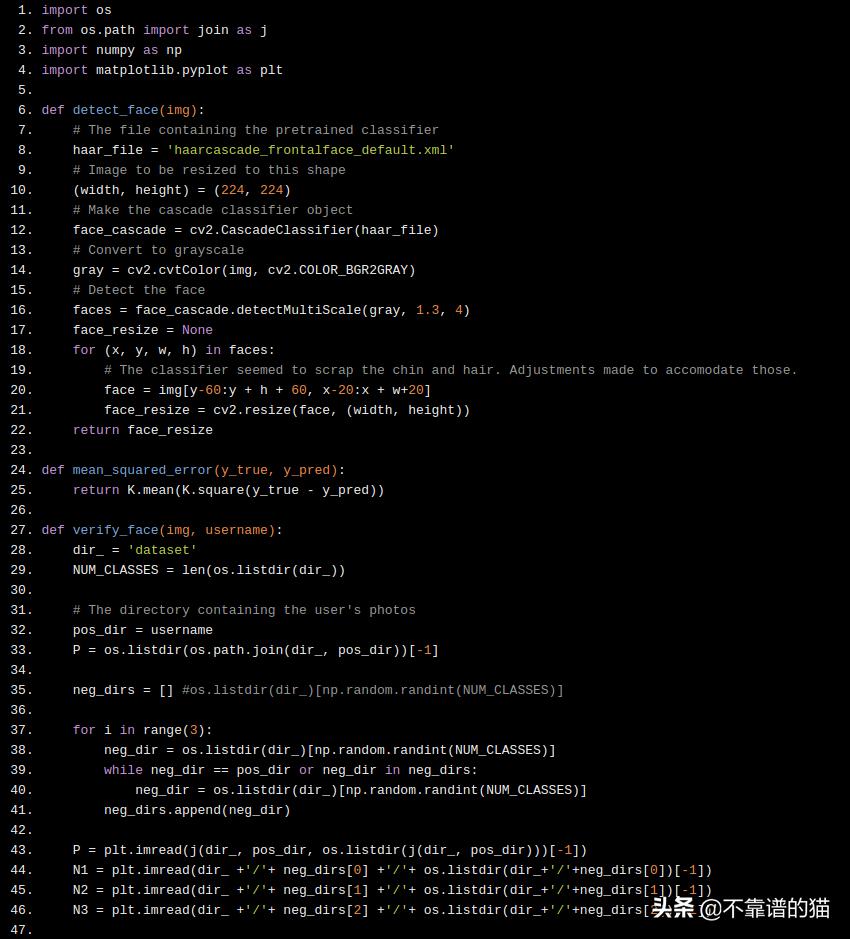
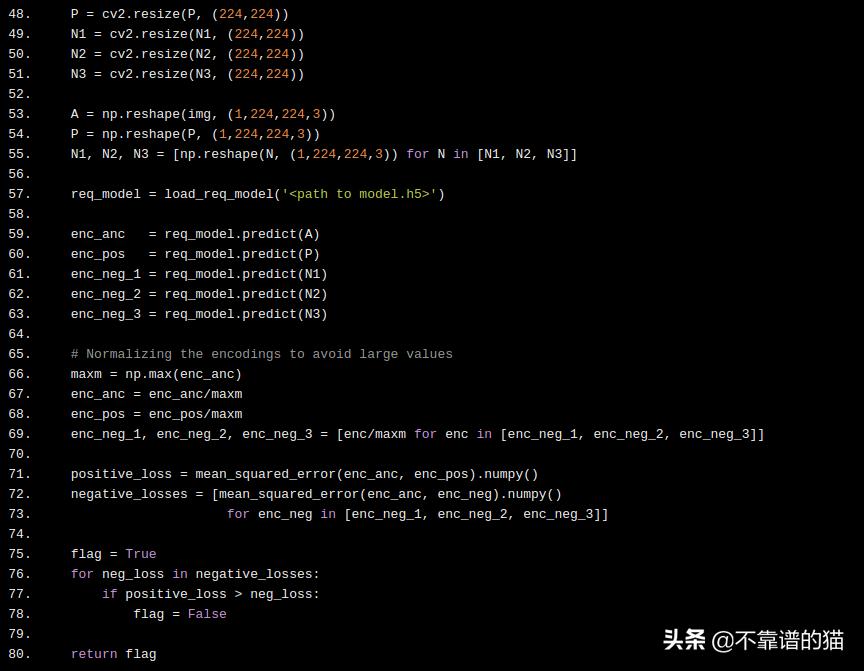
接收图像img(使用网络摄像头捕获的人的图像)的detect_face函数查找面部并将其裁剪。用验证如下:
a)我们在数据集文件夹中找到命名的文件夹。我们从该文件夹中选择一个图像。
b)我们随机选择另外三个文件夹,并从每个文件夹中选择一个图像。这些将作为negative images。
c)我们找到每个图像的编码,由detect_face返回,一个来自步骤a),三个来自步骤b)。
d)我们求出步骤a)和步骤b中每个图像编码的均方误差。
e)如果从步骤b)获得的任何图像的误差小于从步骤a)获得的图像的误差,我们说该人已被授权,否则就没有授权。
import os
from os.path import join as j
import numpy as np
import matplotlib.pyplot as plt

def detect_face(img):
    # The file containing the pretrained classifier
    haar_file = 'haarcascade_frontalface_default.xml'
    # Image to be resized to this shape
    (width, height) = (224, 224)
    # Make the cascade classifier object
    face_cascade = cv2.CascadeClassifier(haar_file)
    # Convert to grayscale
    gray = cv2.cvtColor(img, cv2.COLOR_BGR2GRAY)
    # Detect the face
    faces = face_cascade.detectMultiScale(gray, 1.3, 4)
    face_resize = None
    for (x, y, w, h) in faces:
        # The classifier seemed to scrap the chin and hair. Adjustments made to accomodate those.
        face = img[y-60:y + h + 60, x-20:x + w+20]
        face_resize = cv2.resize(face, (width, height))
    return face_resize

def mean_squared_error(y_true, y_pred):
    return K.mean(K.square(y_true - y_pred))

def verify_face(img, username):
    dir_ = 'dataset'
    NUM_CLASSES = len(os.listdir(dir_))

    # The directory containing the user's photos
    pos_dir = username
    P = os.listdir(os.path.join(dir_, pos_dir))[-1]

    neg_dirs = [] #os.listdir(dir_)[np.random.randint(NUM_CLASSES)]

    for i in range(3):
        neg_dir = os.listdir(dir_)[np.random.randint(NUM_CLASSES)]
        while neg_dir == pos_dir or neg_dir in neg_dirs:
            neg_dir = os.listdir(dir_)[np.random.randint(NUM_CLASSES)]
        neg_dirs.append(neg_dir)

    P = plt.imread(j(dir_, pos_dir, os.listdir(j(dir_, pos_dir)))[-1])
    N1 = plt.imread(dir_ +'/'+ neg_dirs[0] +'/'+ os.listdir(dir_+'/'+neg_dirs[0])[-1])
    N2 = plt.imread(dir_ +'/'+ neg_dirs[1] +'/'+ os.listdir(dir_+'/'+neg_dirs[1])[-1])
    N3 = plt.imread(dir_ +'/'+ neg_dirs[2] +'/'+ os.listdir(dir_+'/'+neg_dirs[2])[-1])

    P = cv2.resize(P, (224,224))
    N1 = cv2.resize(N1, (224,224))
    N2 = cv2.resize(N2, (224,224))
    N3 = cv2.resize(N3, (224,224))

    A = np.reshape(img, (1,224,224,3))
    P = np.reshape(P, (1,224,224,3))
    N1, N2, N3 = [np.reshape(N, (1,224,224,3)) for N in [N1, N2, N3]]

    req_model = load_req_model('<path to model.h5>')

    enc_anc   = req_model.predict(A)
    enc_pos   = req_model.predict(P)
    enc_neg_1 = req_model.predict(N1)
    enc_neg_2 = req_model.predict(N2)
    enc_neg_3 = req_model.predict(N3)

    # Normalizing the encodings to avoid large values
    maxm = np.max(enc_anc)
    enc_anc = enc_anc/maxm
    enc_pos = enc_pos/maxm
    enc_neg_1, enc_neg_2, enc_neg_3 = [enc/maxm for enc in [enc_neg_1, enc_neg_2, enc_neg_3]]

    positive_loss = mean_squared_error(enc_anc, enc_pos).numpy()
    negative_losses = [mean_squared_error(enc_anc, enc_neg).numpy()
                        for enc_neg in [enc_neg_1, enc_neg_2, enc_neg_3]]

    flag = True
    for neg_loss in negative_losses:
        if positive_loss > neg_loss:
            flag = False

    return flag