码个蛋(codeegg)第 620次推文
在 Flutter 中,自带手势监听的目前为止好像只有按钮部件和一些 chip 部件,例如 Text 等部件需要实现手势监听,就需要借助带有监听事件的部件来实现了,这节我们会讲下 InkWell 和 GestureDetector 来实现手势的监听。
InkWell
在前面的一些例子中,小伙伴应该看到了好几次 InkWell 这个部件,通过它我们可以实现对一些手势的监听,并实现 MD 的水波纹效果,举个简单的一个例子
InkWell(child: Text('点我...点我...我能响应点击手势'),onTap: => print('啊...我被点击了...')),
那么当点击 Text 的时候就会响应点击事件,控制台输出日志
我们还是老套路,分析下源码。Ctrl 点击 InkWell 来查看源码(Android Studio 的操作,别的我不懂喔...),然后,「嗯...除了构造函数怎么什么都没有???」那只能看它的父类 InkResponse 了,在那之前,我们看下 InkWell 的说明
/// A rectangular area of a [Material] that responds to touch.
InkWell 是在 MaterialDesign 风格下的一个用来响应触摸的矩形区域(注意加粗的文字,1.如果不是 MD 风格的部件下,你是不能用这个来做点击响应的;2.InkWell 是一块矩形区域,如果你要的是圆形区域,8 好意思,不行!)
/// The [InkWell] widget must have a [Material] widget as an ancestor. The/// [Material] widget is where the ink reactions are actually painted. This/// matches the material design premise wherein the [Material] is what is/// actually reacting to touches by spreading ink.
InkWell 必须要有一个 Material 风格的部件作为锚点,巴拉巴拉巴拉....再次强调必须要在 MD 风格下使用。
接下来看下 InkResponse 吧
InkResponse
const InkResponse({Key key,this.child, // 需要监听的子部件// 一个 `GestureTapCallback` 类型参数,看下 `GestureTapCallback` 的定义,// `typedef GestureTapCallback = void Function;` 就是简单的无参无返回类型参数// 监听手指点击事件this.onTap,// 一个 `GestureTapDownCallback` 类型参数,需要 `TapDownDetails` 类型参数,// `TapDownDetails` 里面有个 `Offset` 参数用于记录点击的位置,监听手指点击屏幕的事件this.onTapDown,// 同 `onTap` 表示点击事件取消监听this.onTapCancel,// 同 `onTap` 表示双击事件监听this.onDoubleTap,// 一个 `GestureLongPressCallback` 类型参数,也是无参无返回值,表示长按的监听this.onLongPress,// 监听高亮的变化,返回 `true` 表示往高亮变化,`false` 相反this.onHighlightChanged,// 是否需要裁剪区域,`InkWell` 该值为 `true`,会根据 `highlightShape` 裁剪this.containedInkWell = false,// 高亮的外形,`InkWell` 该值设置成 `BoxShape.rectangle`,所以是个矩形区域this.highlightShape = BoxShape.circle,this.radius, // 手指点下去的时候,出现水波纹的半径this.borderRadius, // 点击时候外圈阴影的圆角半径this.customBorder,this.highlightColor, // 高亮颜色this.splashColor, // 手指点下生成的水波颜色this.splashFactory, // 两个值 `InkRipple.splashFactory` 和 `InkSplash.splashFactory`this.enableFeedback = true, // 检测到手势是否有反馈this.excludeFromSemantics = false,})
所以一些简单的触摸事件直接通过 InkWell 或者 InkResponse 就能够实现,但是面临一些比较复杂的手势,就有点不太够用了,我们需要通过 GestureDector 来进行处理
GestureDector
GestureDetector 也是一个部件,主要实现对各种手势动作的监听,其监听事件查看下面的表格
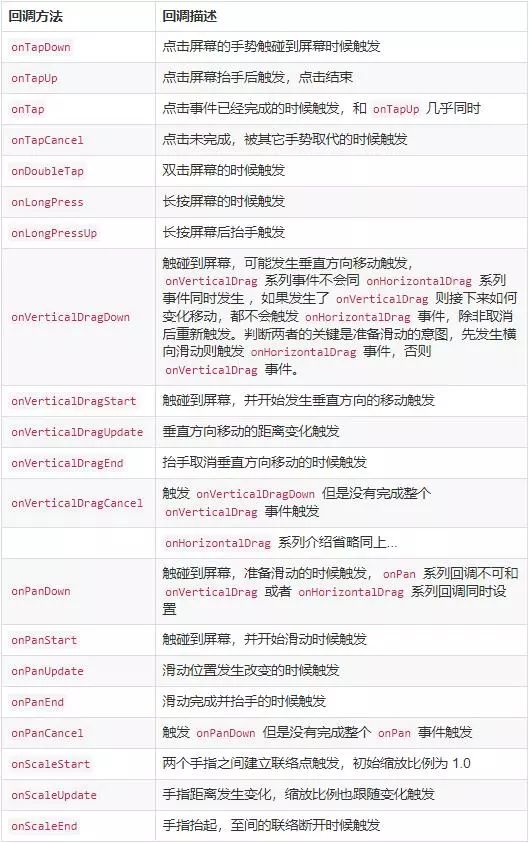
还有 onForcePress 系列事件,这个是根据对屏幕的挤压力度进行触发,需要达到某些定值才能触发。GestureDetector 有个 behavior 属性用于设置手势监听过程中的表现形式
-
deferToChild 默认值,触摸到 child 的范围才会触发手势,空白处不会触发
-
opaque 不透明模式,防止 background widget 接收到手势
-
translucent 半透明模式,刚好同 opaque 相反,允许 background widget 接收到手势
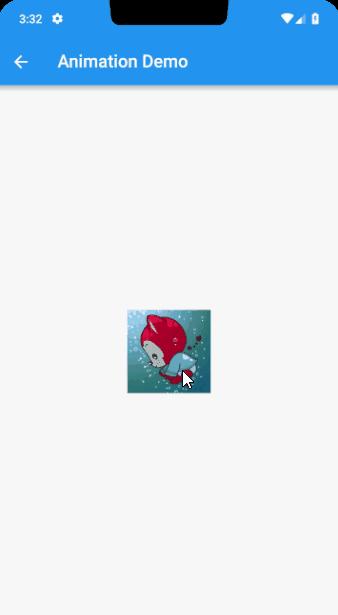
介绍完了手势,那就可以实际操练起来了,比如,实现一个跟随手指运动的小方块,先看下效果图
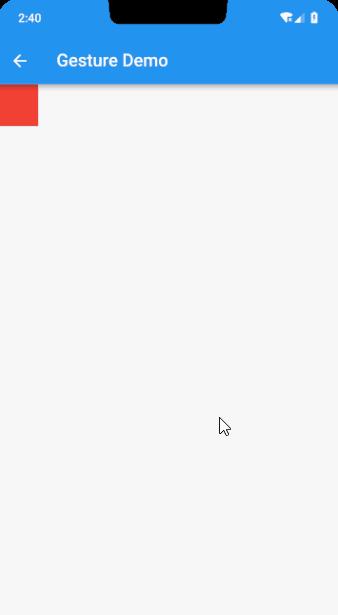
简单的分析下,通过 Positioned 来设置小方块的位置,根据 GestureDetector 的 onPanUpdate 修改 Positioned 的 left 和 top 值,当 onPanEnd 或者 onPanCancel 的时候设置为原点,那么就可以有如图的效果了
class GestureDemoPage extends StatefulWidget {@override_GestureDemoPageState createState => _GestureDemoPageState;}
class _GestureDemoPageState extends State<GestureDemoPage> {double left = 0.0;double top = 0.0;
@overrideWidget build(BuildContext context) {return Scaffold(appBar: AppBar(title: Text('Gesture Demo'),),body: Stack(alignment: Alignment.center,children: <Widget>[Positioned(child: Container(width: 50.0, height: 50.0, color: Colors.red), left: left, top: top),GestureDetector(behavior: HitTestBehavior.translucent,child: Container(color: Colors.transparent,width: MediaQuery.of(context).size.width - 10,height: MediaQuery.of(context).size.height),onPanDown: (details) {setState(() {left = details.globalPosition.dx;top = details.globalPosition.dy;});},onPanUpdate: (details) {setState(() {left = details.globalPosition.dx;top = details.globalPosition.dy;});},onPanCancel: () {setState(() {left = 0.0;top = 0.0;});},onPanEnd: (details) {setState(() {left = 0.0;top = 0.0;});},)],));}}
如果说要实现一个放大缩小的方块,就可以通过 onScaleUpdate 中获取到的 details.scale 来设置方块的宽高即可。这个比较简单就留给小伙伴们自己实现效果了。
该部分代码查看 gesture_main.dart 文件
Animation动画
Flutter 的 Animation 是个抽象类,具体的实现需要看其子类 AnimationController,在这之前,先了解下 Animation 的一些方法和介绍。
-
addListener / removeListener 添加的监听用于监听值的变化,remove 用于停止监听
-
addStatusListener / removeStatusListener 添加动画状态变化的监听,remove 停止监听,Animation 的状态有 4 种:dismissed 动画初始状态,反向运动结束状态,forward 动画正向运动状态,reverse 动画反向运动状态,completed 动画正向运动结束状态。
-
drive 方法用于连接动画,例如官方举的例子,因为 AnimationController 是其子类,所以也拥有该方法
Animation<Alignment> _alignment1 = _controller.drive(AlignmentTween(begin: Alignment.topLeft,end: Alignment.topRight,),);
上面的例子将 AnimationController 和 AlignmentTween 结合成一个 Animation<Alignment> 动画,当然 drive 可以结合多个动画,例如
Animation<Alignment> _alignment3 = _controller.drive(CurveTween(curve: Curves.easeIn)).drive(AlignmentTween(begin: Alignment.topLeft,end: Alignment.topRight,));
因为 Animation 是抽象类,所以具体的还是需要通过 AnimationController 来实现。
AnimationController
AnimationController({double value, // 设置初始的值this.duration, // 动画的时长this.debugLabel, // 主要是用于 `toString` 方法中输出信息this.lowerBound = 0.0, // 最小范围this.upperBound = 1.0, // 最大范围// AnimationController 结束时候的行为,有 `normal` 和 `preserve` 两个值可选this.animationBehavior = AnimationBehavior.normal,// 这个属性可以通过 with `SingleTickerProviderStateMixin`// 或者 `TickerProviderStateMixin` 引入到 `State`,通过 `this` 指定@required TickerProvider vsync,})
AnimationController 控制动画的方法有这么几个
-
forward 启动动画,和上面提到的 forward 状态不一样
-
reverse 方向启动动画
-
repeat 重复使动画运行
-
stop 停止动画
-
reset 重置动画
大概了解了 AnimationController ,接下来通过一个实际的小例子来加深下印象,例如实现如下效果,点击开始动画,结束后再点击反向动画
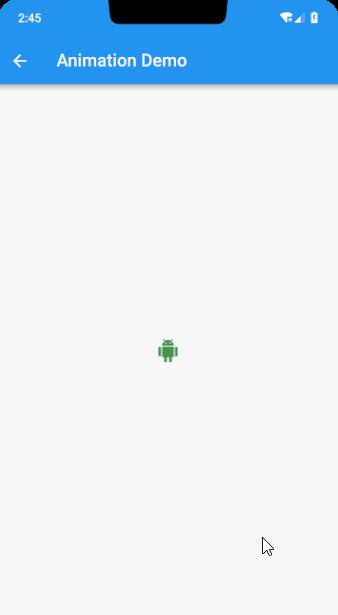
class _AnimationDemoPageState extends State<AnimationDemoPage> with TickerProviderStateMixin {AnimationController _animationController;
@overridevoid initState {super.initState;_animationController = AnimationController(vsync: this, duration: Duration(milliseconds: 1000), lowerBound: 28.0, upperBound: 50.0);
// 当动画值发生变化的时候,重绘下 icon_animationController.addListener( {setState( {});});}
@overridevoid dispose {// 一定要释放资源_animationController.dispose;super.dispose;}
@overrideWidget build(BuildContext context) {return Scaffold(appBar: AppBar(title: Text('Animation Demo'),),body: Center(child: IconButton(icon: Icon(Icons.android, color: Colors.green[500], size: _animationController.value),onPressed:  {// 根据状态执行不同动画运动方式if (_animationController.status == AnimationStatus.completed)_animationController.reverse;else if (_animationController.status == AnimationStatus.dismissed)_animationController.forward;}),),);}}
那么如果要实现无限动画呢,那就可以通过 addStatusListener 监听动画的状态来执行,修改代码,在 initState 增加如下代码
_animationController.addStatusListener((status) {if (_animationController.status == AnimationStatus.completed)_animationController.reverse; // 正向结束后开始反向else if (_animationController.status == AnimationStatus.dismissed)_animationController.forward; // 反向结束后开始正向});
_animationController.forward; // 启动动画
把 Center 的 child 替换成一个 Icon,因为上面已经启动了动画,所以不需要再用点击去启动了,运行后就会无限放大缩小循环跑了。
在这个例子中,通过设置 AnimationController 的 lowerBound 和 upperBound 实现了动画的变化范围,接下来,将通过 Tween 来实现动画的变化范围。先看下 Tween 的一些介绍。
Tween
/// A linear interpolation between a beginning and ending value.////// [Tween] is useful if you want to interpolate across a range.////// To use a [Tween] object with an animation, call the [Tween] object's/// [animate] method and pass it the [Animation] object that you want to/// modify.////// You can chain [Tween] objects together using the [chain] method, so that a/// single [Animation] object is configured by multiple [Tween] objects called/// in succession. This is different than calling the [animate] method twice,/// which results in two separate [Animation] objects, each configured with a/// single [Tween].
Tween 是一个线性插值(如果要修改运动的插值,可以通过 CurveTween 来修改),所以在线性变化的时候很有用
通过调用 Tween 的 animate 方法生成一个 Animation(animate 一般传入 AnimationController)
还可以通过 chain 方法将多个 Tween 结合到一起,这样就不需要多次去调用 Tween 的 animate 方法来生成动画了,多次调用 animate 相当于使用了两个分开的动画来完成效果,但是 chain 结合到一起就是一个动画过程
那么对前面的动画进行一些修改,通过 Tween 来控制值的变化
class _AnimationDemoPageState extends State<AnimationDemoPage> with TickerProviderStateMixin {AnimationController _animationController;Animation _scaleAnimation; // 动画实例,用于修改值的大小
@overridevoid initState {super.initState;_animationController = AnimationController(vsync: this, duration: Duration(milliseconds: 1000)); // 不通过 `lowerBound` 和 `upperBound` 设置范围,改用 `Tween`
// 当动画值发生变化的时候,重绘下 icon_animationController.addListener( {setState( {});});
_animationController.addStatusListener((status) {if (_animationController.status == AnimationStatus.completed)_animationController.reverse;else if (_animationController.status == AnimationStatus.dismissed)_animationController.forward;});
// 通过 `Tween` 的 `animate` 生成一个 Animation// 再通过 Animation.value 进行值的修改_scaleAnimation = Tween(begin: 28.0, end: 50.0).animate(_animationController);_animationController.forward;}
@overridevoid dispose {// 一定要释放资源_animationController.dispose;super.dispose;}
@overrideWidget build(BuildContext context) {return Scaffold(appBar: AppBar(title: Text('Animation Demo'),),body: Center(// 通过动画返回的值,修改图标的大小child: Icon(Icons.favorite, color: Colors.red, size: _scaleAnimation.value),),);}}
再次运行,还是能过达到之前的效果,那么很多小伙伴肯定会问了,「**,加了那么多代码,效果还是和以前的一样,还不如不加...」好吧,我无法反驳,但是如果要实现多个动画呢,那么使用 Tween 就有优势了,比如我们让图标大小变化的同时,颜色和位置也发生变化,只通过 AnimationController 要怎么实现? 又比如说,运动的方式要先加速后减速,那只通过 AnimationController 要如何实现?这些问题通过 Tween 就会非常方便解决,直接上代码
class _AnimationDemoPageState extends State<AnimationDemoPage> with TickerProviderStateMixin {AnimationController _animationController;Animation _scaleAnimation; // 用于控制图标大小Animation<Color> _colorAnimation; // 控制图标颜色Animation<Offset> _positionAnimation; // 控制图标位置
@overridevoid initState {super.initState;_animationController = AnimationController(vsync: this, duration: Duration(milliseconds: 2000));
// 当动画值发生变化的时候,重绘下 icon_animationController.addListener( {setState( {});});
_animationController.addStatusListener((status) {if (_animationController.status == AnimationStatus.completed)_animationController.reverse;else if (_animationController.status == AnimationStatus.dismissed) _animationController.forward;});// 通过 `chain` 结合 `CurveTween` 修改动画的运动方式,曲线类型可自行替换_scaleAnimation =Tween(begin: 28.0, end: 50.0).chain(CurveTween(curve: Curves.decelerate)).animate(_animationController);
_colorAnimation = ColorTween(begin: Colors.red[200], end: Colors.red[900]).chain(CurveTween(curve: Curves.easeIn)).animate(_animationController);
_positionAnimation = Tween(begin: Offset(100, 100), end: Offset(300, 300)).chain(CurveTween(curve: Curves.bounceInOut)).animate(_animationController);
_animationController.forward; // 启动动画}
@overridevoid dispose {_animationController.dispose;super.dispose;}
@overrideWidget build(BuildContext context) {return Scaffold(appBar: AppBar(title: Text('Animation Demo'),),body: Stack(children: <Widget>[Positioned(child: Icon(Icons.favorite, color: _colorAnimation.value, size: _scaleAnimation.value),left: _positionAnimation.value.dx,top: _positionAnimation.value.dy,)],),);}}
那么最后的效果图
当然,Flutter 中已经实现的 Tween 还有很多,包括 BorderTween、TextStyleTween、ThemeDataTween ..等等,实现的方式都是类似的,小伙伴们可以自己慢慢看。
AnimationWidget
在上面的例子中,都是通过 addListener 监听动画值变化,然后通过 setState 方法来实现刷新效果。那么 Flutter 也提供了一个部件 AnimationWidget 来实现动画部件,就不需要一直监听了,还是实现上面的例子
class RunningHeart extends AnimatedWidget {final List<Animation> animations; // 传入动画列表final AnimationController animationController; // 控制动画
RunningHeart({this.animations, this.animationController})// 对传入的参数进行限制(当然你也可以不做限制): assert(animations.length == 3),assert(animations[0] is Animation<Color>),assert(animations[1] is Animation<double>),assert(animations[2] is Animation<Offset>),super(listenable: animationController);
@overrideWidget build(BuildContext context) {return Stack(children: <Widget>[Positioned(// 之前的 animation 都通过 animations 参数传入到 `AnimationWidget`child: Icon(Icons.favorite, color: animations[0].value, size: animations[1].value),left: animations[2].value.dx,top: animations[2].value.dy,)],);}}
其实内部返回的部件和前面的是一样的
接着对 _AnimationDemoPageState 类进行修改,注释 initState 中的 _animationController.addListener 所有内容,然后将 body 属性替换成新建的 RunningHeart 部件,记得传入的动画列表的顺序
body: RunningHeart(animations: [_colorAnimation, _scaleAnimation, _positionAnimation],animationController: _animationController,)
这样就实现了刚才一样的效果,并且没有一直调用 setState 来刷新。
该部分代码查看 animation_main.dart 文件
StaggeredAnimations
Flutter 还提供了交错动画,听名字就可以知道,是按照时间轴,进行不同的动画,并且由同个AnimationController 进行控制。因为没有找到好的例子,原谅我直接搬官方的例子来讲,官方交错动画 demo
在继续看之前,先了解下 Interval
/// An [Interval] can be used to delay an animation. For example, a six second/// animation that uses an [Interval] with its [begin] set to 0.5 and its [end]/// set to 1.0 will essentially become a three-second animation that starts/// three seconds later.
Interval 用来延迟动画,例如一个时长 6s 的动画,通过 Interval 设置其 begin 参数为 0.5,end 参数设置为 1.0,那么这个动画就会变成 3s 的动画,并且开始的时间延迟了 3s。
了解 Interval 功能后,就可以看下实例了,当然我们不和官方的 demo 一样,中间加个旋转动画
class StaggeredAnim extends StatelessWidget {final AnimationController controller;final Animation<double> opacity;final Animation<double> width;final Animation<double> height;final Animation<EdgeInsets> padding;final Animation<BorderRadius> border;final Animation<Color> color;final Animation<double> rotate;
StaggeredAnim({Key key, this.controller}):// widget 透明度opacity = Tween(begin: 0.0, end: 1.0).animate(CurvedAnimation(parent: controller, curve: Interval(0.0, 0.1, curve: Curves.ease))),// widget 宽width = Tween(begin: 50.0, end: 150.0).animate(CurvedAnimation(parent: controller, curve: Interval(0.1, 0.250, curve: Curves.ease))),// widget 高height = Tween(begin: 50.0, end: 150.0).animate(CurvedAnimation(parent: controller, curve: Interval(0.25, 0.375, curve: Curves.ease))),// widget 底部距离padding = EdgeInsetsTween(begin: const EdgeInsets.only(top: 150.0), end: const EdgeInsets.only(top: .0)).animate(CurvedAnimation(parent: controller, curve: Interval(0.25, 0.375, curve: Curves.ease))),// widget 旋转rotate = Tween(begin: 0.0, end: 0.25).animate(CurvedAnimation(parent: controller, curve: Interval(0.375, 0.5, curve: Curves.ease))),// widget 外形border = BorderRadiusTween(begin: BorderRadius.circular(5.0), end: BorderRadius.circular(75.0)).animate(CurvedAnimation(parent: controller, curve: Interval(0.5, 0.75, curve: Curves.ease))),// widget 颜色color = ColorTween(begin: Colors.blue, end: Colors.orange).animate(CurvedAnimation(parent: controller, curve: Interval(0.75, 1.0, curve: Curves.ease))),super(key: key);
Widget _buildAnimWidget(BuildContext context, Widget child) {return Container(padding: padding.value,alignment: Alignment.center,// 旋转变化child: RotationTransition(turns: rotate, // turns 表示当前动画的值 * 360° 角度child: Opacity(opacity: opacity.value, // 透明度变化child: Container(width: width.value, // 宽度变化height: height.value, // 高度变化decoration: BoxDecoration(color: color.value, // 颜色变化border: Border.all(color: Colors.indigo[300], width: 3.0),borderRadius: border.value), // 外形变化),),),);}
@overrideWidget build(BuildContext context) {// AnimatedBuilder 继承 AnimationWidget,用来快速构建动画部件return AnimatedBuilder(animation: controller, builder: _buildAnimWidget);}}
然后修改 body 的参数,设置成我们的动画,当点击的时候就会启动动画
GestureDetector(behavior: HitTestBehavior.opaque,onTap: _playAnim,child: Center(// 定义一个外层圈,能够使动画显眼点child: Container(width: 300,height: 300,decoration: BoxDecoration(color: Colors.black.withOpacity(0.1), border: Border.all(color: Colors.black.withOpacity(0.5))),child: StaggeredAnim(controller: _controller),),),)
看下最后的效果吧

该部分代码查看 staggered_animation_main.dart 文件
结束前,我们再讲一种比较简单的 Hreo 动画,用来过渡用。
Hero
通过指定 Hero 中的 tag,在切换的时候 Hero 会寻找相同的 tag,并实现动画,具体的实现逻辑,这里可以推荐一篇文章 谈一谈Flutter中的共享元素动画Hero,里面写的很详细,就不造车轮了。当然这边还是得提供个简单的 demo 的,替换前面的 body 参数
body: Container(alignment: Alignment.center,child: InkWell(child: Hero(tag: 'hero_tag', // 这里指定 tagchild: Image.asset('images/ali.jpg', width: 100.0, height: 100.0),),onTap: => Navigator.push(context, MaterialPageRoute(builder: (_) => HeroPage)),),)
然后创建 HeroPage 界面,当然也可以是个 Dialog,只要通过路由实现即可
class HeroPage extends StatelessWidget {@overrideWidget build(BuildContext context) {return Scaffold(body: Container(alignment: Alignment.center,child: InkWell(child: Hero(tag: 'hero_tag', child: Image.asset('images/ali.jpg', width: 200.0, height: 200.0)),onTap: => Navigator.pop(context),),),);}}
看下最后的效果图:
该部分代码查看 animation_main.dart 文件
这一部分讲的比较多,小伙伴可以慢慢消化,下节我会尽量填下之前留下的状态管理的坑。
最后代码的地址还是要的:
文章中涉及的代码:demos
https://github.com/kukyxs/flutter_arts_demos_app
基于郭神 cool weather 接口的一个项目,实现 BLoC 模式,实现状态管理:flutter_weather
https://github.com/kukyxs/flutter_weather
一个课程(当时买了想看下代码规范的,代码更新会比较慢,虽然是跟着课上的一些写代码,但是还是做了自己的修改,很多地方看着不舒服,然后就改成自己的实现方式了):flutter_shop
https://github.com/kukyxs/flutter_shop
如果对你有帮助的话,记得给个 Star,先谢过,你的认可就是支持我继续写下去的动力~
往期Flutter系列文,保你一周掌握!(持续更新!!!)
-
Flutter从配置安装到填坑指南详解
-
Flutter 入门指北之 Dart
-
Flutter 入门指北之基础部件
-
Flutter 入门指北之快速搭建界面
-
Flutter 入门指北之常用布局
-
Flutter 入门指北之路由
-
Flutter 入门指北之输入处理(登录界面实战)
-
Flutter入门指北之Sliver 组件及NestedScrollView
-
Flutter 入门指北之弹窗和提示(干货)
记得好东西不要独享,要懂得分享,让大家一起学起来~
近期文章:
-
Google I/O 大会 你需要知道的一切
-
Google官宣:Flutter全平台称霸
今日问题:
今天你学了吗?