一、准备工作
使用rxtx操作串口时,配置相对有点复杂。本文是使用pi4j操作树莓派的串口。
1. 首先需要开启串口,参考文档:
http://hfwudao.cn/a/23.html
2. 安装pi4j
参考文档:https://pi4j.com/1.2/install.html
在线安装命令:
curl -sSL https://pi4j.com/install | sudo bash
二、源码
package com.xundh;
import com.pi4j.io.serial.*;
import com.pi4j.util.CommandArgumentParser;
import com.pi4j.util.Console;
import java.io.IOException;
import java.util.Date;
/**
 * This example code demonstrates how to perform serial communications using the Raspberry Pi.
 *
 * @author Robert Savage
 */
public class SerialExample {
 /**
 * This example program supports the following optional command arguments/options:
 * "--device (device-path)" [DEFAULT: /dev/ttyAMA0]
 * "--baud (baud-rate)" [DEFAULT: 38400]
 * "--data-bits (5|6|7|8)" [DEFAULT: 8]
 * "--parity (none|odd|even)" [DEFAULT: none]
 * "--stop-bits (1|2)" [DEFAULT: 1]
 * "--flow-control (none|hardware|software)" [DEFAULT: none]
 *
 * @param args
 * @throws InterruptedException
 * @throws IOException
 */
 public static void main(String args[]) throws InterruptedException, IOException {
 // !! ATTENTION !!
 // By default, the serial port is configured as a console port
 // for interacting with the Linux OS shell. If you want to use
 // the serial port in a software program, you must disable the
 // OS from using this port.
 //
 // Please see this blog article for instructions on how to disable
 // the OS console for this port:
 // https://www.cube-controls.com/2015/11/02/disable-serial-port-terminal-output-on-raspbian/
 // create Pi4J console wrapper/helper
 // (This is a utility class to abstract some of the boilerplate code)
 final Console console = new Console();
 // print program title/header
 console.title("<-- The Pi4J Project -->", "Serial Communication Example");
 // allow for user to exit program using CTRL-C
 console.promptForExit();
 // create an instance of the serial communications class
 final Serial serial = SerialFactory.createInstance();
 // create and register the serial data listener
 serial.addListener(new SerialDataEventListener() {
 @Override
 public void dataReceived(SerialDataEvent event) {
 // NOTE! - It is extremely important to read the data received from the
 // serial port. If it does not get read from the receive buffer, the
 // buffer will continue to grow and consume memory.
 // print out the data received to the console
 try {
 console.println("[HEX DATA] " + event.getHexByteString());
 console.println("[ASCII DATA] " + event.getAsciiString());
 } catch (IOException e) {
 e.printStackTrace();
 }
 }
 });
 try {
 // create serial config object
 SerialConfig config = new SerialConfig();
 // set default serial settings (device, baud rate, flow control, etc)
 //
 // by default, use the DEFAULT com port on the Raspberry Pi (exposed on GPIO header)
 // NOTE: this utility method will determine the default serial port for the
 // detected platform and board/model. For all Raspberry Pi models
 // except the 3B, it will return "/dev/ttyAMA0". For Raspberry Pi
 // model 3B may return "/dev/ttyS0" or "/dev/ttyAMA0" depending on
 // environment configuration.
 String port = SerialPort.getDefaultPort();
 config.device(port)
 .baud(Baud._38400)
 .dataBits(DataBits._8)
 .parity(Parity.NONE)
 .stopBits(StopBits._1)
 .flowControl(FlowControl.NONE);
 // parse optional command argument options to override the default serial settings.
 if(args.length > 0){
 config = CommandArgumentParser.getSerialConfig(config, args);
 }
 // display connection details
 console.box(" Connecting to: " + config.toString(),
 " We are sending ASCII data on the serial port every 1 second.",
 " Data received on serial port will be displayed below.");
 // open the default serial device/port with the configuration settings
 serial.open(config);
 // continuous loop to keep the program running until the user terminates the program
 while(console.isRunning()) {
 try {
 // write a formatted string to the serial transmit buffer
 serial.write("CURRENT TIME: " + new Date().toString());
 // write a individual bytes to the serial transmit buffer
 serial.write((byte) 13);
 serial.write((byte) 10);
 // write a simple string to the serial transmit buffer
 serial.write("Second Line");
 // write a individual characters to the serial transmit buffer
 serial.write(’\r’);
 serial.write(’\n’);
 // write a string terminating with CR+LF to the serial transmit buffer
 serial.writeln("Third Line");
 }
 catch(IllegalStateException ex){
 ex.printStackTrace();
 }
 // wait 1 second before continuing
 Thread.sleep(1000);
 }
 }
 catch(IOException ex) {
 console.println(" ==>> SERIAL SETUP FAILED : " + ex.getMessage());
 return;
 }
 }
}
运行时要使用sudo
sudo java -jar pi4jtest.jar --device /dev/ttyAMA0
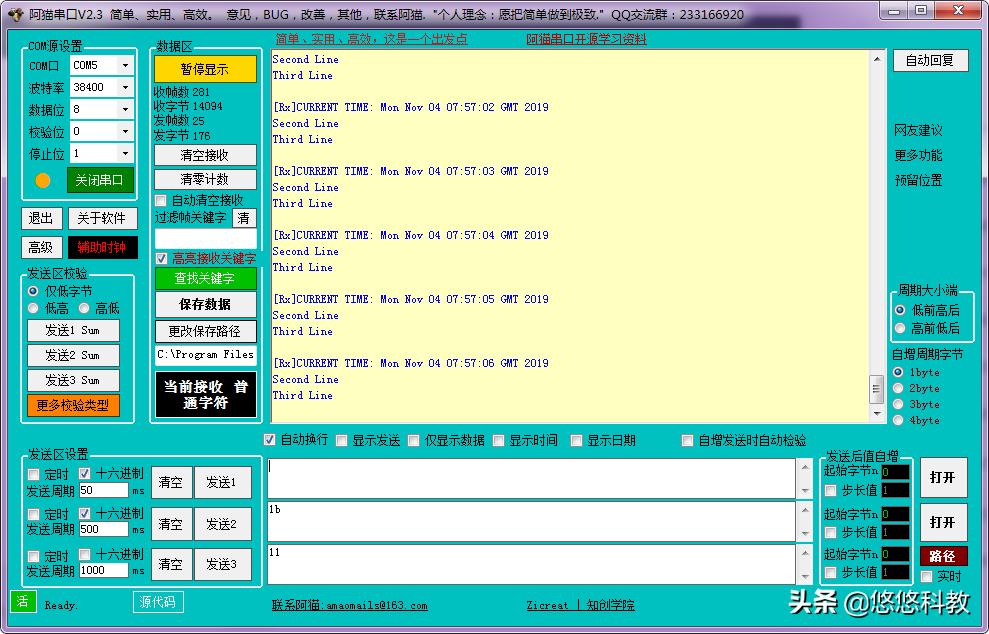
三、线路连接
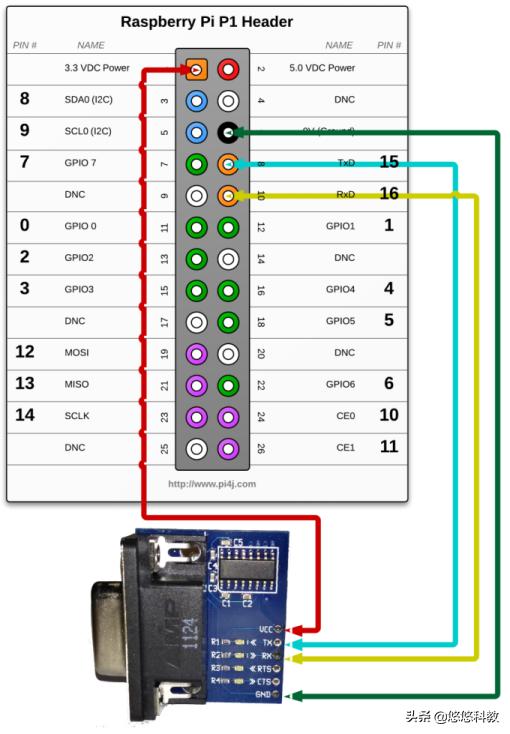
通过电脑连接串口,可以看到打印出来的字符串。
参考文档:
https://pi4j.com/1.2/example/serial.html
源码项目:
https://gitee.com/xundh/raspberry-java-pi4j