几天前,OpenAI宣布对GPT-4和GPT-3.5 API进行一些重大增强。这包括一些显著的成本降低,以及发布 GPT-16 模型的 3.5k 上下文窗口版本。但最大的新闻是将函数调用功能引入聊天完成端点。
ChatGPT API 的函数调用功能允许用户传递模型在需要帮助来执行其任务时可以调用的函数列表。这些不是实际的函数,而是函数调用签名的规范。通过将函数列表传递给LLM,我们为其提供了使用这些函数来回答所提出的问题的选项。它可以通过生成函数调用来做到这一点,该函数调用只是一个 JSON,其中包含要调用的函数的名称和函数参数的值。从本质上讲,此功能允许我们从 ChatGPT 获取 JSON 格式的输出。对于许多用户来说,这是一个主要的痛点,因为LLM并不总是按照提示给出JSON响应,从而导致应用程序中出现各种混乱的情况。
整个互联网都在谈论这个新功能。在本文中,我将带您完成一个教程,展示如何使用函数调用功能来实现类似 ChatGPT 的插件系统。我们将在 Flask 中构建一个聊天应用程序,并在其中逐步设计和实现一个插件系统,使其类似于 ChatGPT 插件系统。在本文结束时,我们将拥有一个完全工作的类似 ChatGPT 的应用程序,支持网页浏览插件和 Python 代码解释器插件。所以让我们开始吧!
GPT-4 和 GPT-3.5 API 中的函数调用简介
在查看函数调用之前,让我们先快速了解调用聊天完成 API 的基础知识。聊天组件 API 用于调用 ChatGPT 模型以完成用户提示。API 需要两个必需的参数: model 和 messages 。
- 模型:这描述了应该使用的模型。目前,我们可以选择使用 GPT-4 或 GPT-3.5-Turbo 模型。有关模型的完整和当前列表,请查看OpenAI的模型文档。
- 消息:这是表示用户与 ChatGPT 模型之间的聊天对话历史记录的消息列表。列表中的每条消息都是一个由角色和消息内容组成的 JSON 对象。角色可以采用以下三个可能的值之一:系统、用户和助理。系统角色用于设置模型行为及其个性。用户角色通常表示用户输入的消息,助手角色用于表示LLM本身生成的消息。
下面是一个示例,取自 OpenAI 文档:
import openai

openai.ChatCompletion.create(
  model="gpt-3.5-turbo",
  messages=[
        {"role": "system", "content": "You are a helpful assistant."},
        {"role": "user", "content": "Who won the world series in 2020?"},
        {"role": "assistant", "content": "The Los Angeles Dodgers won the World Series in 2020."},
        {"role": "user", "content": "Where was it played?"}
    ]
)
函数参数
新的函数调用功能为此 API 引入了另一个参数。此参数函数列表。每个函数有 3 个字段: name 、 description 及其 parameters 。 name 和 description 字段分别描述函数的名称及其功能。 parameters 字段描述函数采用的参数。为了使LLM能够生成准确的函数调用,需要使用JSON架构规范来描述这些参数。下面是一个名为 square 的函数的示例函数调用。
{
    "name": "square",
    "description": "square the given number",
    "parameters": {
        "type": "object",
        "properties": {
            "x": {
                "type": "integer",
                "description": "The number to be squared"
            }
        }
    }
}
如果我们向LLM发送提示,例如“计算214321223的平方”,它可能会返回如下所示的响应:
{
	'index': 0,
	'message': {
		'role': 'assistant',
		'content': None,
		'function_call': {
			'name': 'square',
			'arguments': '{\n  "x": 214321223}'
		}
	},
	'finish_reason': 'function_call'
}
当 LLM 在其响应中生成函数调用时,它会添加一个新字段 function_call ,其中包含 LLM 要调用的函数的名称以及该函数的参数值。我们可以轻松地读取响应中 function_call 字段的值并将其解析为 JSON。
如果LLM决定不进行函数调用,则不会设置响应中的 function_call 字段,而是在 content 字段中找到LLM的回复。通过检查响应中是否设置了 function_call 字段,我们可以知道 LLM 何时进行函数调用。
function_call API 参数
还有另一个可选参数作为函数调用的一部分引入。此参数称为 function_call ,它可以采用 3 个可能的值:
- none :如果我们不希望LLM生成函数调用,我们可以传递值为none的 function_call 。如果我们不向 API 传递任何函数,这是默认设置。
- auto :这允许LLM决定是否生成函数调用。如果已将多个函数传递给它,它可以选择最合适的一个。这是将函数传递给 API 时的默认设置。
- 函数名称:我们还可以传递特定函数的名称,例如,如果希望 LLM 生成对该函数的调用,则为 {“name”: “square”} 。
本质上,它是对LLM是否生成函数调用的提示。
如果您正在寻找使用函数调用的更详细示例,我建议您查看函数调用的 OpenAI 文档。我在本文中的重点是展示如何利用函数调用功能来实现更复杂的用例,例如构建类似 ChatGPT 的插件框架。
使用函数调用构建 ChatGPT 插件框架
利用函数调用参数从LLM生成JSON格式的输出只是这个新功能的最基本应用。然而,它为更复杂的应用开辟了可能性。通过将多个函数传递给 ChatGPT API 调用,LLM 可以根据需要有选择地调用其中任何一个函数来实现其目标。这允许涉及用户,LLM和函数的非线性流,LLM可以浏览一系列函数调用,通过问题与用户交互,并返回函数调用以得出最终答案。
例如,下图演示了此过程的工作原理。假设Web搜索和HTML抓取是传递给LLM的函数,它可以选择利用它们来回答超出其训练数据的用户查询。
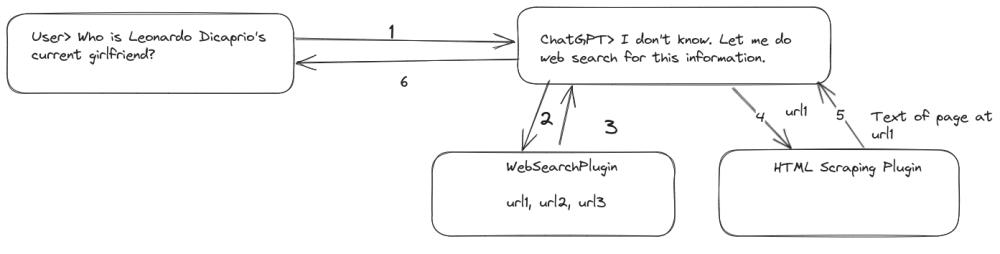
在某种程度上,这反映了 ChatGPT 插件的功能。根据分配的任务和启用的插件,ChatGPT 选择最合适的工具并在幕后执行必要的功能以获得答案。让我们开发一个简单的概念证明来演示此过程。我们将通过在 Python 中使用 Flask 构建一个聊天应用程序并在其中实现一个插件框架来实现这一点。
本文以下部分的所有代码均可在 GitHub 上找到: https://github.com/abhinav-upadhyay/chatgpt_plugins
设置需求和虚拟环境
让我们快速设置一个虚拟环境并安装此项目所需的依赖项。打开终端并执行以下命令:
mkdir chatgpt_plugins # create a directory for the projectcd chatgpt_pluginspython -m venv venv # create a virtual environment source venv/bin/activate # activate the virtual environmentpip install openai --upgradepip install flask requests python-dotenv
在这里,我们为项目创建了一个目录,设置了一个虚拟环境,并安装了必要的依赖项。
设置 OpenAI API 密钥
如果尚未获取,则需要从 OpenAI 获取 API 密钥才能进行 API 调用。为此,请转到OpenAI帐户页面,然后单击“创建新密钥”按钮以创建新密钥。创建密钥后,将其复制并保存在安全的地方。
创建密钥后,创建一个名为 OPEN_AI_KEY 的环境变量,并将密钥分配为其值。建议在项目中创建一个 .env 文件,并在其中声明环境变量。
OPEN_AI_KEY="<your api key here>"
在管理密钥时要格外小心,以避免任何泄漏,因为误用可能会导致大量费用。
创建应用结构
接下来,让我们为 Flask 应用程序创建结构。假设我们在项目的目录 ( chatgpt_plugins ) 内,执行以下命令:
mkdir -p app/templatestouch app/__init__.py
app 目录将包含我们应用程序的代码,模板目录将存储应用程序用户界面的 HTML 模板。
创建聊天界面
在创建 UI 方面,我不是很好,因为我想尽快发布这篇文章,所以我在 ChatGPT 的帮助下创建了简单的东西来让事情顺利进行。以下是聊天界面的 UI,我们将输入 templates/chat.html 。
<!DOCTYPE html>
<html>
  <head>
    <title>Chat App</title>
    <link
      rel="stylesheet"
      href="https://cdnjs.cloudflare.com/ajax/libs/bootstrap/5.3.0/css/bootstrap.min.css"
    />
    <style>
      .chat-container {
        max-width: 500px;
        margin: 0 auto;
        padding: 20px;
      }

      .message-list {
        list-style-type: none;
        padding: 0;
      }

      .message-list li {
        margin-bottom: 10px;
      }

      .message-list .sender-name {
        font-weight: bold;
        margin-bottom: 5px;
      }

      .message-list .message-content {
        background-color: #f6f6f6;
        padding: 10px;
        border-radius: 8px;
      }

      .input-box {
        display: flex;
        margin-top: 20px;
      }

      .input-box input[type="text"] {
        flex: 1;
        padding: 10px;
        border: 1px solid #ccc;
        border-radius: 4px;
        margin-right: 10px;
      }

      .input-box input[type="submit"] {
        background-color: #007bff;
        color: #fff;
        border: none;
        padding: 10px 15px;
        border-radius: 4px;
        cursor: pointer;
      }
    </style>
  </head>
  <body>
    <div class="chat-container">
      <h2>Chat App</h2>
      <ul class="message-list" id="messageList"></ul>
      <div class="input-box">
        <input type="text" id="messageInput" placeholder="Type your message" />
        <input type="submit" value="Send" id="sendButton" />
      </div>
    </div>

    <script>
        const conversationData = {{ conversation|tojson}};
        console.log(conversationData)

        const messageList = document.getElementById("messageList");
        const messageInput = document.getElementById("messageInput");
        const sendButton = document.getElementById("sendButton");

        function translateRole(role) {
          if (role == "user") {
            return "You";
          }
          return "ChatGPT";
        }

        function renderMessage(sender, message) {
          const listItem = document.createElement('li');
          const senderName = document.createElement('div');
          senderName.className = 'sender-name';
          senderName.innerText = sender;

          const messageContent = document.createElement('div');
          messageContent.className = 'message-content';
          messageContent.innerText = message;

          listItem.appendChild(senderName);
          listItem.appendChild(messageContent);
          messageList.appendChild(listItem);
        }
        // Render initial conversation data
        function renderConversation() {
          conversationData.forEach((item) => {
            const listItem = document.createElement("li");
            const senderName = document.createElement("div");
            senderName.className = "sender-name";
            senderName.innerText = translateRole(item.role);

            const messageContent = document.createElement("div");
            messageContent.className = "message-content";
            messageContent.innerText = item.content;

            listItem.appendChild(senderName);
            listItem.appendChild(messageContent);
            messageList.appendChild(listItem);
          });
        }

        // Handle message submission
        function submitMessage() {
        const message = messageInput.value.trim();
        if (message !== '') {
          renderMessage('You', message);
          messageInput.value = '';

          // Simulate backend API call
          fetch('/chat', {
            method: 'POST',
            headers: {
              'Content-Type': 'application/json'
            },
            body: JSON.stringify({ message })
          })
            .then(response => response.json())
            .then(data => {
              const responseMessage = data.message;
              renderMessage('ChatGPT', responseMessage);
            })
            .catch(error => {
              console.error('Error:', error);
            });
        }
      }

        // Bind event listeners
        sendButton.addEventListener("click", submitMessage);
        messageInput.addEventListener("keydown", (event) => {
          if (event.keyCode === 13) {
            event.preventDefault();
            submitMessage();
          }
        });

        // Render initial conversation
        renderConversation();
    </script>
  </body>
</html>
创建聊天模块
在我们围绕它构建插件框架之前,让我们从构建基本的聊天功能开始。我们将所有与实现聊天功能相关的代码放在 chat 模块中,该模块将位于 chat 包中。让我们继续创建这些组件:
mkdir app/chattouch app/chat/__init__.pytouch app/chat/chat.py
维护对话
在 chat 模块中,我们将创建一个类来维护用户和 ChatGPT 之间的对话。
import openai
import requests
import json
from typing import List, Dict
import uuid

class Conversation:
    """
    This class represents a conversation with the ChatGPT model.
    It stores the conversation history in the form of a list of
    messages.
    """
    def __init__(self):
        self.conversation_history: List[Dict] = []

    def add_message(self, role, content):
        message = {"role": role, "content": content}
        self.conversation_history.append(message)
对话中的每条消息都由消息的角色和内容组成,正如 ChatGPT API 所期望的那样。
创建聊天会话
接下来,我们将创建一个抽象来表示聊天会话。这并不复杂。
GPT_MODEL = "gpt-3.5-turbo-0613"
SYSTEM_PROMPT = """
    You are a helpful AI assistant. You answer the user's queries.
    NEVER make up an answer.
    If you don't know the answer,
    just respond with "I don't know".
"""

class ChatSession:
    """
    Represents a chat session.
    Each session has a unique id to associate it with the user.
    It holds the conversation history
    and provides functionality to get new response from ChatGPT
    for user query.
    """

    def __init__(self):
        self.session_id = str(uuid.uuid4())
        self.conversation = Conversation()
        self.conversation.add_message("system", SYSTEM_PROMPT)

    def get_messages(self) -> List[Dict]:
        """
        Return the list of messages from the current conversation
        """
        # Exclude the SYSTEM_PROMPT when returning the history
        if len(self.conversation.conversation_history) == 1:
            return []
        return self.conversation.conversation_history[1:]

    def get_chatgpt_response(self, user_message: str) -> str:
        """
        For the given user_message,
        get the response from ChatGPT
        """
        self.conversation.add_message("user", user_message)
        try:
            chatgpt_response = self._chat_completion_request(
                self.conversation.conversation_history
                )
            chatgpt_message = chatgpt_response.get("content")
            self.conversation.add_message("assistant", chatgpt_message)
            return chatgpt_message
        except Exception as e:
            print(e)
            return "something went wrong"

    def _chat_completion_request(self, messages: List[Dict]):
        headers = {
            "Content-Type": "application/json",
            "Authorization": "Bearer " + openai.api_key,
        }
        json_data = {"model": GPT_MODEL,
                     "messages": messages,
                     "temperature": 0.7}
        try:
            response = requests.post(
                "https://api.openai.com/v1/chat/completions",
                headers=headers,
                json=json_data,
            )
            return response.json()["choices"][0]["message"]
        except Exception as e:
            print("Unable to generate ChatCompletion response")
            print(f"Exception: {e}")
            return e
类由两个字段组成:
- session_id :这是用于标识用户与 ChatGPT 之间的会话的唯一 ID。它允许我们将一个唯一的 ChatSession 实例与每个用户相关联,确保他们的消息不会混淆。
- conversation :这是此用户的对话历史记录
get_chatgpt_response 方法是此类的重要组成部分。它充当获取用户消息并通过 API 调用从 ChatGPT 获取响应的主要接口。它还将用户的消息和 ChatGPT 的响应添加到对话历史记录中,确保对话顺利进行。
请务必注意,此方法未实现处理上下文窗口限制和在达到限制时排除较旧的消息。
连接 UI 和聊天后端
现在我们已经准备好将 UI 与后端连接起来。为此,我们将在应用程序目录中创建“routes.py”,我们将在其中定义聊天应用程序的所有端点。
首先,我们将为应用程序的根定义端点。
import os
from typing import Dict
from dotenv import load_dotenv
from flask import Flask, render_template, request, session, jsonify
from flask import Flask
from .chat.chat import ChatSession

load_dotenv()
app = Flask(__name__)
# flask requires a secret to use sessions.
app.secret_key = os.getenv("CHAT_APP_SECRET_KEY")


chat_sessions: Dict[str, ChatSession] = {}

@app.route("/")
def index():
    chat_session = _get_user_session()
    return render_template("chat.html", conversation=chat_session.get_messages())

def _get_user_session() -> ChatSession:
    """
    If a ChatSession exists for the current user return it
    Otherwise create a new session, add it into the session.
    """

    chat_session_id = session.get("chat_session_id")
    if chat_session_id:
        chat_session = chat_sessions.get(chat_session_id)
        if not chat_session:
            chat_session = ChatSession()
            chat_sessions[chat_session.session_id] = chat_session
            session["chat_session_id"] = chat_session.session_id
    else:
        chat_session = ChatSession()
        chat_sessions[chat_session.session_id] = chat_session
        session["chat_session_id"] = chat_session.session_id
    return chat_session
下面是上面的代码中发生的情况:
- 我们使用 dotenv 模块从 .env 文件中读取环境变量。
- 我们还需要在 .env 文件中设置另一个名为 CHAT_APP_SECRET_FILE 的环境变量。此变量的值可以是随机字符串。我们正在阅读它并将其用作烧瓶应用程序中的密钥。Flask 需要这样做来设置用户会话。
- _get_user_session() 函数是一个实用程序函数,用于检索与当前用户关联的 ChatSession 。我们使用 Flask 会话为每个用户存储一个 ChatSession 对象。在会话中,我们存储用户的聊天会话 ID。如果我们在会话中找到一个 ID,我们从 ChatSession 字典中查找相应的 chat_sessions 对象。如果当前用户没有现有会话,我们将创建一个新会话并将其存储在会话中。
- index 函数映射到应用程序的根目录。它检索当前用户的 ChatSession 并返回聊天 UI 模板。如果当前会话具有正在进行的对话,我们将所有这些消息发送到模板,以便它可以向用户显示历史对话。
现在,我们已准备好测试应用程序。但是,我们需要创建一个启动文件来启动 Flask 应用程序。在项目 ( chatgpt_plugins ) 的根目录中,我们将创建一个名为 run.py 的文件,并将以下样板代码放入其中,这使我们能够运行应用程序。
from app.routes import app

if __name__ == '__main__':
    app.run(host='0.0.0.0:5000', debug=True)
此时,我们可以对聊天进行测试运行。让我们这样做。在终端中,我们需要在项目的根目录 ( chatgpt_plugins ) 中运行以下命令。
flask --app run.py run
如果一切按计划进行,则应开始在端口 5000 上运行 Flask 服务器。您应该能够在 http://localhost:5000 访问应用程序 UI,它应类似于下面的屏幕截图:
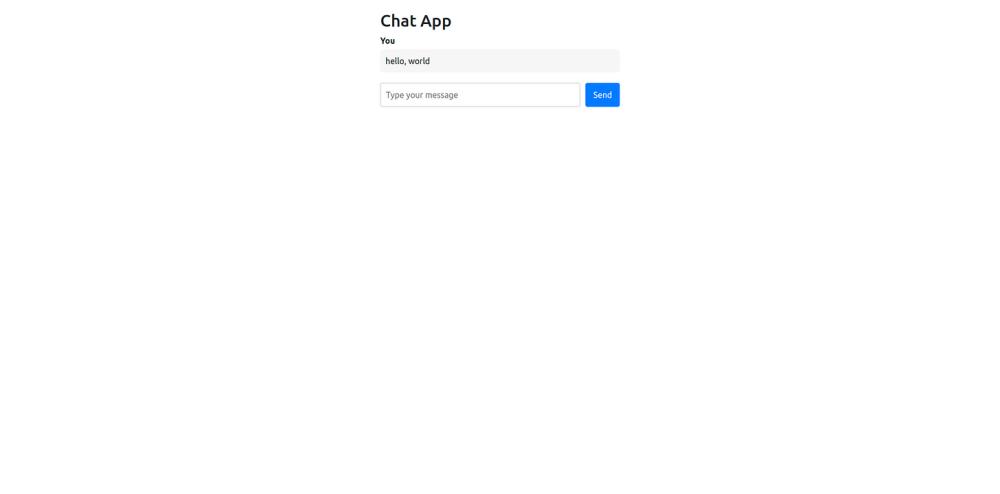
我输入了消息“hello, world”,但没有任何反应。这是意料之中的,因为我们还没有从 ChatGPT 返回响应的代码。接下来让我们这样做。
生成聊天GPT响应
我们只需要在 routes.py 中进行几行更改,以添加 UI 在提交消息时调用的 /chat 个终结点。让我们这样做。以下更改适用于 routes.py:
@app.route('/chat', methods=['POST'])
def chat():
    message: str = request.json['message']
    chat_session = _get_user_session()
    chatgpt_message = chat_session.get_chatgpt_response(message)
    return jsonify({"message": chatgpt_message})
就是这样!UI 在请求的 JSON 正文中发送用户的消息,我们在 chat() 函数的第一行读取该消息。我们将该消息传递给 get_chatgpt_response() 函数,并将来自 ChatGPT 的响应返回给 UI。
让我们尝试再次运行该应用程序,看看我们是否从 ChatGPT 得到响应。

它有效!现在基本的聊天功能已经工作了,我们可以开始实现插件了。
添加对 ChatGPT 的支持,如插件
为了合并多个插件,例如 Web 搜索插件或 python 代码解释器插件,我们需要为插件建立一个接口。一旦插件满足了这个接口的要求,我们就可以调用它,而不必担心具体的插件实现。为此,我们将在 chat 包中创建一个 plugins 包,如下所述:
# assuming we are in the root of our projectmkdir app/chat/pluginstouch app/chat/plugins/__init__.py
接下来,我们将在 plugin.py 中定义插件接口,如下所示:
# plugin.py

from abc import ABC, abstractmethod
from typing import Dict

class PluginInterface(ABC):

    @abstractmethod
    def get_name(self) -> str:
        """
        return the name of the plugin (should be snake case)
        """
        pass

    @abstractmethod
    def get_description(self) -> str:
        """
        return a detailed description of what the plugin does
        """
        pass

    @abstractmethod
    def get_parameters(self) -> Dict:
        """
        Return the list of parameters to execute this plugin in the form of
        JSON schema as specified in the OpenAI documentation:
        https://platform.openai.com/docs/api-reference/chat/create#chat/create-parameters
        """
        pass

    @abstractmethod
    def execute(self, **kwargs) -> Dict:
        """
        Execute the plugin and return a JSON serializable dict.
        The parameters are passed in the form of kwargs
        """
        pass
PluginInterface 是一个抽象类,它定义了任何插件实现都应遵循的 API。让我们详细讨论这些 API。
- get_name 、 get_description 和 get_parameters 方法分别返回插件的名称、描述和必需参数。此信息对于将函数参数传递给聊天完成 API 是必需的,我们在本文前面讨论了该 API。插件的描述特别重要,因为LLM根据描述中提供的信息确定要调用的函数。
- 当我们想要执行插件时,调用 execute 方法。此方法应返回 JSON 可序列化字典,因为结果将返回到 LLM,LLM 将从中提取任何相关信息。将返回值保留为 JSON 可使接口灵活,因为不同的插件在其返回值中可能具有不同的复杂性。
网络搜索插件
现在,让我们实现我们的第一个插件。我们将首先使用 Brave 搜索 API 创建一个简单的 Web 搜索插件。如果您正在跟进,则需要使用 Brave 创建一个免费帐户,并获取免费计划的 API 密钥。虽然他们要求提供信用卡信息,但免费计划不收取任何费用。它限制我们每秒 1 个请求和每月 2000 个请求,这对于这个玩具项目来说已经足够了。获取密钥后,将新的环境变量添加到 .env 文件中,如下所示:
BRAVE_API_KEY="<your Brave API key>"
接下来,在 plugins 包中,创建一个名为 websearch.py 的新文件以包含 Web 搜索插件的实现。这是它的代码:
from .plugin import PluginInterface
from typing import  Dict
import requests
import os

BRAVE_API_KEY = os.getenv("BRAVE_API_KEY")
BRAVE_API_URL = "https://api.search.brave.com/res/v1/web/search"


class WebSearchPlugin(PluginInterface):
    def get_name(self) -> str:
        """
        return the name of the plugin (should be snake case)
        """
        return "websearch"

    def get_description(self) -> str:
        return """
        Executes a web search for the given query
        and returns a list of snipptets of matching
        text from top 10 pages
        """


    def get_parameters(self) -> Dict:
        """
        Return the list of parameters to execute this plugin in the form of
        JSON schema as specified in the OpenAI documentation:
        https://platform.openai.com/docs/api-reference/chat/create#chat/create-parameters
        """
        parameters = {
            "type": "object",
            "properties": {
                "q": {
                    "type": "string",
                    "description": "the user query"
                }
            }
        }
        return parameters

    def execute(self, **kwargs) -> Dict:
        """
        Execute the plugin and return a JSON response.
        The parameters are passed in the form of kwargs
        """

        headers = {
            "Accept": "application/json",
            "X-Subscription-Token": BRAVE_API_KEY
        }

        params = {
            "q": kwargs["q"]
        }

        response = requests.get(BRAVE_API_URL,
                                headers=headers,
                                params=params)

        if response.status_code == 200:
            results = response.json()['web']['results']
            snippets = [r['description'] for r in results]
            return {"web_search_results": snippets}
        else:
            return {"error":
                    f"Request failed with status code: {response.status_code}"}
所有这些都非常简单。 WebSearchPlugin 只是实现 PluginInterface 类中定义的接口。 execute 函数对 Brave 搜索 API 进行 API 调用并返回响应。
我应该指出,Brave 的完整回应是广泛的。但是,由于我们使用的是 GPT-4 的 3.5k 上下文版本,因此我们的空间有限。因此,我们没有将所有详细信息发送到 ChatGPT,而是通过仅包含前 10 个匹配结果的片段来采取捷径。最好将 URL 发送到 ChatGPT,以便在需要时可以抓取这些结果的文本以提供答案。
将网络搜索插件集成到聊天应用程序中
让我们通过将 Web 搜索插件添加到聊天应用程序来测试此集成是否有效。我们需要在 chat 模块中进行一些小的更改。打开 chat.py 并进行以下修改:
from .plugins.plugin import PluginInterface
from .plugins.websearch import WebSearchPlugin

SYSTEM_PROMPT = """
    You are a helpful AI assistant. You answer the user's queries.
    When you are not sure of an answer, you take the help of
    functions provided to you.
    NEVER make up an answer if you don't know, just respond
    with "I don't know" when you don't know.
"""

class ChatSession:

    def __init__(self):
        self.session_id = str(uuid.uuid4())
        self.conversation = Conversation()
        self.plugins: Dict[str, PluginInterface] = {}
        self.register_plugin(WebSearchPlugin())
        self.conversation.add_message("system", SYSTEM_PROMPT)

    def register_plugin(self, plugin: PluginInterface):
        """
        Register a plugin for use in this session
        """
        self.plugins[plugin.get_name()] = plugin

    def _get_functions(self) -> List[Dict]:
        """
        Generate the list of functions that can be passed to the chatgpt
        API call.
        """
        return [self._plugin_to_function(p) for
                p in self.plugins.values()]

    def _plugin_to_function(self, plugin: PluginInterface) -> Dict:
        """
        Convert a plugin to the function call specification as
        required by the ChatGPT API:
        https://platform.openai.com/docs/api-reference/chat/create#chat/create-functions
        """
        function = {}
        function["name"] = plugin.get_name()
        function["description"] = plugin.get_description()
        function["parameters"] = plugin.get_parameters()
        return function

    def _execute_plugin(self, func_call) -> str:
        """
        If a plugin exists for the given function call, execute it.
        """
        func_name = func_call.get("name")
        print(f"Executing plugin {func_name}")
        if func_name in self.plugins:
            arguments = json.loads(func_call.get("arguments"))
            plugin = self.plugins[func_name]
            plugin_response = plugin*ex.e**cute(**arguments)
        else:
            plugin_response = {"error": f"No plugin found with name {func_call}"}

        # We need to pass the plugin response back to ChatGPT
        # so that it can process it. In order to do this we
        # need to append the plugin response into the conversation
        # history. However, this is just temporary so we make a
        # copy of the messages and then append to that copy.
        print(f"Response from plugin {func_name}: {plugin_response}")
        messages = list(self.conversation.conversation_history)
        messages.append({"role": "function",
                         "content": json.dumps(plugin_response),
                         "name": func_name})
        next_chatgpt_response = self._chat_completion_request(messages)

        # If ChatGPT is asking for another function call, then
        # we need to call _execute_plugin again. We will keep
        # doing this until ChatGPT keeps returning function_call
        # in its response. Although it might be a good idea to
        # cut it off at some point to avoid an infinite loop where
        # it gets stuck in a plugin loop.
        if next_chatgpt_response.get("function_call"):
            return self._execute_plugin(next_chatgpt_response.get("function_call"))
        return next_chatgpt_response.get("content")

    def get_chatgpt_response(self, user_message: str) -> str:
        """
        For the given user_message,
        get the response from ChatGPT
        """
        self.conversation.add_message("user", user_message)
        try:
            chatgpt_response = self._chat_completion_request(
                self.conversation.conversation_history)

            if chatgpt_response.get("function_call"):
                chatgpt_message = self._execute_plugin(
                    chatgpt_response.get("function_call"))
            else:
                chatgpt_message = chatgpt_response.get("content")
            self.conversation.add_message("assistant", chatgpt_message)
            return chatgpt_message
        except Exception as e:
            print(e)
            return "something went wrong"
突出显示的行表示我们为集成插件所做的添加或修改。让我们简要讨论一下它们。
- 我们在 SYSTEM_PROMPT 中做了一个小的更改,以便向 LLM 指示它需要根据需要使用函数。虽然我不确定它是否真的需要,因为 OpenAI 的文档说最新版本的模型经过微调,可以根据需要自动生成函数调用。
- 在 ChatSession 类中,我们添加了一个字典来维护插件及其名称的映射。可以调用 register_plugin 方法来注册新插件。目前,我们正在以 __init__ 方法自己启用网络搜索插件。
- _get_functions() 方法是一个实用程序函数,用于生成要传递给 ChatGPT API 的 functions 参数(如果注册了任何插件)。
- 最后, _execute_plugin() 方法是此实现的核心。如果 LLM 在其响应中返回 function_call ,我们使用 LLM 响应中返回的 3 字段的值调用 _execute_plugin 。请求的插件被执行,其响应被发送回LLM进行处理。如果LLM需要调用另一个函数来执行其任务,它可能会在其响应中请求另外 function_call 个函数。只要它继续请求函数调用,我们就会继续调用 _execute_plugin() 。但是,如果LLM卡住,这可能会导致无限循环,但为了简单起见,这里不处理。
- 在 get_chatgpt_response() 方法中,我们添加了一个检查以查看 LLM 是否在其响应中返回了 function_call 。如果它请求了函数调用,我们调用 _execute_plugin() 。否则,我们将消息从 ChatGPT 返回到 UI。
通过这些更改,我们已准备好尝试网络搜索功能。让我们看看它的实际效果。
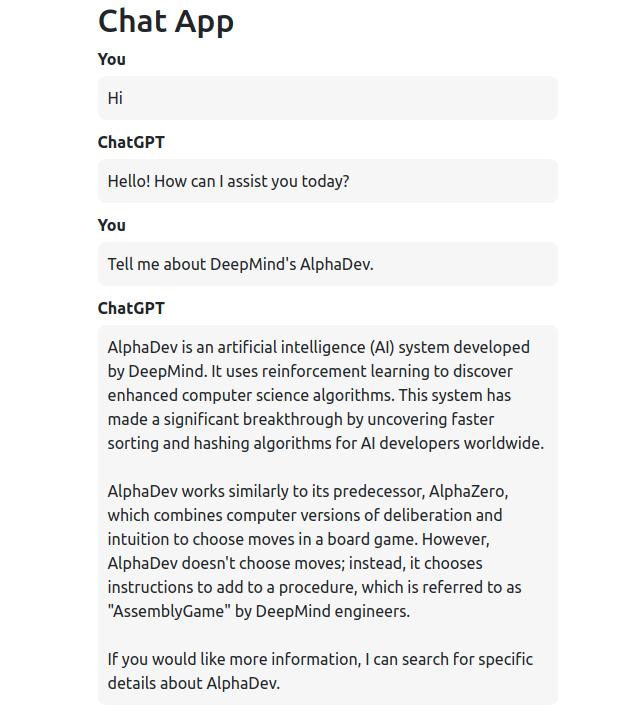
如您所见,当被要求提供像 DeepMind 的 AlphaDev 这样的最新内容时,它能够提供准确的信息,因为在幕后它正在调用我们的 websearch 插件来检索这些信息。
实现 Python 代码解释器插件
如果没有 Python 代码解释器插件,我们的插件生态系统将是不完整的。让我们快速实现它。在 plugins 模块中,我们将创建一个 pythoninterpreter.py 文件并添加以下代码。
from .plugin import PluginInterface
from typing import Dict
from io import StringIO
import sys
import traceback

class PythonInterpreterPlugin(PluginInterface):
    def get_name(self) -> str:
        """
        return the name of the plugin (should be snake case)
        """
        return "python_interpreter"

    def get_description(self) -> str:
        return """
        Execute the given python code return the result from stdout.
        """

    def get_parameters(self) -> Dict:
        """
        Return the list of parameters to execute this plugin in
        the form of JSON schema as specified in the
        OpenAI documentation:
        https://platform.openai.com/docs/api-reference/chat/create#chat/create-parameters
        """

        return {
            "type": "object",
            "properties": {
                "code": {
                    "type": "string",
                    "description": "Python code which is to be executed"
                }
            }
        }


    def execute(self, **kwargs) -> Dict:
        """
        Execute the plugin and return a JSON response.
        The parameters are passed in the form of kwargs
        """
        output = StringIO()

        try:
            global_namespace = {}
            local_namespace = {}
            sys.stdout = output
            exec(kwargs['code'], local_namespace, global_namespace)
            result = output.getvalue()
            if not result:
                return {'error': 'Not result written to stdout. Please print result on stdout'}
            return {"result": result}
        except Exception:
            error = traceback.format_exc()
            return {"error": error}
        finally:
            sys.stdout = sys.__stdout__
该插件接受一个参数,即 ChatGPT 本身生成的代码。执行此代码是为了向用户的查询提供答案。插件的核心功能在于 execute 方法。但是,在应用程序进程中执行任意代码是非常危险的,应避免。尽管如此,由于这只是一个玩具代码解释器插件,不适用于生产,因此让我们保持简单。
为了执行代码,我们直接将其传递给 exec 函数。由于我们对正在执行的代码一无所知,因此我们不确定如何获取其结果。为了克服这个问题,我让 ChatGPT 将结果打印在 stdout 上,以便我可以从那里读取它。通过将 sys.stdout 重定向到 StringIO 对象,我们可以读取写入 stdout 的任何输出。尽管这种方法并不完全安全可靠,但对于这个有限的演示来说已经足够了。一个稍微好一点的替代方案是生成一个新的 Python 进程,在该进程中执行代码,并读取其标准输出。
尽管此插件的实现存在上述缺点,但我们仍然可以将其集成到应用程序中并对其进行测试。为此,我们只需要在 chat.py 中注册插件,如下所示:
from .plugins.pythoninterpreter import PythonInterpreterPlugin
...

class ChatSession:
    def __init__(self):
        …
        self.register_plugin(PythonInterpreterPlugin())
让我们试一试。

如您所见,通过添加代码解释器插件,LLM现在能够执行数*运学**算。在幕后,它只是生成对我们插件的调用。
总结
现在是结束这篇相当冗长的帖子的时候了。在这篇文章中,我们了解了为 GPT-4 和 GPT-3.5 聊天模型引入的新功能调用功能,并探讨了如何将此功能用于复杂的用例,例如实现类似 ChatGPT 的插件。此功能的可能性是无穷无尽的。例如,您还可以创建类似于 AutoGPT 的代理或具有一组特定函数的更专门的代理。唯一的限制是你的想象力。
资源
本文中显示的所有代码都可以在 MIT 许可下的 GitHub 上找到。随意使用它:https://github.com/abhinav-upadhyay/chatgpt_plugins
原文:https://codeconfessions.substack.com/p/creating-chatgpt-plugins-using-the