由于代码太多,文章中的附件放置尾部
一、使用create-react-app创建react应用
1. 准备工作
Ø 安装node.js和npm
Ø 安装cnpm 命令:npm install -g cnpm --registry=https://registry.npm.taobao.org
Ø 安装yarn( 查看附件一 )
2. 创建项目并启动
Ø 第一步,全局安装:npm i -g create-react-app
Ø 第二步,切换到想创项目的目录,使用命令:create-react-app hello-react
Ø 第三步,进入项目文件夹:cd hello-react
Ø 第四步,启动项目:npm start
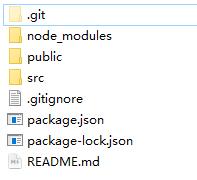
3. react脚手架项目结构
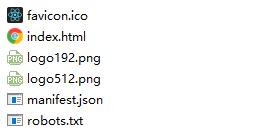
public ---- 静态资源文件夹
favicon.icon ------ 网站页签图标
index.html -------- 主页面
logo192.png ------- logo图
logo512.png ------- logo图
manifest.json ----- 应用加壳的配置文件
robots.txt -------- 爬虫协议文件
index页面:
<!DOCTYPE html>
<html lang="en">
   <head>
     <meta charset="utf-8" />
     <!--%PUBLIC_URL%代表public文件夹的路径-->
     <link rel="icon" href="%PUBLIC_URL%/favicon.ico" />
     <!--开启理想视口,用于做移动端网页的适配-->
     <meta name="viewport" content="width=device-width, initial-scale=1" />
     <!--用于配置浏览器页签+地址栏的颜色(仅支持安卓手机浏览器)-->
     <meta name="theme-color" content="#000000" />
     <meta
       name="description"
       content="Web site created using create-react-app"
     />
     <!-- 用于指定网页添加到手机主屏幕后的图标 -->
     <link rel="apple-touch-icon" href="%PUBLIC_URL%/logo192.png" />
     <!-- 应用加壳时的配置文件 -->
     <link rel="manifest" href="%PUBLIC_URL%/manifest.json" />

     <title>React App</title>
   </head>
   <body>
     <!-- 若llq不支持js则展示标签中的内容 -->
     <noscript>You need to enable JavaScript to run this app.</noscript>
     <div id="root"></div>
   </body>
</html>
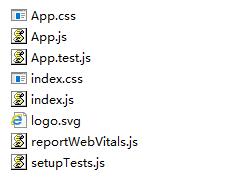
src ---- 源码文件夹
App.css -------- App组件的样式
App.js --------- App组件
App.test.js ---- 用于给App做测试
index.css ------ 样式
index.js ------- 入口文件
logo.svg ------- logo图
reportWebVitals.js------ 页面性能分析文件(需要web-vitals库的支持)
setupTests.js------ 组件单元测试的文件(需要jest-dom库的支持)
注意: 组件js文件除了 首字母大写 ,还可以将后缀改为 jsx ,来和普通js文件进行区分
4. Helloworld案例
Ø 创建Hello和welcome组件
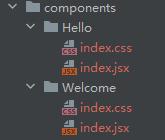
Ø Hello==index.jsx

import React, {Component} from 'react';
import hello from './index.css'

class Hello extends Component {
 render() {
   return (
     <div>
     	<h2 className={hello.title}>hello,react!</h2>
     </div>
   );
 }
}
export default Hello;

Ø Hello==idnex.css

.title{
 	background-color: orange;
}

Ø Welcome==index.jsx

import React, {Component} from 'react';
import './index.css'

class Welcome extends Component {
 render() {
   return (
     <div>
     	<h2 className='title'>Welcome</h2>
     </div>
   );
 }
}
export default Welcome;

Ø Welcome==index.css

.title{
 	background-color: skyblue;
}

Ø APP.js

import Hello from "./components/Hello";
import Welcome from "./components/Welcome";
import React, {Component} from 'react';

class App extends Component {
 render() {
   return (
     <div>
       <Hello/>
       <Welcome/>
     </div>
   );
 }
}
export default App;

Ø index.js

//react核心库
import React from 'react';
import ReactDOM from 'react-dom';
//app组件
import App from './App';

ReactDOM.render(<App/>, document.getElementById('root'));
|

5. 功能界面的组件化编码流程(通用)
1. 拆分组件: 拆分界面,抽取组件
2. 实现静态组件: 使用组件实现静态页面效果
3. 实现动态组件
3.1 动态显示初始化数据
3.1.1 数据类型
3.1.2 数据名称
3.1.2 保存在哪个组件?
3.2 交互(从绑定事件监听开始)
附件一
附件一:yarn安装
Ø yarn的安装:
npm install -g yarn
Ø 查看版本:
yarn --version
Ø Yarn 淘宝源安装
yarn config set registry https://registry.npm.taobao.org -g
yarn config set sass_binary_site http://cdn.npm.taobao.org/dist/node-sass -g
Ø yarn的常用命令
1、安装yarn
npm install -g yarn
2、安装成功后,查看版本号:
yarn --version
3、创建文件夹 yarn
md yarn
4、进入yarn文件夹
cd yarn
5、初始化项目
yarn init // 同npm init,执行输入信息后,会生成package.json文件
5、yarn的配置项:
yarn config list // 显示所有配置项
yarn config get <key> //显示某配置项
yarn config delete <key> //删除某配置项
yarn config set <key> <value> [-g|--global] //设置配置项
6、安装包:
yarn install //安装package.json里所有包,并将包及它的所有依赖项保存进yarn.lock
yarn install --flat //安装一个包的单一版本
yarn install --force //强制重新*载下**所有包
yarn install --production //只安装dependencies里的包
yarn install --no-lockfile //不读取或生成yarn.lock
yarn install --pure-lockfile //不生成yarn.lock
7、添加包(会更新package.json和yarn.lock):
yarn add [package] // 在当前的项目中添加一个依赖包,会自动更新到package.json和yarn.lock文件中
yarn add [package]@[version] // 安装指定版本,这里指的是主要版本,如果需要精确到小版本,使用-E参数
yarn add [package]@[tag] // 安装某个tag(比如beta,next或者latest)
//不指定依赖类型默认安装到dependencies里,你也可以指定依赖类型:
yarn add --dev/-D // 加到 devDependencies
yarn add --peer/-P // 加到 peerDependencies
yarn add --optional/-O // 加到 optionalDependencies
//默认安装包的主要版本里的最新版本,下面两个命令可以指定版本:
yarn add --exact/-E // 安装包的精确版本。例如yarn add foo@1.2.3会接受1.9.1版,但是yarn add foo@1.2.3 --exact只会接受1.2.3版
yarn add --tilde/-T // 安装包的次要版本里的最新版。例如yarn add foo@1.2.3 --tilde会接受1.2.9,但不接受1.3.0
8、发布包
yarn publish
9、移除一个包
yarn remove <packageName>:移除一个包,会自动更新package.json和yarn.lock
10、更新一个依赖
yarn upgrade 用于更新包到基于规范范围的最新版本
11、运行脚本
yarn run 用来执行在 package.json 中 scripts 属性下定义的脚本
12、显示某个包的信息
yarn info <packageName> 可以用来查看某个模块的最新版本信息
13、缓存
yarn cache
yarn cache list # 列出已缓存的每个包
yarn cache dir # 返回 全局缓存位置
yarn cache clean # 清除缓存
结语:
把所有美好都给你
你值得
我愿意
回复react笔记,可以获得全套笔记
react高质量笔记_9(Diffing算法)
react高质量笔记_8(组件的生命周期)