本篇主要讲websocket的服务端实现,主要基于Tomcat9.0,关于登录,用户列表下篇再讲,
前端可以借鉴上篇文章,地址如下:
自己动手实现基于websocket的聊天web聊天功能高仿仿qq
基于Tomcat9的websocket服务实现
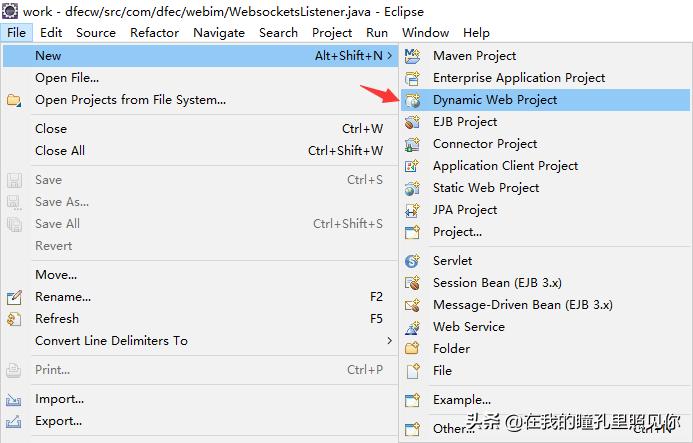
首先创建一个javaweb项目(此处以eclipse开发工具为例)
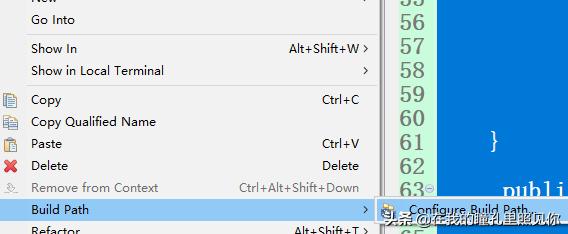
然后选中项目build path
假如tomcat的依赖jar包
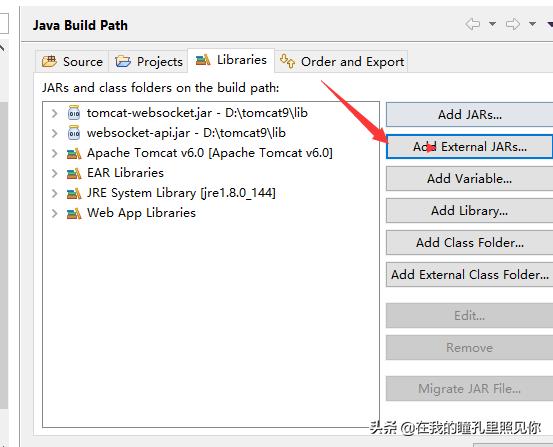
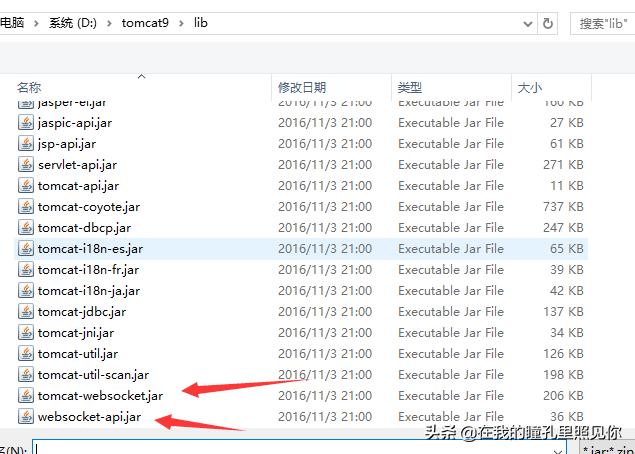
websocket-api.jar
tomcat-websocket.jar
这样就可以了
下面是websocket的简单的实现:
此处“imchat”为访问路径,“{id}”为需传递的参数,是OnOpen时接收的参数这两处变量名需要写一样,如果是多参数可以后面继续追加如/imchat/{id}/{name}
@ServerEndpoint(value="/imchat/{id}")
public class ImSocket {
//静态变量,用来记录当前在线连接数。应该把它设计成线程安全的。
private static int onlineCount = 0;
//concurrent包的线程安全Set,用来存放每个客户端对应的MyWebSocket对象。若要实现服务端与单一客户端通信的话,可以使用Map来存放,其中Key可以为用户标识
private static CopyOnWriteArraySet<ImSocket> webSocketSet = new CopyOnWriteArraySet<ImSocket>();
//与某个客户端的连接会话,需要通过它来给客户端发送数据
private Session session;
/**
* 连接建立成功调用的方法,只在建立连接时调用
* @param session 可选的参数。session为与某个客户端的连接会话,需要通过它来给客户端发送数据
*/
@OnOpen
public void onOpen(@PathParam("id") String id,Session session){
this.session = session;
webSocketSet.add(this); //加入set中
addOnlineCount(); //在线数加1
System.out.println("有新连接加入!当前在线人数为" + getOnlineCount());
}
/**
* 连接关闭调用的方法
*/
@OnClose
public void onClose(){
webSocketSet.remove(this); //从set中删除
subOnlineCount(); //在线数减1
System.out.println("有一连接关闭!当前在线人数为" + getOnlineCount());
}
/**
* 收到客户端消息后调用的方法,连接后所有交互数据都在此处理
* @param message 客户端发送过来的消息
* @param session 可选的参数
*/
@OnMessage
public void onMessage(String message, Session session) {
System.out.println("来自客户端的消息:" + message);
//群发消息
for(ImSocket item: webSocketSet){
try {
item.sendMessage(message);
} catch (IOException e) {
e.printStackTrace();
continue;
}
}
}
/**
* 发生错误时调用
* @param session
* @param error
*/
@OnError
public void onError(Session session, Throwable error){
System.out.println("发生错误");
error.printStackTrace();
}
/**
* 这个方法与上面几个方法不一样。没有用注解,是根据自己需要添加的方法。
* @param message
* @throws IOException
*/
public void sendMessage(String message) throws IOException{
this.session.getBasicRemote().sendText(message);
//this.session.getAsyncRemote().sendText(message);
}
public static synchronized int getOnlineCount() {
return onlineCount;
}
public static synchronized void addOnlineCount() {
ImSocket.onlineCount++;
}
public static synchronized void subOnlineCount() {
ImSocket.onlineCount--;
}
}
前端测试代码
<!DOCTYPE html>
<html>
<head>
<title>Java后端WebSocket的Tomcat实现</title>
</head>
<body>
Welcome<br/><input id="text" type="text"/>
<button onclick="send()">发送消息</button>
<hr/>
<button onclick="closeWebSocket()">关闭WebSocket连接</button>
<hr/>
<div id="message"></div>
</body>
<script type="text/javascript">
var websocket = null;
//判断当前浏览器是否支持WebSocket
if (’WebSocket’ in window) {
websocket = new WebSocket("ws://localhost:8080/项目名/imchat/id123");
}
else {
alert(’当前浏览器 Not support websocket’)
}
//连接发生错误的回调方法
websocket.onerror = function () {
setMessageInnerHTML("WebSocket连接发生错误");
};
//连接成功建立的回调方法
websocket.onopen = function () {
setMessageInnerHTML("WebSocket连接成功");
}
//接收到消息的回调方法
websocket.onmessage = function (event) {
setMessageInnerHTML(event.data);
}
//连接关闭的回调方法
websocket.onclose = function () {
setMessageInnerHTML("WebSocket连接关闭");
}
//监听窗口关闭事件,当窗口关闭时,主动去关闭websocket连接,防止连接还没断开就关闭窗口,server端会抛异常。
window.onbeforeunload = function () {
closeWebSocket();
}
//将消息显示在网页上
function setMessageInnerHTML(innerHTML) {
document.getElementById(’message’).innerHTML += innerHTML + ’<br/>’;
}
//关闭WebSocket连接
function closeWebSocket() {
websocket.close();
}
//发送消息
function send() {
var message = document.getElementById(’text’).value;
websocket.send(message);
}
</script>
</html>
以上是简单的websocket后端与前端的连接与交互,以上测试通过后咱们写一下我们聊天的简单实现
基于上面的认识我们已经能够实现简单的前端与websocket服务端的交互,下面我们接着上篇的自己动手实现基于websocket的聊天web聊天功能高仿仿qq
首先我们看一下qq的逻辑,简单的讲就这 三步,登录---》获取好友列表---》发送消息给好友;
第一步登录和获取好友列表,这个我们有两种方式去实现,一种是http请求,一种是websocket去实现,考虑到这样请求websocket会使处理流程变的复杂,所以我们采用http的方式实现,这样我们得websocket主要用来处理消息转发 服务,
首先我们创建一个实体作为消息的承载体
public class ImMsgModel {
	 private boolean system;//消息类型
	 private String key;//事件类型// offline离线消息 online在线消息
	 private String avatar;
	 private String id;
	 private String sign;
	 private String status;
	 private String username;
	 private String name;
	 private String type;
	 private String content;
	 private long timestamp;
	 private String fromid;

		public boolean isSystem() {
			return system;
		}
		public void setSystem(boolean system) {
			this.system = system;
		}
		public String getKey() {
			return key;
		}
		public void setKey(String key) {
			this.key = key;
		}
		public String getId() {
			return id;
		}
		public void setId(String id) {
			this.id = id;
		}
		public long getTimestamp() {
			return timestamp;
		}
		public void setTimestamp(long timestamp) {
			this.timestamp = timestamp;
		}
		public String getFromid() {
			return fromid;
		}
		public void setFromid(String fromid) {
			this.fromid = fromid;
		}
		public void setAvatar(String avatar) {
	 this.avatar = avatar;
	 }
	 public String getAvatar() {
	 return avatar;
	 }
	 public void setSign(String sign) {
	 this.sign = sign;
	 }
	 public String getSign() {
	 return sign;
	 }
	 public void setStatus(String status) {
	 this.status = status;
	 }
	 public String getStatus() {
	 return status;
	 }
	 public void setUsername(String username) {
	 this.username = username;
	 }
	 public String getUsername() {
	 return username;
	 }
	 public void setName(String name) {
	 this.name = name;
	 }
	 public String getName() {
	 return name;
	 }
	 public void setType(String type) {
	 this.type = type;
	 }
	 public String getType() {
	 return type;
	 }
	 public void setContent(String content) {
	 this.content = content;
	 }
	 public String getContent() {
	 return content;
	 }
第二步我们对websocket进行封装,此处消息实体根据layim前端封装,需要了解详情的请移步layui官网访问layim模块
@ServerEndpoint(value="/imchat/{id}")
public class WebsocketsListener {

	 private static final Set<WebsocketsListener> connections = new CopyOnWriteArraySet<WebsocketsListener>();
	 private Session session;
	 private String userid;

	Logger log = null;
	public WebsocketsListener() {
		log = Logger.getGlobal();
	}

	 @OnOpen
	public void start(@PathParam(value="id") String id,Session session) {
		// TODO Auto-generated method stub
		//log.log(Level.INFO, "打开监听onOpen");
		this.session=session;
		this.userid=id;
		connections.add(this);
//		Redis.use().hmset("userid="+id, hash);
		System.out.println(id+"用户session:"+session);
	}
	@OnMessage
 public void incoming(String message) {
		 log.info("------------------"+message);
	 try {
	 	 ImMsgModel m = JSON.parseObject(message, ImMsgModel.class);
	 	 System.out.println(m.getFromid()+"发送给"+m.getId());

	 	 Session s = getSessionByID(m.getId());//接收者id

	 	 //消息接收方掉线
				if(s==null){
					 Session s1 = getSessionByID(m.getFromid());
					 //发送方也不在线
					 if(s1==null) {
						 log.info( "用户已掉线线");
					 }else {
						 //发送消息给消息发送方提示消息接收方掉线
						 ImMsgModel msg = new ImMsgModel();
						 msg.setKey("offline");
						 msg.setSystem(true);
						 msg.setId(m.getId());
						 msg.setType("friend");
						 msg.setContent("对方已掉线");
						 log.info( "对方已掉线");
						 send2user(JSON.toJSONString(msg), s1);
					 }
				}else{
					//发送消息给消息接收方
					 m.setId(m.getFromid());
					 m.setKey("online");
					 send2user(JSON.toJSONString(m), s);
				}

	 } catch (Exception e) {
	 // TODO Auto-generated catch block
	 e.printStackTrace();
	 }

	 }
	private Session getSessionByID(String id) {
		System.out.println("连接用户数"+connections.size());
		for (WebsocketsListener wb : connections) {
			 //接收对象id对应的session
 		if(id.equals(wb.userid)) {
 			return wb.session;
 		}
 	}
		return null;
	}
	@OnClose
 public void end() {
		connections.remove(this);
	 }

	@OnError
	 public void onError(Throwable t) throws Throwable {
		log.info( "发生错误onError");
		t.printStackTrace();
	}

	private void send2user(String msg,Session session){
			 try {
					 session.getBasicRemote().sendText(msg);
			} catch (IOException e) {
				e.printStackTrace();
			}

	}

	 public static void sendAll(String string) {
			 for (WebsocketsListener wb : connections) {
	 	try {
	 			wb.session.getBasicRemote().sendText(string);
					} catch (Exception e) {
						e.printStackTrace();
						 connections.remove(wb);
						try {
						 wb.session.close();
						} catch (IOException e1) {
							e1.printStackTrace();
						}
					}

	 }
		}
	}
以上完成了websocket的服务前端消息转发代码(数据持久化与 redis后面继续进行补充)
下面我贴一下上篇中讲的前端代码的完整版
前端代码
<!DOCTYPE html>
<html>
<head>
<meta charset="utf-8">
<title>layui</title>
<meta name="renderer" content="webkit">
<meta http-equiv="X-UA-Compatible" content="IE=edge,chrome=1">
<meta name="viewport" content="width=device-width, initial-scale=1, maximum-scale=1">
<link rel="stylesheet" href="js/css/modules/layui.css" media="all">
<!-- 注意:如果你直接复制所有代码到本地,上述css路径需要改成你本地的 -->
</head>
<body>
<script src="js/layui.js" charset="utf-8"></script>
<!-- 注意:如果你直接复制所有代码到本地,上述js路径需要改成你本地的 -->
<style>
/* img */
i{font-style:normal;}
.qq-login{width:430px;height:330px;margin:0 0 -165px -215px;bottom:50%;left:50%;position:fixed;z-index:9999;border-radius:3px;overflow:hidden;box-shadow:0 0 5px #333;background:#ebf2f9 url(js/images/bj/qq-login-bg.jpg) center top no-repeat;display:block;}
.login-menu{width:90px;height:30px;top:0;right:0;position:absolute;}
.login-menu span{float:left;width:30px;height:30px;background-image:url(js/images/bj/qq-login-bg.jpg);}
.login-menu span:hover{background-color:#3a95de;}
.login-menu span:nth-child(1){background-position:left center;}
.login-menu span:nth-child(2){background-position:-30px center;}
.login-menu span:nth-child(3){background-position:-90px center;}
.login-menu span:nth-child(3):hover{background-color:#ea4848;}
.login-ner{margin-top:182px;float:left;width:100%;height:148px;}
.login-left{float:left;width:133px;height:148px;}
.login-head{float:left;width:80px;height:80px;border-radius:50%;border:1px solid #ccc;overflow:hidden;margin:12px 11px 0 40px;}
.login-head img{width:80px;height:80px;}
.login-on{width:194px;height:148px;float:left;}
.login-txt{float:left;margin-top:12px;height:60px;width:100%;}
.login-txt input{border:1px solid #d1d1d1;float:left;height:30px;padding:0 7px;font-size:12px;width:100%;}
.login-txt input:nth-child(1){border-radius:4px 4px 0 0;}
.login-txt input:nth-child(2){border-radius:0 0 4px 4px;margin-top:-1px;}
.login-xuan{width:100%;float:left;height:14px;line-height:14px;margin-top:8px;}
.login-xuan input{width:14px;height:14px;float:left;}
.login-xuan i{float:left;padding-left:4px;}
.login-right{width:103px;height:60px;float:left;margin-top:12px;}
.login-right a{float:left;padding-left:10px;width:90%;color:#2786e4;line-height:30px;text-indent:10px;}
.login-but{width:100%;height:30px;margin:13px 0;float:left;background:#09a3dc;color:#fff;text-align:center;line-height:30px;border-radius:4px;font-size:14px; cursor:context-menu;}
.login-menu span {
float: left;
width: 30px;
height: 30px;
background-image: url(js/images/bj/wins.png);
}
.login-tips{line-height:40px;width:300px;padding:10px;color: white;top:0;left:0;position:absolute;}
</style>
<script id="login_html" type="text/html">
<div class="qq-login">
<div class="login-tips" id="login-tips"></div>
<div class="login-menu">
<span></span><span></span><span class="login-close"></span>
</div>
<div class="login-ner">
<div class="login-left">
<div class="login-head"><img src="js/css/modules/layim/skin/4.jpg"></div>
</div>
<div class="login-on">
<div class="login-txt"><input type="text" id="username" placeholder="QQ号码/手机/邮箱"><input id="password" type="password" placeholder="密码"></div>
<div class="login-xuan"><span class="fl"><input type="checkbox"><i>记住密码</i></span><span class="fr"><input type="checkbox"><i>自动登录</i></span></div>
<div class="login-but" id="login-but">安全登录</div>
</div>
<div class="login-right">
<a href="http://zc.qq.com/chs/index.html" target="_blank">注册账号</a><a href="https://aq.qq.com/cn2/findpsw/pc/pc_find_pwd_input_account?pw_type=0&aquin=" target="_blank">找回密码</a>
</div>
</div>
</div>
</script>
<script>
layui.use(’layim’, function(){
var layim = layui.layim,id;
$ = layui.jquery,
layer.open({
title:false
,type: 1
,offset: ’auto’ //具体配置参考:http://www.layui.com/doc/modules/layer.html#offset
,content: login_html.innerHTML
,btn: false
,shadeClose: false
,closeBtn: 0
,moveType: 0
,move: ’.login-head’
,btnAlign: ’r’ //按钮居中
,shade: 0 //不显示遮罩
});
//绑定登陆事件
$(document).on(’click’, ’#login-but’, function(data) {
login();
});
var tips= $(’#login-tips’);
function login(){
tips.html("正在登陆……");
var un= $("#username").val();
var ps= $("#password").val();
var d={"m":"login","username":un,"password":ps}
$.ajax({
type:"POST",
url:"../chat",
dataType:"json",
data:d,
success:function(data){
if(data.code==20000){
id=data.data.id
tips.html("登陆成功");
chartSetting();
connection();
}else{
tips.html("登陆失败请重试!"+data.msg);
}
},
error:function(jqXHR){
tips.html("发生错误"+jqXHR.status);
}
});
}
function chartSetting(){
//基础配置
layim.config({
//初始化接口
init: {
url: ’chat?m=list&id=’+id
,data: {}
}
//查看群员接口
,members: {
url: ’chat?m=getMembers&id=’+id
,data: {}
}
,uploadImage: {
url: ’uploadv2?filepath=’ //(返回的数据格式见下文)
,type: ’’ //默认post
}
,uploadFile: {
url: ’uploadv2?filepath=’ //(返回的数据格式见下文)
,type: ’’ //默认post
}
,isAudio: true //开启聊天工具栏音频
,isVideo: true //开启聊天工具栏视频
//扩展工具栏
,tool: [{
alias: ’code’
,title: ’代码’
,icon: ’’
}]
,brief: false //是否简约模式(若开启则不显示主面板)
,title: ’消息’ //自定义主面板最小化时的标题
,right: ’10px’ //主面板相对浏览器右侧距离
,minRight: ’90px’ //聊天面板最小化时相对浏览器右侧距离
,initSkin: ’3.jpg’ //1-5 设置初始背景
,skin: [’js/css/modules/layim/skin/6.jpg’,
’js/css/modules/layim/skin/1.jpg’] //新增皮肤
,isfriend: true //是否开启好友
,isgroup: true //是否开启群组
,min: false //是否始终最小化主面板,默认false
,notice: true //是否开启桌面消息提醒,默认false
,voice: true //声音提醒,默认开启,声音文件为:default.mp3
,msgbox: ’msgbox.html’ //消息盒子页面地址,若不开启,剔除该项即可
,find: ’find.html’ //发现页面地址,若不开启,剔除该项即可
,chatLog: ’chatlog.html’ //聊天记录页面地址,若不开启,剔除该项即可
});
}
//监听在线状态的切换事件
layim.on(’online’, function(status){
layer.msg(status);
});
//演示自动回复
var autoReplay = [
’您好,我现在有事不在,一会再和您联系。’,
’你没发错吧?face[微笑] ’,
’洗澡中,请勿打扰,*窥偷**请购票,个体四十,团体八折,订票电话:一般人我不告诉他!face[哈哈] ’,
’你好,我是主人的美女秘书,有什么事就跟我说吧,等他回来我会转告他的。face[心] face[心] face[心] ’,
’face[威武] face[威武] face[威武] face[威武] ’,
’<(@ ̄︶ ̄@)>’,
’你要和我说话?你真的要和我说话?你确定自己想说吗?你一定非说不可吗?那你说吧,这是自动回复。’,
’face[黑线] 你慢慢说,别急……’,
’(*^__^*) face[嘻嘻] ,是贤心吗?’
];
//监听在线状态的切换事件
layim.on(’online’, function(status){
layer.msg(status);
});
//监听签名修改
layim.on(’sign’, function(value){
layer.msg(value);
});
//监听自定义工具栏点击,以添加代码为例
layim.on(’tool(code)’, function(insert){
layer.prompt({
title: ’插入代码 - 工具栏扩展示例’
,formType: 2
,shade: 0
}, function(text, index){
layer.close(index);
insert(’[pre class=layui-code]’ + text + ’[/pre]’); //将内容插入到编辑器
});
});
//监听layim建立就绪
layim.on(’ready’, function(res){
//console.log(res.mine);
layim.msgbox(5); //模拟消息盒子有新消息,实际使用时,一般是动态获得
});
//监听发送消息
layim.on(’sendMessage’, function(data){
var To = data.to;
var Me = data.mine;
if(To.type === ’friend’){
layim.setChatStatus(’<span style="color:#FF5722;">对方正在输入。。。</span>’);
}
if(To.id==Me.id){
alert("无法和自己发起聊天");
return;
}else{
var data={
username: Me.username //消息来源用户名
,avatar: Me.avatar //消息来源用户头像
,id: To.id //消息的来源ID(如果是私聊,则是用户id,如果是群聊,则是群组id)
,type:To.type //聊天窗口来源类型,从发送消息传递的to里面获取
,content: Me.content //消息内容
,cid: 0 //消息id,可不传。除非你要对消息进行一些操作(如撤回)
,mine: false //是否我发送的消息,如果为true,则会显示在右方
,fromid:Me.id //消息的发送者id(比如群组中的某个消息发送者),可用于自动解决浏览器多窗口时的一些问题
,timestamp:new Date().getTime() //服务端时间戳毫秒数。注意:如果你返回的是标准的 unix 时间戳,记得要 *1000
};
//模拟系统消息
websocket.send(JSON.stringify(data));
layim.setChatStatus(’<span style="color:#FF5722;">在线</span>’);
}
});
//监听查看群员
layim.on(’members’, function(data){
//console.log(data);
});
//监听聊天窗口的切换
layim.on(’chatChange’, function(res){
var type = res.data.type;
console.log(res.data.id)
if(type === ’friend’){
//模拟标注好友状态
layim.setChatStatus(’<span style="color:#FF5722;">在线</span>’);
} else if(type === ’group’){
//模拟系统消息
layim.getMessage({
system: true
,id: res.data.id
,type: "group"
,content: ’模拟群员’+(Math.random()*100|0) + ’加入群聊’
});
}
});
function connection(){
tips.html("开始连接服务……");
if(’WebSocket’ in window){
websocket = new WebSocket("ws://"+sy()+"/imchat/"+id);
}else{
tips.html("不支持websocket");
}
//连接发生错误的回调方法
websocket.onerror = function(ev,data){
tips.html("连接发生错误的回调方法");
};
//连接成功建立的回调方法
websocket.onopen = function(e){
tips.html("");
};
//接收到消息的回调方法
websocket.onmessage = function(event){
// layim.getMessage(event.data);
var json=JSON.parse(event.data);
console.log("接收信息:");
console.log(event.data);
if(json.key=="offline"){
//用户离线
layim.setFriendStatus(json.id, ’offline’);
layim.setChatStatus(’<span style="color:gray;">离线</span>’);
layer.msg(json.content+"无法接收到消息", {
icon: 1
});
}else if(json.key=="online"){ //接收在线消息
//制造好友消息
layim.setFriendStatus(json.id, ’online’);
layim.setChatStatus(’<span style="color:#FF5722;">在线</span>’);
layim.getMessage(json);
}
};
//连接关闭的回调方法
websocket.onclose = function(event){
//alert(’连接关闭的回调方法’);
tips.html("连接已关闭,尝试重连……");
disConnect();
};
//监听窗口关闭事件,当窗口关闭时,主动去关闭websocket连接,防止连接还没断开就关闭窗口,server端会抛异常。
window.onbeforeunload = function(){
websocket.close();
};
}
//检查链接,短线重连
var disConnect = function(){
setTimeout(function(){
connection();
},5000);
}
//关闭连接
function closeWebSocket(){
tips.html("关闭closeWebSocket");
websocket.close();
}
function sy(){
var curWwwPath = window.document.location.href;
var pathName = window.document.location.pathname;
var pos = curWwwPath.indexOf(pathName);
var localhostPaht = curWwwPath.substring(0,pos);
var projectName = pathName.substring(0,pathName.substr(1).indexOf(’/’)+1);
var ip=window.location.host;
var prot=window.location.port;
return (ip + projectName);
}
});
</script>
</body>
</html>
结合以上服务端代码和前端代码可以实现基本的聊天功能,本篇没涉及到登录接口和用户列表接口,下篇再做补充。需要的同学关注一下下篇。有问题欢迎留言指正