写在前面
之前我们了解一下Netty的简单介绍和原理实现,并实现了一个简单的springboot工程整合Netty实现服务端程序,错过的同学可以点击SpringBoot结合Netty实现网络编程回顾一下。实际工作中我们在使用Netty时还会遇到很多需要,今天主要是找几个常见的需求实现一下。
Netty客户端
首先我们来实现一个Netty的Client程序
@Slf4j
@Component
public class NettyClient implements Runnable{

    @Value("${netty.server.ip}")
    private String serverIp;

    @Value("${netty.server.port}")
    private Integer serverPort;

    private EventLoopGroup group;

    private Bootstrap bootstrap;

    private ChannelFuture future;

    private Integer reconn = new Integer(0);

    @Override
    public void run() {
        this.start();
    }

    public void initEventLoopGroup() {
        EventLoopGroup group = new NioEventLoopGroup();
        this.group = group;
    }

    public void initBootstrap(){
        Bootstrap bootstrap = new Bootstrap()
                .group(this.group)
                //该参数的作用就是禁止使用Nagle算法,使用于小数据即时传输
                .option(ChannelOption.TCP_NODELAY, true)
                .channel(NioSocketChannel.class)
                .handler(new NettyClientInitializer());
        this.bootstrap =  bootstrap;
    }

    public void initChannelFuture(){
        ChannelFuture future = null;
        try {
            future = this.bootstrap.connect(serverIp, serverPort).sync();
            log.info("客户端连接成功....");
        } catch (Exception e) {
            e.printStackTrace();
            if (null != group) {
                group.schedule(new Runnable() {
                    @Override
                    public void run() {
                        if (reconn < 10080) {
                            reconn++;
                            log.info("第{}次开始重连服务器...", reconn);
                            start();
                        }
                    }
                }, 60L, TimeUnit.SECONDS);
            }
        }finally {

        }
        this.future = future;
    }

    public void close(){
        try {
            if(null!=future){
                // 等待连接被关闭
                future.channel().closeFuture().sync();
            }
            if(null!=this.group){
                this.group.shutdownGracefully();
            }
        }catch (Exception e){
            e.printStackTrace();
        }

    }

    public void start() {
        try{
            initEventLoopGroup();
            initBootstrap();
            initChannelFuture();
        }catch (Exception e){
            e.printStackTrace();
        }
    }

    public void sendMsg(String msg){
        try {
            //发送消息
            if (null != this.future && this.future.channel().isActive()) {
                this.future.channel().writeAndFlush(msg);
            } else {
                start();
            }

        } catch (Exception e) {
            e.printStackTrace();
        }
    }

    public Integer getReconn() {
        return reconn;
    }

    public void setReconn(Integer reconn) {
        this.reconn = reconn;
    }
1、客户端程序和服务端程序差不多都是EventLoopGroup->Bootstrap->ChannelFuture三个要素,这里我依然实现Runnable接口用线程池启动客户端
2、用TCP工具创建一个端口为13002的服务端程序,正常结果如下
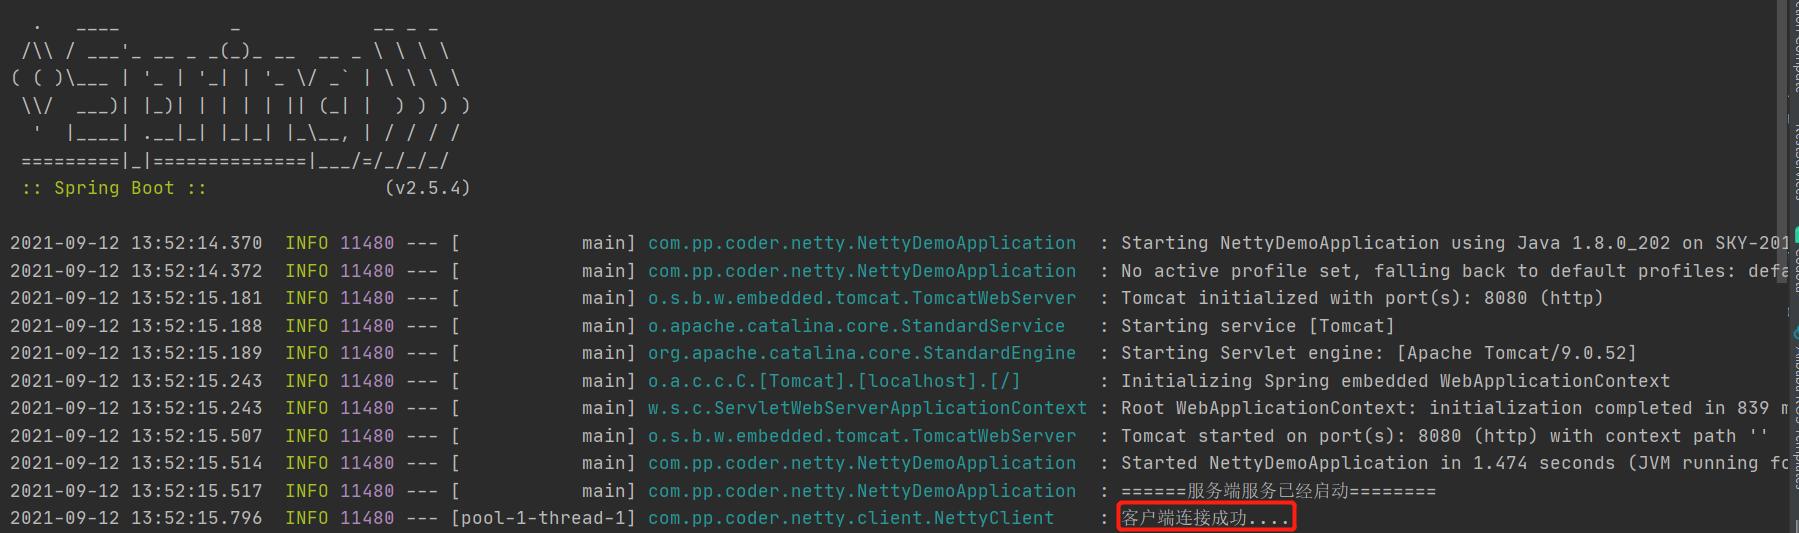
客户端程序
实现心跳机制
现在一个简单的客户端就实现了,一般物联网程序与服务端程序长连接状态下都会一定时间内发送一次心跳数据,以告诉服务端程序它还存活。当然这种心跳机制也在SpringCloud的相关组件比如注册中心Eureka,或者阿里的nacos的实现中应用,注册中心客户端便是每隔多长时间发送一次心跳给服务端以保证微服务正常存活,有兴趣的同学可以去研究一下他们的实现方式。也就是说如果我们想做一个微服务的注册中心可以用Netty来实现。
那么现在我们来看一下Netty的心跳机制。
public class NettyClientInitializer extends ChannelInitializer<SocketChannel> {
    @Override
    protected void initChannel(SocketChannel socketChannel) throws Exception {
        socketChannel.pipeline().addLast(new IdleStateHandler(0, 10, 30));
        socketChannel.pipeline().addLast("decoder", new StringDecoder(Charset.forName("UTF-8")));
        socketChannel.pipeline().addLast("encoder", new StringEncoder(Charset.forName("UTF-8")));
        socketChannel.pipeline().addLast(new NettyClientHandler());

    }
}
@Slf4j
public class NettyClientHandler extends ChannelInboundHandlerAdapter {

    private Channel channel;


    @Override
    public void channelActive(ChannelHandlerContext ctx) throws Exception {
        log.info("客户端Active .....");
        this.channel = ctx.channel();
    }

    @Override
    public void channelInactive(ChannelHandlerContext ctx) throws Exception {
        log.info("客户端Inactive .....");
        final EventLoop eventLoop = ctx.channel().eventLoop();
        eventLoop.schedule(new Runnable() {
            @Override
            public void run() {

            }
        },60L,TimeUnit.SECONDS);
        super.channelInactive(ctx);
    }

    @Override
    public void channelRead(ChannelHandlerContext ctx, Object msg) throws Exception {
        log.info("客户端收到消息: {}", msg.toString());
        try{

        }catch (Exception e){
            e.printStackTrace();
        }
    }

    @Override
    public void exceptionCaught(ChannelHandlerContext ctx, Throwable cause) throws Exception {
        cause.printStackTrace();
        ctx.close();
        log.error("掉线了。。。");
        final EventLoop eventLoop = ctx.channel().eventLoop();
        eventLoop.schedule(new Runnable() {
            @Override
            public void run() {

            }
        }, 60L, TimeUnit.SECONDS);
        super.channelInactive(ctx);

    }

    @Override
    public void userEventTriggered(ChannelHandlerContext ctx, Object evt) throws Exception {
        if (evt instanceof IdleStateEvent) {
            IdleState state = ((IdleStateEvent) evt).state();
            if (state == IdleState.WRITER_IDLE) {
              	ctx.write("beat message!");
                ctx.flush();
                log.info("发送心跳");
            }
        } else {
            super.userEventTriggered(ctx, evt);
        }
    }
}
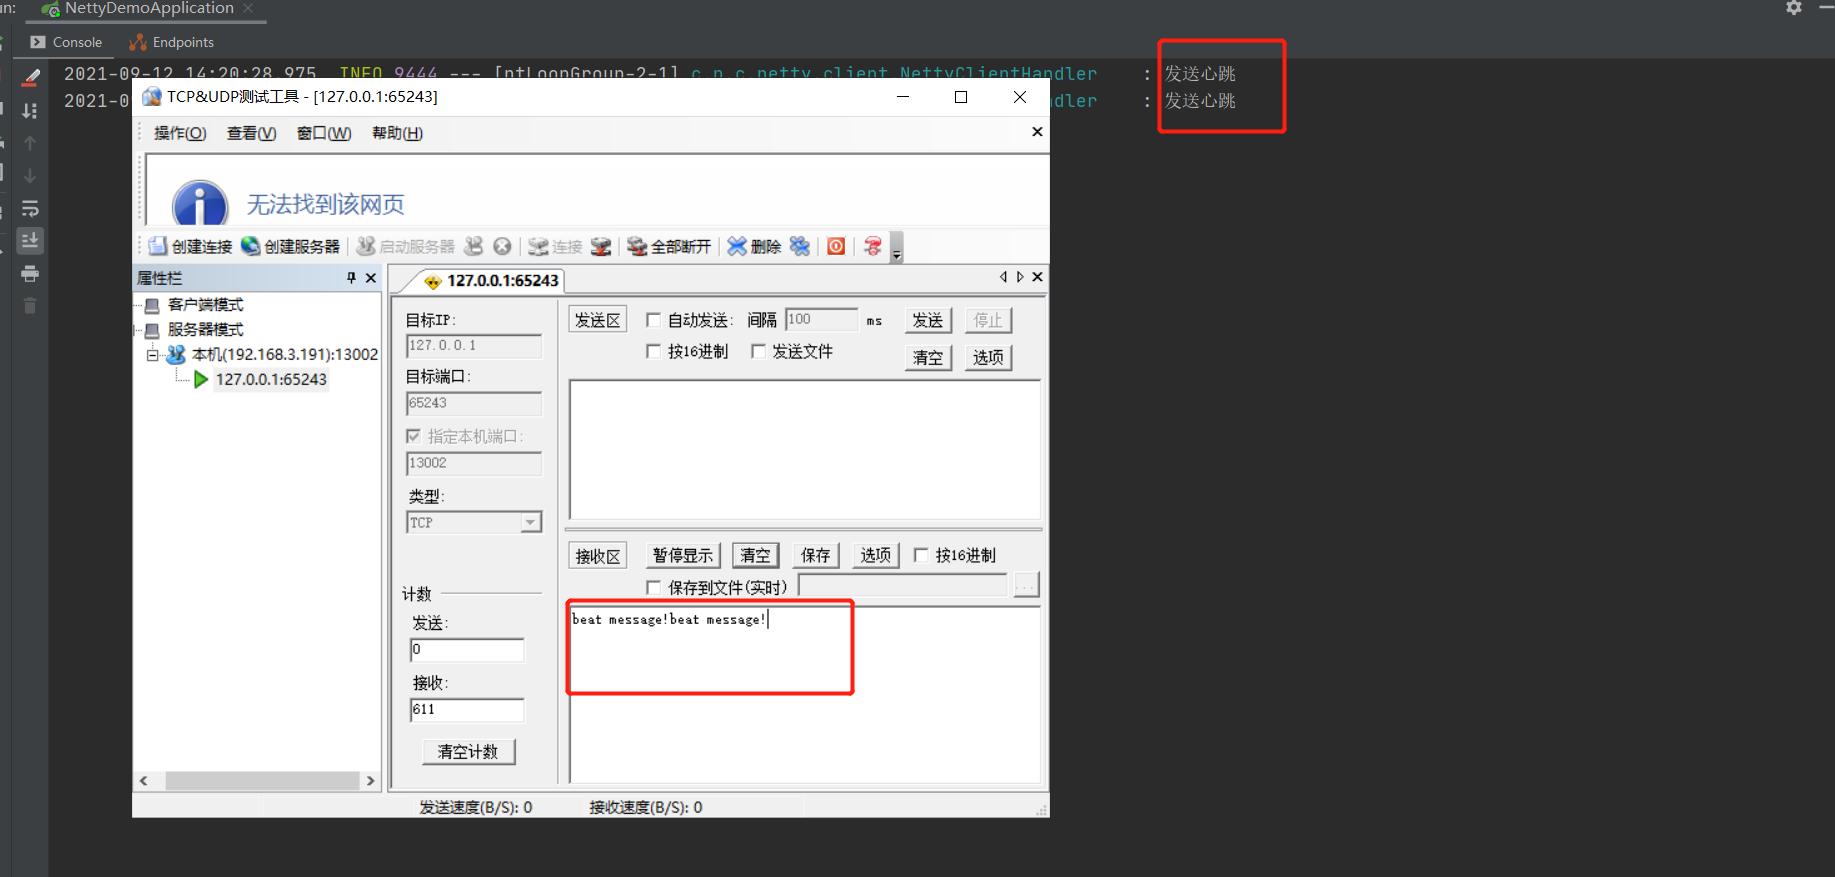
1、心跳的关键是在创建管道是增加IdleStateHandler心跳检测处理器,他可以在指定时间内如果没有读操作,写操作时触发,如果我们指定30秒内没有写操作那么就认为应该上报一次心跳了
socketChannel.pipeline().addLast(new IdleStateHandler(0, 10, 30));
2、在增加心跳检测处理器后在我们的Handler中实现userEventTriggered方法,捕捉到的事件会在这个方法触发,那么我们就可以在这个方法内进行发送心跳操作
@Override
    public void userEventTriggered(ChannelHandlerContext ctx, Object evt) throws Exception {
        if (evt instanceof IdleStateEvent) {
            IdleState state = ((IdleStateEvent) evt).state();
            if (state == IdleState.WRITER_IDLE) {
                ctx.write("beat message!");
                ctx.flush();
                log.info("发送心跳");
            }
        } else {
            super.userEventTriggered(ctx, evt);
        }
    }
结果如图
实现断线重连机制
通常由于网络原因或者程序原因会出现客户端程序和服务端程序断开连接的情况,此时就需要断线重连机制来保证程序能在的一定时间内主动在建立连接。断线重连一般会出现在以下的情况中:
- 客户端程序启动连接不上服务器,开启断线重连
public void initChannelFuture(){
    ChannelFuture future = null;
    try {
        future = this.bootstrap.connect(serverIp, serverPort).sync();
        log.info("客户端连接成功....");
    } catch (Exception e) {
        e.printStackTrace();
        if (null != group) {
            group.schedule(new Runnable() {
                @Override
                public void run() {
                    if (reconn < 10080) {
                        reconn++;
                        log.info("第{}次开始重连服务器...", reconn);
                        start();
                    }
                }
            }, 60L, TimeUnit.SECONDS);
        }
    }finally {

    }
    this.future = future;
}
- 客户端程序连接过程中与服务器断开,开启断线重连
@Override
public void channelInactive(ChannelHandlerContext ctx) throws Exception {
    log.info("客户端Inactive .....");
    final EventLoop eventLoop = ctx.channel().eventLoop();
    eventLoop.schedule(new Runnable() {
        @Override
        public void run() {
            //开启重连

        }
    },60L,TimeUnit.SECONDS);
    super.channelInactive(ctx);
}
重连过程中我们可以自定义最大次数,如果最大次数还是连不上只能失败只能进行报警处理或者其他应急处理措施。
编码、解码器
编码、解码器是针对不同协议的转换,有的设备发送的是HEX信息,我们需要将其转换为可读的字符串,或者我们约定的协议有固定的协议头和结束符,我们可以在解码器中进行处理。再或者一些中文乱码问题我们可以指定消息的字符串解码编码格式。
Netty自带了关于字符串的编码解码器,如下对字符串进行UTF-8的编码,当然你也可以指定为GBK的格式
socketChannel.pipeline().addLast("decoder", new StringDecoder(Charset.forName("UTF-8")));
socketChannel.pipeline().addLast("encoder", new StringEncoder(Charset.forName("UTF-8")));
当然我们也可以自定义编解码实现我们定制的需求
socketChannel.pipeline().addLast("encoder", new MyHexMessageEncoder());
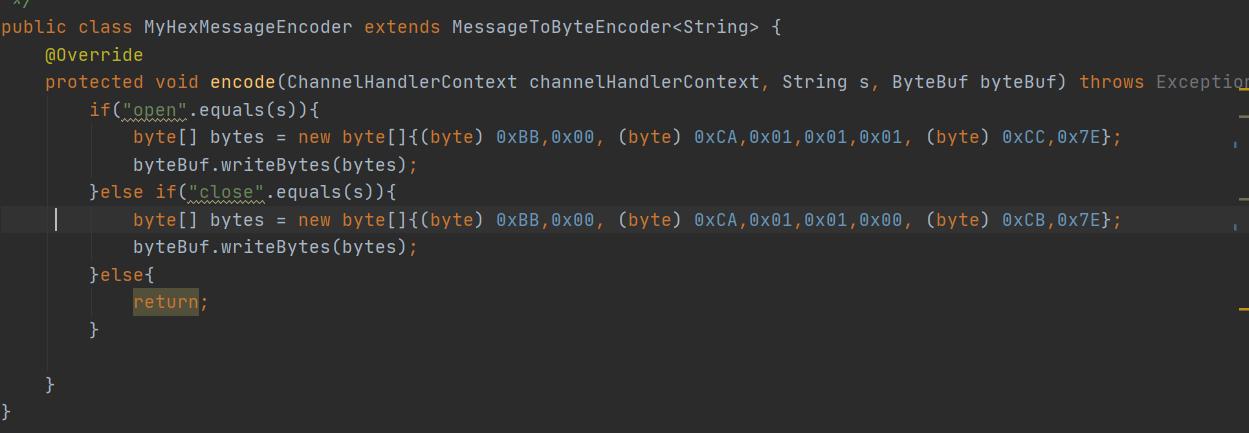
这样我们可以把我们可读的命令按照协议格式进行转换为Hex字符返回
解决TCP粘包、半包问题
TCP传输过程中总是会因为一些网络状况导致我们的消息被合并到一个包里或者消息过长被分解成多个包的状况,这就是粘包、半包问题,通常我们都会自定义传输协议来避免这样的问题,就是告诉接收端你按照指定格式校验通过了才是一次正常的通信包。
粘包和半包,指的都不是一次是正常的 ByteBuf 缓存区接收。
1、粘包,就是接收端读取的时候,多个发送过来的 ByteBuf “粘”在了一起。
换句话说,接收端读取一次的 ByteBuf ,读到了多个发送端的 ByteBuf ,是为粘包。
2、半包,就是接收端将一个发送端的ByteBuf “拆”开了,形成一个破碎的包,我们定义这种 ByteBuf 为半包。
针对这种问题Netty也提出了很多实用的解决方案,主要是编解码器入手,在接收端使用。
- FixedLengthFrameDecoder:定长协议解码器,我们可以指定固定的字节数算一个完整的报文
- LineBasedFrameDecoder: 行分隔符解码器,遇到\n或者\r\n,则认为是一个完整的报文
- DelimiterBasedFrameDecoder: 分隔符解码器,与LineBasedFrameDecoder类似,只不过分隔符可以自己指定
- LengthFieldBasedFrameDecoder:长度编码解码器,将报文划分为报文头/报文体,根据报文头中的Length字段确定报文体的长度,因此报文提的长度是可变的
- JsonObjectDecoder:json格式解码器,当检测到匹配数量的"{" 、”}”或”[””]”时,则认为是一个完整的json对象或者json数组。
因为通常我们协议有固定的格式

通信协议
所以可以根据数据包的总长度,开头固定包0xAA 0x55,结束符0xFF 进行判断完整的包,或者根据换行符等分隔符进行判定。这些在具体的需求中采用不同的校验方式,netty提供了上述几种常见的方式,若不满足可以根据自己协议定制,相信这都不是事!
总结
总的来说Netty是一个非常好的框架,这些都只是其皮毛或者常见的应用场景,如果你有兴趣可以用Netty来实现一个Web服务器,或者高性能的RPC框架,或者注册中心,或者一个高并发的IOT处理服务器,这就像一块块积木,只要你有想法就可以实现,欢迎抛出你的想法来分享[送心]