如何使用Django和Python怎么搭建一个小博客呢?
这是一个简单而困难的问题。简单的原因是,只要做过一次,基本上就能做到举一反三;
困难的原因是有没有用心和耐心去完成这个实验。
如果你成功了,那绝对是赚了!如果你失败了,也就耽误你玩几局游戏的时间。
为了能够完成搭建小博客的实验,小安Sir当时花了大概一天的时间,看着书本的代码,一遍又一遍地琢磨和度娘完成实验,最后才写下这份总结。
也正是因为这个过程,我再次通过自己的努力实现一些有意思的想法,并且不断更新迭代!
朋友们,如果你们有想法,直接*它干**,正所谓"千里之行,始于足下"!不要再犹豫了!
本文大纲
1. 配置虚拟环境
2. 创建和配置[入门版]博客
3. 优化[入门版]博客
1 配置虚拟环境
1.1 安装python(3.7.0)版本的虚拟环境
[python@PYMY-DDB~]nbsp;pyenvvirtualenv3.7.0MyDjango
1.2 启用MyDjango虚拟环境
[python@PYMY-DDB~]nbsp;pyenvactivateMyDjango
pyenv-virtualenv:promptchangingwillberemovedfromfuturerelease.configure`exportPYENV_VIRTUALENV_DISABLE_PROMPT=1'tosimulatethebehavior.
(MyDjango)[python@PYMY-DDB~]nbsp;python-V
Python3.7.0
1.3 安装Django
(MyDjango)[python@PYMY-DDB~]nbsp;pipinstalldjango
2 创建博客项目
2.1 创建easyblog项目
(MyDjango)[python@PYMY-DDBMyproject]nbsp;pwd
/home/python/Myproject
(MyDjango)[python@PYMY-DDBMyproject]$ django-adminstartprojecteasyblog
2.2 创建APP(mysite)
(MyDjango)[python@PYMY-DDBMyproject]nbsp;django-adminstartprojecteasyblog
(MyDjango)[python@PYMY-DDBMyproject]nbsp;ls-l
drwxrwxr-x3pythonpython4096Feb2421:31easyblog

(MyDjango)[python@PYMY-DDBMyproject]nbsp;cdeasyblog/

(MyDjango)[python@PYMY-DDBeasyblog]nbsp;pythonmanage.pystartappmysite
(MyDjango)[python@PYMY-DDBeasyblog]nbsp;ls-l
total12
drwxrwxr-x2pythonpython4096Feb2421:31easyblog
-rwxrwxr-x1pythonpython806Feb2421:31manage.py
drwxrwxr-x3pythonpython4096Feb2421:31mysite
查看easyblog项目的结构
(MyDjango)[python@PYMY-DDBMyproject]nbsp;pwd
/home/python/Myproject

(MyDjango)[python@PYMY-DDBMyproject]nbsp;treeeasyblog
easyblog
├──easyblog
│├──__init__.py
│├──__init__.pyc
│├──settings.py
│├──settings.pyc
│├──urls.py
│└──wsgi.py
├──manage.py
└──mysite
├──admin.py
├──apps.py
├──__init__.py
├──migrations
│└──__init__.py
├──models.py
├──tests.py
└──views.py
2.3 配置settings.py
1) 添加主机的IP地址
### 将
ALLOWED_HOSTS=[]
### 改为如下:
ALLOWED_HOSTS=['192.168.117.30']
2) 添加APP(mysite)模块
### 将
INSTALLED_APPS=[
'django.contrib.admin',
'django.contrib.auth',
'django.contrib.contenttypes',
'django.contrib.sessions',
'django.contrib.messages',
'django.contrib.staticfiles',
]
### 改为如下:
INSTALLED_APPS=[
'django.contrib.admin',
'django.contrib.auth',
'django.contrib.contenttypes',
'django.contrib.sessions',
'django.contrib.messages',
'django.contrib.staticfiles',
'mysite',
]
3) 修改语言和时区
### 将
LANGUAGE_CODE='en-us'
TIME_ZONE='UTC'

### 改为如下:
ANGUAGE_CODE='zh_hans'
TIME_ZONE='Aisa/Shanghai'
2.4 APP项目所需的数据库的中介文件
执行以下命令,Django会默认使用SQLite存储数据库(简化文件型SQL关系数据库系统)。执行migrate命令,也会创建db.sqlite3文件。
(MyDjango)[python@PYMY-DDBeasyblog]nbsp;pythonmanage.pymigrate
Operationstoperform:
Applyallmigrations:admin,auth,contenttypes,sessions
Runningmigrations:
Applyingcontenttypes.0001_initial...OK
Applyingauth.0001_initial...OK
Applyingadmin.0001_initial...OK
Applyingadmin.0002_logentry_remove_auto_add...OK
Applyingcontenttypes.0002_remove_content_type_name...OK
Applyingauth.0002_alter_permission_name_max_length...OK
Applyingauth.0003_alter_user_email_max_length...OK
Applyingauth.0004_alter_user_username_opts...OK
Applyingauth.0005_alter_user_last_login_null...OK
Applyingauth.0006_require_contenttypes_0002...OK
Applyingauth.0007_alter_validators_add_error_messages...OK
Applyingauth.0008_alter_user_username_max_length...OK
Applyingsessions.0001_initial...OK
此网站添加的数据都会放在db.sqlite3文件!
[python@PYMY-DDBeasyblog]nbsp;ls-l
total64
-rw-r--r--1pythonpython41984Feb2422:48db.sqlite3
drwxrwxr-x2pythonpython4096Feb2622:31easyblog
-rwxrwxr-x1pythonpython806Feb2421:31manage.py
drwxrwxr-x3pythonpython4096Feb2622:30mysite
2.5 测试网站的IP和端口是否OK
(MyDjango)[python@PYMY-DDBeasyblog]$pythonmanage.pyrunserver192.168.117.30:8000

注意:默认连接:pythonmanage.pyrunserver->http://127.0.0.1:8000
打开网页,检测IP和端口是否成功!

2.6 定义数据类型(models.py)
默认情况下,Django的数据库是以Model方式操作,在程序中不直接面对数据库,而是以class类先创建好Model,然后通过操作Model达到操作数据库的目的。好处是日后如果更换数据库,无须修改大量程序代码。
(MyDjango)[python@PYMY-DDBmysite]nbsp;pwd
/home/python/Myproject/easyblog/mysite
(MyDjango)[python@PYMY-DDBmysite]nbsp;catmodels.py
fromdjango.dbimportmodels
fromdjango.utilsimporttimezone
#Createyourmodelshere.

classPost(models.Model):
title=models.CharField(max_length=200)
slug=models.CharField(max_length=200)
body=models.TextField()
pub_date=models.DateTimeField(default=timezone.now)

classMeta:
ordering=('-pub_date',)

def__unicode__(self):
returnself.title

#title显示文章的标题
#slug显示文章的网址
#body显示文章的内容
#pub_date是本文的发表时间
#__unicode__以文章标题作为显示的内容,增加操作过程中的可读性,使用__unicode__而不是str,让这个标题可以正确地支持中文标题。
#pub_date,以timezone.now的方式让其自动产生,需要pytz的模块(pipinstallpytz)
2.7 创建数据库和同步Django间的中介文件
执行"python manage.py makemigrations mysite",让此模型生效,执行“python manage.py migrate”,同步更新数据库内容。
(MyDjango)[python@PYMY-DDBeasyblog]nbsp;pythonmanage.pymakemigrationsmysite
Migrationsfor'mysite':
mysite/migrations/0001_initial.py
-CreatemodelPost
(MyDjango)[python@PYMY-DDBeasyblog]nbsp;pythonmanage.pymigrate
Operationstoperform:
Applyallmigrations:admin,auth,contenttypes,mysite,sessions
Runningmigrations:
Applyingmysite.0001_initial...OK
2.8 启动 admin 的管理界面
(MyDjango)[python@PYMY-DDBeasyblog]nbsp;pythonmanage.pycreatesuperuser
Username(leaveblanktouse'python'):admin
Emailaddress:
Password:--密码:"admin"密码要八位数
Password(again):
Thispasswordistooshort.Itmustcontainatleast8characters.
Thispasswordistoocommon.
Password:--密码:"python1234",PASS!
Password(again):
Superusercreatedsuccessfully.
2.9 将Post纳入管理,修改admin.py
1) 导入Post类,然后通过admin.site.register注册。
完成设置后,通过打开http://192.168.117.30:8000,可以看到登陆页面。
2) PostAdmin类让页面显示标题,链接和日期
(MyDjango)[python@PYMY-DDBmysite]nbsp;pwd
/home/python/Myproject/easyblog/mysite

(MyDjango)[python@PYMY-DDBmysite]nbsp;catadmin.py
#-*-coding:utf-8-*-
from__future__importunicode_literals

fromdjango.contribimportadmin
from.modelsimportPost

#Registeryourmodelshere.


classPostAdmin(admin.ModelAdmin):
list_display=('title','slug','pub_date')

admin.site.register(Post,PostAdmin)
3) 打开网页http://192.168.117.30:8000/admin/,登陆!

4) Posts页面,这是一个数据库管理页面,第一次进入Posts管理页面是没有任何内容的!

5) 向Posts增加数据

6) 增加《王者荣耀-貂蝉》的数据,如此类推增加吕布和铠,slug要用英文或者数字。

7) 查看Posts的页面(共新增3组数据)

2.10 urls.py 负责网站和程序间的对应工作
"^"表示字符串开头, "#34;表示字符串结尾。"^#34;指的是根网址,就会调用homepage函数。
(MyDjango)[python@PYMY-DDBeasyblog]nbsp;caturls.py
fromdjango.conf.urlsimportinclude,url
fromdjango.contribimportadmin
frommysite.viewsimporthomepage

urlpatterns=[
url(r'^#39;,homepage),
url(r'^admin/',include(admin.site.urls)),
]13. 创建网页输出模板 templates
2.11 修改settings.py中的TEMPLATES
如何把拿到的数据进行排版下,变得更加美观,那就是通过template模板。以.html的文件形式存储在templates目录。
1) 新建templates目录
(MyDjango)[python@PYMY-DDBeasyblog]nbsp;pwd
/home/python/Myproject/easyblog
(MyDjango)[python@PYMY-DDBeasyblog]nbsp;mkdirtemplates/
2) 修改DIRS内容,新增templates目录
TEMPLATES=[
{
'BACKEND':'django.template.backends.django.DjangoTemplates',
'DIRS':[os.path.join(BASE_DIR,'templates')],
'APP_DIRS':True,
'OPTIONS':{
'context_processors':[
'django.template.context_processors.debug',
'django.template.context_processors.request',
'django.contrib.auth.context_processors.auth',
'django.contrib.messages.context_processors.messages',
],
},
},
]
2.12 修改views.py
views.py是负责如何把这些数据取出来,如何存进去等程序逻辑。
1) 用Post.objects.all()取得所有数据项。
2) 当网站有数据需要输出的时候,则通过渲染函数(render,或者网页显示)把数据存放到指定的位置中,得到的结果再交给HttpResponse输出给浏览器。
3) 使用locals()函数把当前内存中的局部变量使用字典打包起来,可以在.html模板中接收到所有的局部变量。
(MyDjango)[python@PYMY-DDBmysite]nbsp;catviews.py

#-*-coding:utf-8-*-
from__future__importunicode_literals
fromdjango.template.loaderimportget_template
fromdjango.shortcutsimportrender
fromdjango.httpimportHttpResponse
from.modelsimportPost
fromdatetimeimportdatetime

#Createyourviewshere.
defhomepage(request):
template=get_template('index.html')
posts=Post.objects.all()
now=datetime.now()
html=template.render(locals())
returnHttpResponse(html)
2.13 创建index.html模板
把第12步骤,接收到的局部变量posts和now都放在index.html中使用。
(MyDjango)[python@PYMY-DDBtemplates]nbsp;catindex.html
<!DOCTYPEhtml>
<htmllang="en">
<head>
<metacharset="UTF-8">
<title>
欢迎光临我的博客
</title>
</head>
<body>
<h1>
欢迎光临我的博客
</h1>
<hr>
{{posts}}
<hr>
<h3>现在时刻:{{now}}</h3>
</body>
</html>
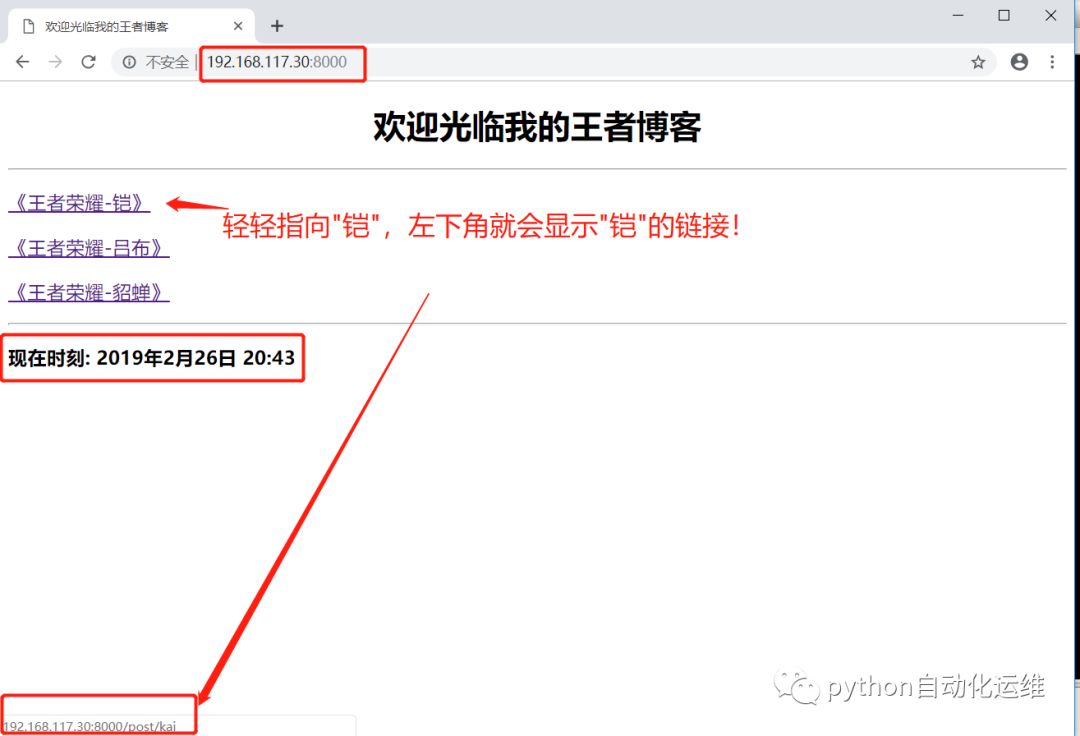
2.14 查看页面展示效果

3 微优化[入门版]博客
3.1 修改index.html模板
1) 显示标题。2) 每个标题制作一个链接(slug),放在post/下。3) 单击链接时,才会打开另外一个页面,显示该文章的内容。
4) {% for %}和{% endfor %}成对使用,将post.slug和post.title循环取出。
(MyDjango)[python@PYMY-DDBtemplates]nbsp;catindex.html

<!DOCTYPEhtml>
<html>
<head>
<metacharset="UTF-8">
<title>
欢迎光临我的王者博客
</title>
</head>
<body>
<h1align="center">
欢迎光临我的王者博客
</h1>
<hr>
{%forpostinposts%}
<pstyle='font-family:微软雅黑;font-size:14pt;font-weight:blod;'>
<ahref='/post/{{post.slug}}'>{{post.title}}</a>
</p>
{%endfor%}
<hr>
<h3>现在时刻:{{now}}</h3>
</body>
</html>
3.2 修改urls.py
'^post/(\w+)#39;,把所有post/开头的网址后面的字符串都找出来当作第2个参数(第一个参数是request)传送给showpost函数。要记得在urls.py导入showpost函数。
(MyDjango)[python@PYMY-DDBeasyblog]nbsp;caturls.py

fromdjango.conf.urlsimporturl,include
fromdjango.contribimportadmin

frommysite.viewsimporthomepage,showpost

urlpatterns=[
url(r'^#39;,homepage),
url(r'^post/(\w+)#39;,showpost),
url(r'^admin/',include(admin.site.urls)),
]
3.3 修改views.py
1) views.py新建showpost函数处理接收到的参数。
2) post = Post.objects.get(slug=slug)搜索文章。
3) redirect('/')的方式是直接返回首页。
(MyDjango)[python@PYMY-DDBeasyblog]nbsp;catviews.py

#-*-coding:utf-8-*-
from__future__importunicode_literals
fromdjango.template.loaderimportget_template
fromdjango.shortcutsimportrender
fromdjango.shortcutsimportredirect
fromdjango.httpimportHttpResponse
from.modelsimportPost
fromdatetimeimportdatetime


#Createyourviewshere.
defhomepage(request):
template=get_template('index.html')
posts=Post.objects.all()
now=datetime.now()
html=template.render(locals())
returnHttpResponse(html)


defshowpost(request,slug):
template=get_template('post.html')
try:
post=Post.objects.get(slug=slug)
ifpost!=None:
html=template.render(locals())
returnHttpResponse(html)
except:
returnredirect('/')
3.4 修改post.html模板
设计post.html和index.html有很多重复的元素。
(MyDjango)[python@PYMY-DDBeasyblog]nbsp;catpost.html
<!DOCTYPEhtml>
<html>
<head>
<metacharset="UTF-8">
<title>
欢迎光临我的王者博客
</title>
</head>
<body>
<h1align="center">{{post.title}}
</h1>
<hr>
<pstyle='font-family:微软雅黑;font-size:12pt;letter-spacing:2pt;'>
{{post.body}}
</p>
<hr>
<h3align="center"><ahref='/'>返回首页</a></h3>
</body>
</html>
3.5 查看页面展示效果
1) 首页
2) 点击页面

4 总结
搭建一个入门版的小博客也就是这一些步骤,我个人认为还有一个难点是要去领悟,如何将MTV框架和每一个python文件、每一个函数等关联起来。
如果你搭建成功了,恭喜你,你入门了,值得骄傲,不要谦虚!
如果你尚未搭建成功,你可以留言告诉我哪一个步骤不懂或者度娘找解决方案,还有一点需要提示的是,不要转牛角尖。
因为这条路很长,适当忽略一些,并不会阻碍你的成长,反而大有益处!除非你想这样......

接下来,小安Sir还会分享进阶版的博客,让我们一起学习努力!
[微信公众号:python自动化运维],关注我,优质干货,为您第一时间送达!