断更了,因为有些急事要处理,所以今天才更新。
上一期说到了上传的图片不用加到数据库中,而是直接去目录中读取,后来我又*翻推**了这个操作,因为后面四位随机数的原因,图片顺序不好处理。所以我又加了一步提交到任务的数据库中。
这期我们把提交的任务列表显示出来。
一开始是想用uni-list这个组件,但是一扯到二次开发的组件,就感觉用着不爽,很多姿势不能熟练地运用,所以我还是摒弃了这个组件,改为纯HTML+CSS手撸代码。
这手到擒来的感觉太爽了,可以随意地控制姿势和力度。
完成后的样子就是这样:
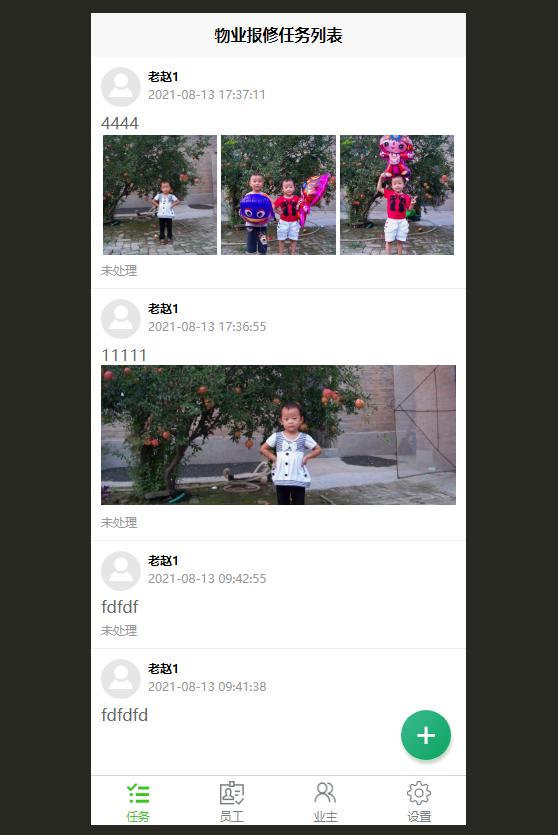
任务列表的样子
怎么样?还是像模像样的吧?
如果任务没有图,就只显示文字内容,如果任务只有小于三张图的话,就显示一张大图。如果任务的图大于三张,就显示前三张。
下面放这个页面的代码(task.vue):
<template>
	<view>
		<view v-for="(item,index) in taskListArr" :key="index" class="listItem1">
			<view class="uheader">
				<view class="uheadPic">
					<image style="width:80rpx;height:80rpx;" src="../../static/avatar.png"></image>
				</view>
				<view class="uheadTxt">
					<view style="font-weight: bold;">
						{{item.users_nickName}}
					</view>
					<view style="color:#999;">
						{{item.tasks_makeDate}}
					</view>
				</view>
			</view>
			<view class="con">
				{{item.tasks_content}}
			</view>
			<block v-if="item.tasks_pics != null">
				<view class="pic" v-if="item.tasks_pics.length == 1">
					<image mode="aspectFill" :src="'https://***.***.com' + item.tasks_pics[0]"></image>
				</view>
				<view class="pic2" v-else="item.tasks_pics.length >= 3">
					<block v-for="(item2,index2) in item.tasks_pics" :key="index2" v-if="index2 < 3">
						<image mode="aspectFill" :src="'https://***.***.com' + item2"></image>
					</block>
				</view>
			</block>
			<view class="status">
				未处理
			</view>
		</view>

		<!-- 右下角悬浮的按钮 -->
		<view class="newTaskBtn" @click="newTask">+</view>
	</view>
</template>

<script>
	export default {
		data() {
			return {
				userMsg : false,
				taskListArr : []
			}
		},
		onShow() {
			this.userMsg = this.getLoginMsg();
			if(this.userMsg !== false){
				this.loadTask();
			}
		},
		methods: {
			newTask:function(e){
				uni.navigateTo({
					url :"../newTask/newTask"
				})
			},
			loadTask:function(e){
				var that = this;
				this.requestAPI({
					class:"tasks",
					fun:"list",
					pageSize:5,
					phoneNum : that.userMsg.userPhone,
					vCode : that.userMsg.vCode
				},function(res){
					var rows = res.data.data.rows;
					for(var item=0; item<rows.length; item++){
						if (rows[item].tasks_pics != null && rows[item].tasks_pics.length > 4){
							console.log(item,rows[item].tasks_pics);
							rows[item].tasks_pics = JSON.parse(rows[item].tasks_pics);
						}
					}
					that.taskListArr = rows;
					console.log("the rows:",rows);
				});
			}
		}
	}
</script>

<style>
	.listItem1{
		display:flex;
		padding:20rpx;
		border-bottom:1px #eee solid;
		flex-direction: column;
	}
	.listItem1 .uheader{
		display: flex;
		margin-bottom:10rpx;
	}
	.listItem1 .uheader .uheadPic{
		width:80rpx;
		height:80rpx;
		overflow: hidden;
		margin-right:15rpx;
	}
	.listItem1 .uheader .uheadTxt{
		font-size:0.6em;
		line-height:1.5em;
	}
	.listItem1 .pic image{
		max-height:280rpx;
		width:100%;
	}
	.listItem1 .pic2{
		display: flex;
	}
	.listItem1 .pic2 image{
		width:250rpx;
		height:240rpx;
		margin: 5rpx;
	}
	.listItem1 .con{
		font-size: 1em;
		color:#666;
		font-weight: normal;
		flex:1;
	}
	.listItem1 .status{
		font-size: 0.6em;
		color:#999;
		font-weight: normal;
		margin-top:10rpx;
	}

	.newTaskBtn{
		position: fixed;
		bottom:130rpx;
		right:30rpx;
		width:100rpx;
		height:100rpx;
		border-radius: 50rpx;
		line-height:90rpx;
		font-size:68rpx;
		background-color: #4CD964;
		color:#fff;
		text-align: center;
		background-image: linear-gradient(to top left, #0ba360 0%, #3cba92 100%);
		box-shadow:3rpx 8rpx 8rpx #c8d8c8;
	}
</style>
很简单吧?我没有使用太多的特技语法,就是最基础的语法,运行效果达到了就行。还省得写注释,一看就明白。
布局使用了flex,这是一个非常有用的布局办法,大家一定要掌握。
我们还没有做其它操作,比如接单,处理进度,反馈之类的操作。
后面章节慢慢做。